
 | ||
| The Forward Look Network | ||
| ||
 What did you do to your FL car today? What did you do to your FL car today?Jump to page : < ... 49 50 51 52 53 54 55 56 57 58 59 60 ... > Now viewing page 55 [50 messages per page] | View previous thread :: View next thread |
| Forward Look NON-Technical Discussions -> 1955-1961 Forward Look MoPar General Discussion | Message format |
| imfinlay |
| ||
Extreme Veteran Posts: 489        Location: London, England | That looks like the channel under the rear deck trim, right? I had some leakage there, but when I reinstalled the trim I used Gun Gum around all the clips, loaded the nuts with it then put some more on. Seems to have sealed them as far as I can tell. | ||
| |||
| d500neil |
| ||
Exner Expert 19,174 posts. Neil passed away 18 Sep 2015. You will be missed, Neil! Posts: 19146        Location: bishop, ca | Yup; that's what I did with my ride; sealed-up those mounting holes as best I could. Doesn't hurt, though, to wet down the back glass area, as a 'bench' test of that area. That molding-channel also caused the leakage-overflow in it to get/flow onto the corners of the parcel shelf, too. | ||
| |||
| imfinlay |
| ||
Extreme Veteran Posts: 489        Location: London, England | Luckily it's a sunny, hot day today, so I re-sealed the front screen corner with black windscreen sealant and tested both rear quarter windows. They're fine now. I did get in the trunk in the end and found that the remaining leaks at the back end were from the joint where the rear fenders meet the rear deck. There's a really obvious joint where the water was entering between the panels. So, rear corners of the trunk seal off, Dum Dum putty in the channel and the joint (just like it says in the sealing manual!) and NO MORE LEAKS! While I was testing the windshield corners (which are fine) I found one trim clip that I hadn't tightened, and a leak around the new heater valve I installed, so sealed those and I THINK I have a dry car! At least until the next rain I also blocked out the small paint defect in the dash and repainted it, hopefully I can clear coat later today as paint is drying quite quickly in this weather. Then maybe I can get the dash back in tomorrow! | ||
| |||
| d500neil |
| ||
Exner Expert 19,174 posts. Neil passed away 18 Sep 2015. You will be missed, Neil! Posts: 19146        Location: bishop, ca | Dum Dum dries out; I'd have recommended 100% silicone sealant; it stays flexible. | ||
| |||
| 60 Imp |
| ||
    Location: North Australia | Must be fix the leaks month! I lifted up the bottom section of my trunk seal rubber and found a horror story. Rust through on both corners for inches and a couple spots in between. I cleaned it up with a wire wheel, passivized the rust, painted with some white zinc rich enamel, filled the holes with H.D. 2pack plastic filler, painted again. Then sealed the old rubber back into the channel with auto sikaflex and shut the lid! Managed to salvage the original seal without breaking it and it looks good! Once I do a bit of clean up, and fill a couple little cracks in the rubber with some paint on liquid rubber it should be a good thing. Did this over 2 days, and I forgot to take photos, sorry. I didn't think the rust would be so bad as the rest of the car is real good. I was surprised, but pleased with the repair job. No more musty boot! Steve. | ||
| |||
| imfinlay |
| ||
Extreme Veteran Posts: 489        Location: London, England | Well, after a night's rain it seems that the windshield still leaks, an.there's still water ingress into the trunk, but it's better. Had a dry couple of hours so loosened the deck trim, cleaned out all the accumulated gunge and put a big bead of sealer in - looks like I never sealed the left side at all. It's just rained bucket loads for the last 20 minutes so I'll see how that went. Also found a puddle on the floor, which I think may be coming in round the driver's door and tracking backwards along the floorpan. Dash looks OK with a couple more coats of clear satin. | ||
| |||
| b5rt |
| ||
Expert Posts: 2519   Location: central Illinois | After almost a two year wait my De Soto heads for the body shop. (image.jpg) (image.jpg) (image.jpg) Attachments ----------------  image.jpg (120KB - 331 downloads) image.jpg (120KB - 331 downloads) image.jpg (126KB - 337 downloads) image.jpg (126KB - 337 downloads) image.jpg (106KB - 321 downloads) image.jpg (106KB - 321 downloads) | ||
| |||
| imfinlay |
| ||
Extreme Veteran Posts: 489        Location: London, England | That's a big moment! Anyway, in the meantime, turns out my rear left quarter window is NOT leaking, it's around the rear windshield. So, more sealant goes in... The puddle on the floor turns out to be from the doors. The window sweepers are about as waterproof as an open window, so water pours into the door and splashes into the car (no door cards yet). Guess my next job is splash shields. | ||
| |||
| skyhawk |
| ||
Veteran Posts: 161    Location: newton north carolina | Put the Fury body on the rotisserie, ground down the welds where the floor had to be replaced, then cleaned the bottom with a grinder and a wire cup brush. Fifty-five years of crud, undercoating, and rust, most of it ending up on me. (59 plymouth on the rotisserie_2.jpg) Attachments ----------------  59 plymouth on the rotisserie_2.jpg (276KB - 296 downloads) 59 plymouth on the rotisserie_2.jpg (276KB - 296 downloads) | ||
| |||
| 60crossram |
| ||
Elite Veteran Posts: 836      Location: Layton, Utah | Great work guys !!! I love the 60 DeSoto body style. I got so much attention when I had mine on the road for 20 years before I sold it. All I have now is my 60 Ramcharge DeSoto to look at until I get some other projects finished before I start her. Your car will be an eye catcher. What color are you going with. The original lighter green ? DeSoto lives !!! | ||
| |||
| b5rt |
| ||
Expert Posts: 2519   Location: central Illinois | 60crossram - 2014-07-15 8:35 AM Great work guys !!! I love the 60 DeSoto body style. I got so much attention when I had mine on the road for 20 years before I sold it. All I have now is my 60 Ramcharge DeSoto to look at until I get some other projects finished before I start her. Your car will be an eye catcher. What color are you going with. The original lighter green ? DeSoto lives !!       Location: London, England | Yesterday I vacuumed out the dust in the behind-dash area and got my dash back in! Now for reassembly! (photo 1.JPG) (photo 2.JPG) Attachments ----------------  photo 1.JPG (146KB - 346 downloads) photo 1.JPG (146KB - 346 downloads) photo 2.JPG (144KB - 330 downloads) photo 2.JPG (144KB - 330 downloads) | ||
| |||
| imfinlay |
| ||
Extreme Veteran Posts: 489        Location: London, England | While I think about it - one useful tip... The rubber surround for my shift button pod had shrunk a little and gone a bit hard. I dunked it in very hot water for a few moments and it softened up and fit beautifully. It hasn't shrunk back either. | ||
| |||
| imopar380 |
| ||
Expert 5K+ Posts: 7207     Location: Victoria, BC, on Vancouver Island, Canada | Well I finally got the A/C working again this weekend with the help of Ron Wenzel, the owner of my ex-1960 Polara. After having the new compressor installed now for about 6 weeks, we finally found a drier about the right size but couldn't find one with the same fittings so Ron machined some up and silver soldered the fittings on. Then evacuated the entire system and re-charged with refrigerant and ester oil with a dye to find any possible leaks. SO far, no leaks and it's blowing ice cold. (IMG_0006.JPG) Attachments ----------------  IMG_0006.JPG (176KB - 311 downloads) IMG_0006.JPG (176KB - 311 downloads) | ||
| |||
| imopar380 |
| ||
Expert 5K+ Posts: 7207     Location: Victoria, BC, on Vancouver Island, Canada | The drier and custom made fittings. Camera phone shot, flash is useless. (2014-07-20_16-39-29_882.jpg) Attachments ----------------  2014-07-20_16-39-29_882.jpg (75KB - 323 downloads) 2014-07-20_16-39-29_882.jpg (75KB - 323 downloads) | ||
| |||
| ttotired |
| ||
Expert 5K+ Posts: 8444         Location: Perth Australia | A drier with the correct size fittings MAY have been available from a commercial refrigeration supply place, but that modification is much better as it now uses the common sized automotive fitting size Good work | ||
| |||
| soiouz |
| ||
Expert Posts: 3480          Location: Montreal, Canada | Took the car in for a needed power steering rebuild monday.... Had a major leak, and "stuck" while turning left sometimes.. Wish me luck, it will be expensive..! | ||
| |||
| d500neil |
| ||
Exner Expert 19,174 posts. Neil passed away 18 Sep 2015. You will be missed, Neil! Posts: 19146        Location: bishop, ca | The driver's window has been 'catching' on the rear edge of the window-opening for a while, now. Told Mat Keij, when he was visiting, recently, that I'd (finally) fix that mis-alignment. Wasn't Jonsing on the prospect of stressing the door trim panel, again, by removing/re-installing it, just to adjust the movement of the door glass. Looked at the binding, and realized that all I needed to do was to file-out a (larger) notch in the door to allow the window frame to move unimpeded. So, had at it, knowing that good old Rustoleum Red is an almost perfect color match to Dodge's "Flame Red". After the paint sets up, will lightly color-sand it to smooth out its appearance! (The new notching, and paint touch-up, is seen in photos 1041 +) Edited by d500neil 2014-07-24 6:08 PM (PICT1029.JPG) (PICT1033.JPG) (PICT1036.JPG) (PICT1040.JPG) (PICT1041.JPG) (PICT1047.JPG) (PICT1050.JPG) (PICT1053.JPG) Attachments ----------------  PICT1029.JPG (70KB - 325 downloads) PICT1029.JPG (70KB - 325 downloads) PICT1033.JPG (89KB - 311 downloads) PICT1033.JPG (89KB - 311 downloads) PICT1036.JPG (89KB - 316 downloads) PICT1036.JPG (89KB - 316 downloads) PICT1040.JPG (102KB - 305 downloads) PICT1040.JPG (102KB - 305 downloads) PICT1041.JPG (68KB - 301 downloads) PICT1041.JPG (68KB - 301 downloads) PICT1047.JPG (96KB - 307 downloads) PICT1047.JPG (96KB - 307 downloads) PICT1050.JPG (109KB - 300 downloads) PICT1050.JPG (109KB - 300 downloads) PICT1053.JPG (102KB - 317 downloads) PICT1053.JPG (102KB - 317 downloads) | ||
| |||
| db300 |
| ||
Extreme Veteran Posts: 314    | Got to see my 413 for the first time after getting built! Now all the goodies go on :-) | ||
| |||
| Windsor59 |
| ||
Expert Posts: 2596      Location: Upplands Väsby, Sweden | Mounted there cigarette Benzel to Sviwel seat. Bought it from Sven. Did order the flush windshield. Replaced the rubber bellows on the pedal which was defective. Now works perfectly without leakage angry. (DSC_4737.JPG) (DSC_4738.JPG) Attachments ----------------  DSC_4737.JPG (65KB - 320 downloads) DSC_4737.JPG (65KB - 320 downloads) DSC_4738.JPG (50KB - 314 downloads) DSC_4738.JPG (50KB - 314 downloads) | ||
| |||
| imfinlay |
| ||
Extreme Veteran Posts: 489        Location: London, England | I finished sticking the shower curtains onto the left side doors with the butyl adhesive I had, then got the steering column refitted and all the column mounts and clamp bolts done up. I'd like to get the fuel tank in later, but it's just too hot to work under the car. And I'm in London, so it's either too hot and humid, or raining. That's our version of summer! Mostly it's just been too hot. The inside of the car is like an oven. I can't wait until we move house and I get a garage! | ||
| |||
| lownslow |
| ||
Extreme Veteran Posts: 440      Location: Vermont | Arlington VT Car show (P7260477.JPG) Attachments ----------------  P7260477.JPG (309KB - 299 downloads) P7260477.JPG (309KB - 299 downloads) | ||
| |||
| wizard |
| ||
Board Moderator & Exner Expert 10K+ Posts: 13054       Location: Southern Sweden - Sturkö island | Windsor59 - 2014-07-27 12:54 PM Mounted there cigarette Benzel to Sviwel seat. Bought it from Sven. Did order the flush windshield. Replaced the rubber bellows on the pedal which was defective. Now works perfectly without leakage angry. Nice Jocke - it fit's like a glove - I'm happy that you have yet another option now | ||
| |||
| Windsor59 |
| ||
Expert Posts: 2596      Location: Upplands Väsby, Sweden | wizard - 2014-07-27 10:35 AM Windsor59 - 2014-07-27 12:54 PM Mounted there cigarette Benzel to Sviwel seat. Bought it from Sven. Did order the flush windshield. Replaced the rubber bellows on the pedal which was defective. Now works perfectly without leakage angry. Nice Jocke - it fit's like a glove - I'm happy that you have yet another option now Thanks Sven, this options being great. (I has looking after this benzel over 10 years) | ||
| |||
| christine-lover |
| ||
Expert Posts: 2996          Location: Sept. 1958 | Windsor59 - 2014-07-27 6:54 AM Mounted there cigarette Benzel to Sviwel seat. Bought it from Sven. Did order the flush windshield. Replaced the rubber bellows on the pedal which was defective. Now works perfectly without leakage angry. Never seen that option before. Your Windsor looks so nice as always. | ||
| |||
| soiouz |
| ||
Expert Posts: 3480          Location: Montreal, Canada | Since my car's been grounded in the garage for the last three weeks (long and painful story...), i have tackled other stuff on it. This weekend, I changed the roof rail weatherstrip and weatherstrip railings. The old ones had been torn off when I had my interior redone, the only thing the guys at the shop really messed up. They didn't know how they were installed, so they put them back by drowning them in weatherstrip adhesive. First couple of pics show what i started with and the rest is a couple of pics during the installation, and some after. I'm pretty happy with the results. (image.jpg) (image.jpg) (image.jpg) (image.jpg) (image.jpg) (image.jpg) (image.jpg) (image.jpg) (image.jpg) (image.jpg) Attachments ----------------  image.jpg (87KB - 314 downloads) image.jpg (87KB - 314 downloads) image.jpg (146KB - 301 downloads) image.jpg (146KB - 301 downloads) image.jpg (89KB - 301 downloads) image.jpg (89KB - 301 downloads) image.jpg (82KB - 314 downloads) image.jpg (82KB - 314 downloads) image.jpg (131KB - 300 downloads) image.jpg (131KB - 300 downloads) image.jpg (105KB - 306 downloads) image.jpg (105KB - 306 downloads) image.jpg (130KB - 296 downloads) image.jpg (130KB - 296 downloads) image.jpg (81KB - 304 downloads) image.jpg (81KB - 304 downloads) image.jpg (86KB - 309 downloads) image.jpg (86KB - 309 downloads) image.jpg (93KB - 298 downloads) image.jpg (93KB - 298 downloads) | ||
| |||
| ab7fh |
| ||
Veteran Posts: 172    Location: Aridzona | Big day for the '60 Seneca. I started the new 318 poly stroker for the first time and took it for a short cruise around the block. Everything is doing well http://forwardlook.net/forums/forums/thread-view.asp?tid=46090&posts=67&start=1
https://www.youtube.com/watch?v=NaORcpDajA0 Edited by ab7fh 2014-08-18 4:05 PM | ||
| |||
| soiouz |
| ||
Expert Posts: 3480          Location: Montreal, Canada | soiouz - 2014-08-17 3:03 PM Since my car's been grounded in the garage for the last three weeks (long and painful story...), i have tackled other stuff on it. This weekend, I changed the roof rail weatherstrip and weatherstrip railings. The old ones had been torn off when I had my interior redone, the only thing the guys at the shop really messed up. They didn't know how they were installed, so they put them back by drowning them in weatherstrip adhesive. First couple of pics show what i started with and the rest is a couple of pics during the installation, and some after. I'm pretty happy with the results. I have been asked by another member where I got the weatherstrip, so maybe the info is useful for others too. I got it from Gary Goers. | ||
| |||
| LD3 Greg |
| ||
Expert Posts: 1906       Location: Ontario, Canada | I'm afraid that I didn't do anything good. After insulting my car by tearing a lot of the interior out I spent a day or so cleaning, waxing etc. The car is in the shop, so- ooo, I left the window open. You know, to get rid of the smelly wax and cleaning smell! Well, I went today to close it all up and, for some reason, ran all the elec. windows down and up. When I ran the right quarter windows down something inside the quarter panel started to go softly thump---- thump ---- thump! What the hell!!! There is something alive in there!! SO, I ran the window up a bit and then down, you know, to deliver a fatal blow! Hey, it worked! There was a few seconds of rapid thumping and all was silent. Now what?! Wait for the thing to start to stink? Or, start pulling even more interior panels and seats out looking for the critter?! Yeah! I know the answer! Greg | ||
| |||
| d500neil |
| ||
Exner Expert 19,174 posts. Neil passed away 18 Sep 2015. You will be missed, Neil! Posts: 19146        Location: bishop, ca | DON'T worry about that, Greg; you're just experiencing a normal FWDLK Gremlin ! | ||
| |||
| LD3 Greg |
| ||
Expert Posts: 1906       Location: Ontario, Canada | Well, Neil, with any kind of luck the "gremlin" is dead. It seems that my interior work isn't done anyway. The 6 way seat is still malfunctioning. The front and rear both up and down all work fine but not the fore and aft. The motor runs but doesn't engage the gear train. If I remember, hey it has been close to 20 years since I worked on these, the problem is likely the solenoid/ choke coil. I should have a bunch of spares. Time will tell! Greg | ||
| |||
| d500neil |
| ||
Exner Expert 19,174 posts. Neil passed away 18 Sep 2015. You will be missed, Neil! Posts: 19146        Location: bishop, ca | Ding Dong, the witch is dead...and she'll start to smell fairly soon. Yeah, you've got another Gremlin in that power seat. Remember, you want to adjust the seat tracks so that they are as far-up, and back, as possible, before you disassemble the mechanisms. Usually, the 'big' mistake is to get the two tracks' gearing slightly un-synchronized, so that the two tracks do not move 100% in coordination. That's a frustrating re-repair to do, because you normally will only notice that 'crab-walking' after the seat tracks are re-installed into the car. Edited by d500neil 2014-08-23 2:36 AM | ||
| |||
| LD3 Greg |
| ||
Expert Posts: 1906       Location: Ontario, Canada | With any kind of luck I will just have to install/ re wire a "new" solenoid/ choke into the mechanism. I have totally rebuilt, even made my own seat tracks and rollers in the past, for several of these cars and I agree with you. 6 way seat systems are very, very difficult to repair/restore. To give credit where it is due, these systems were really tough. The major problem was that the tracks were so low in the car that all debris,including coins, all rolled into them and when the track rollers tried to "drive over " these obstacles, damage was done! Greg | ||
| |||
| d500neil |
| ||
Exner Expert 19,174 posts. Neil passed away 18 Sep 2015. You will be missed, Neil! Posts: 19146        Location: bishop, ca | And, what is really gratifying about 50's-early 60's technology is that the electrical appliances were very electro-mechanical in design. E.G.: the headlight switches can be disassembled easily, and cleaned/repaired and then re-assembled. The power seat switches, too, can be field-stripped and repaired. | ||
| |||
| soiouz |
| ||
Expert Posts: 3480          Location: Montreal, Canada | Being the detail freak that I am, I am super happy that I finally found and installed a correct rear speaker grille! Now the rear shelf that I made last winter is complete and looks like I wanted. (photo%204.jpg) (photo%203.jpg) Attachments ----------------  photo%204.jpg (169KB - 297 downloads) photo%204.jpg (169KB - 297 downloads) photo%203.jpg (319KB - 299 downloads) photo%203.jpg (319KB - 299 downloads) | ||
| |||
| d500neil |
| ||
Exner Expert 19,174 posts. Neil passed away 18 Sep 2015. You will be missed, Neil! Posts: 19146        Location: bishop, ca | Using David's photo as an example, it appears clearly that the forward/upper/leading edge of the window frame was digging into the roof rail weatherstrip as the window was being raised. If your car's rear window(s) are very-hard to close fully (sometimes requiring a physical-pulling of their forward edges to get them to complete their maneuvers)...and, even if you have tried opening up the windows' inner panel areas, to try to adjust the windows' operation, but to no real success....... you can use a 'box-cutter' type knife either to: Cut a lateral slice along the upper length of that weatherstrip, which will allow the window frame to pass through that added-extra head-room, and/or: remove a small length OF the 'roof' (replicating the appearance of David's example)...which will provide additional space for the window to pass through the weatherstrip, as it arcs its way upward and around/forward during its raising-maneuver. A slit-roof is completely invisible, as the slit closes up onto itself. An excavated roof section (the size of David's example) is virtually invisible, as a person would need to be looking/ focusing straight upwards at the front of the rear window.....which is NOT an easy or a normal position to assume! ALSO, some (it's been a while...) roof rail weatherstrips may actually have an 'attic' in their upper areas, formed by two horizontal layers of rubber. In this instance, removing the lower run of rubber, which is inhibiting the movement of the window, is a no-brainer. Edited by d500neil 2014-09-05 5:03 PM (image.jpg) Attachments ----------------  image.jpg (87KB - 288 downloads) image.jpg (87KB - 288 downloads) | ||
| |||
| jboymechanic |
| ||
Expert Posts: 2196      Location: Muskego, WI | After patiently waiting way too long, the Hemi has been built. The original 1956 354 Hemi bored out .0625" to accept standard bore 392 pistons (just more options and the cylinders were pretty rough after sitting since 1965). 10:1 Hypereutectic cast pistons and I don't have the cam specs in front of me. MSD ignition, block and heads both shaved about .005" to true them up. Mopar small block dampener and oil pump from Hot Heads. Hope to add the dual plane aluminum intake and quick fuel carb this weekend. Builder estimates it will produce about 365 hp and 425 ft-lb, can't wait to run it. 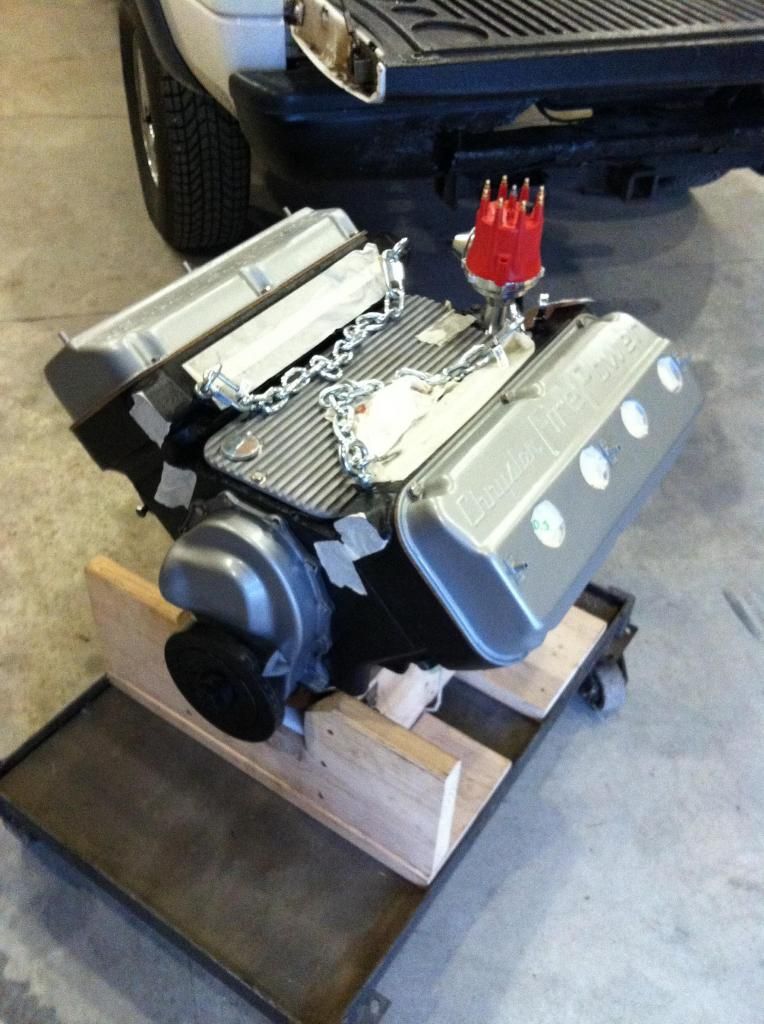 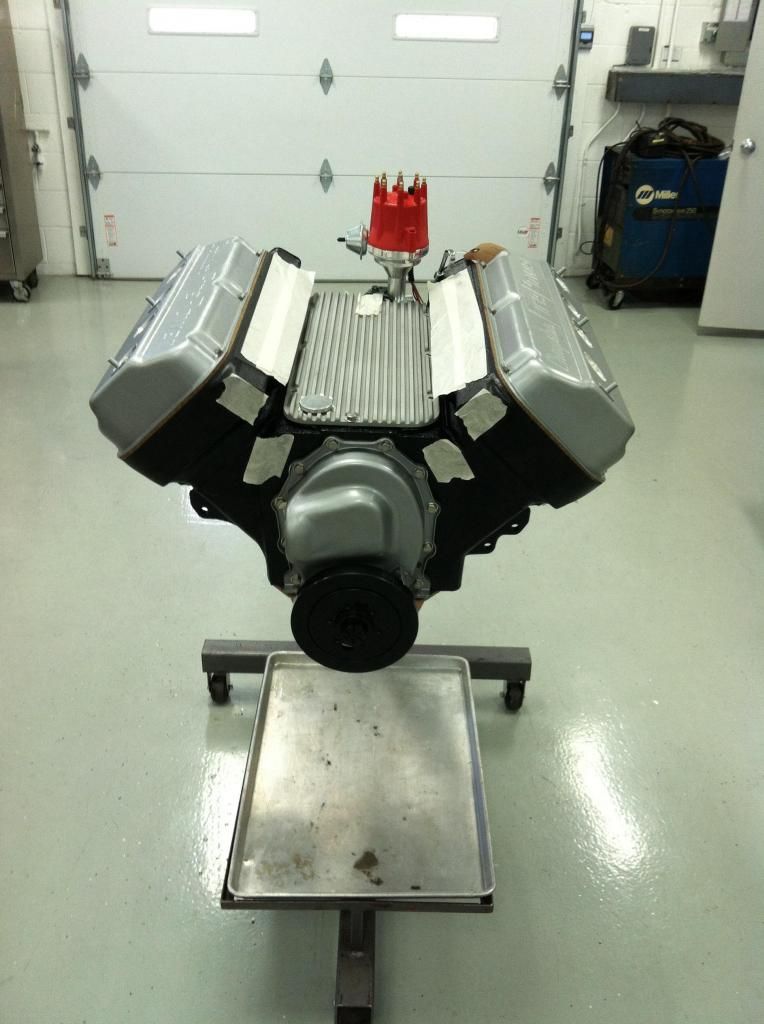 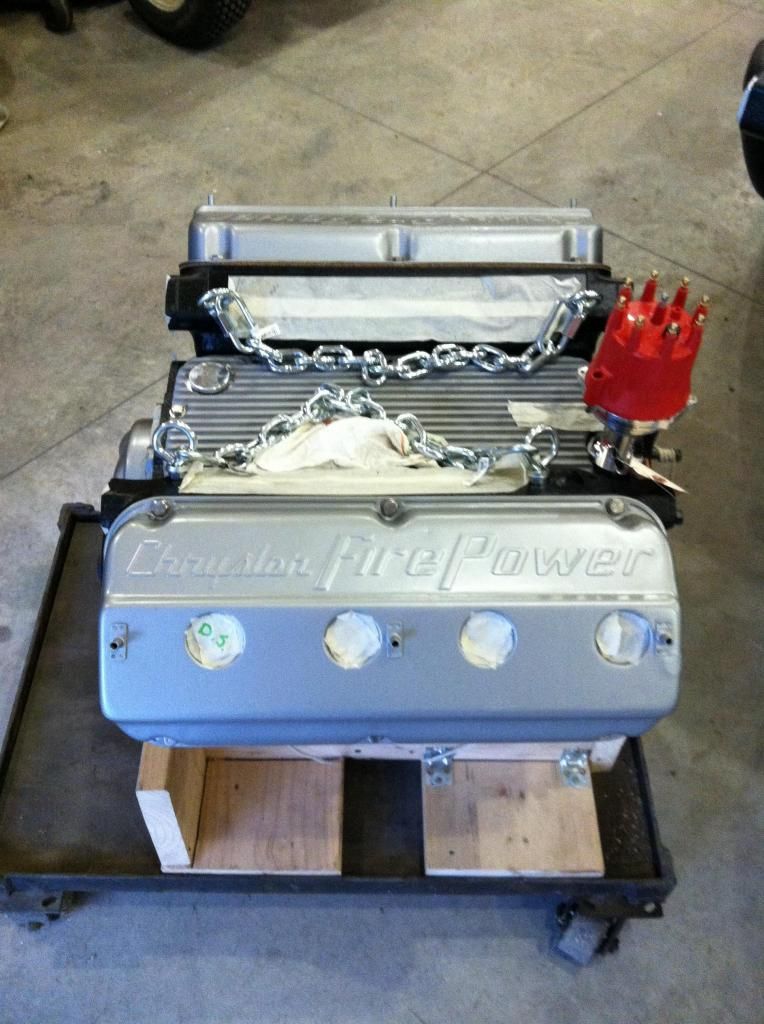 | ||
| |||
| jboymechanic |
| ||
Expert Posts: 2196      Location: Muskego, WI | Great progress today. Hit a snag with the Milodon oil pan, the drain plug as on the far edge of the rear of the pan so it ended up right up again the transmission plate/bell housing. Switched back to a factory replacement pan. Similar story with the straight down oil filter adapter, had to switch to the 30 degree upward angle adapter. Made those changes and got the exhaust studs sealed in place and the transmission installed and buttoned up. 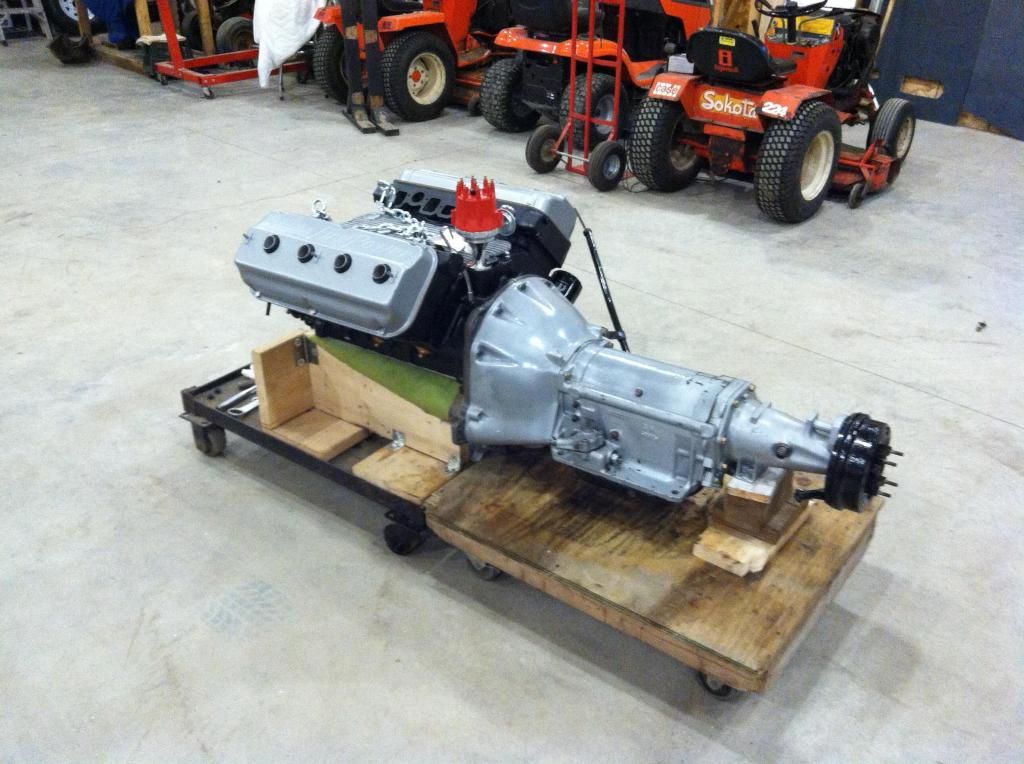 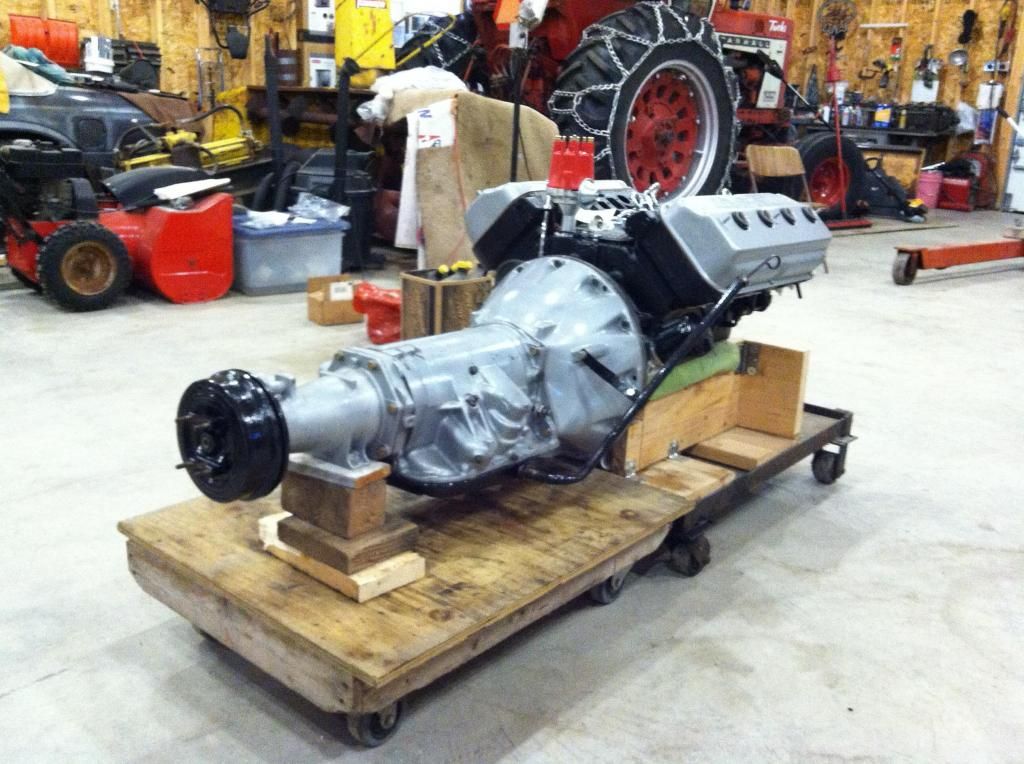 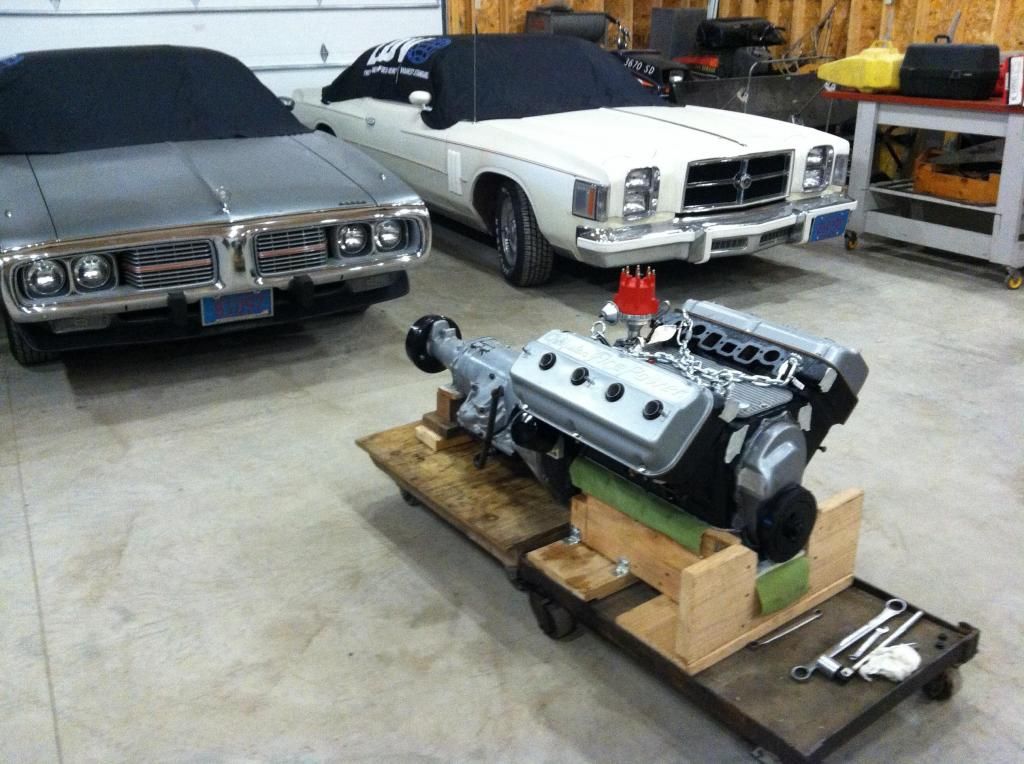 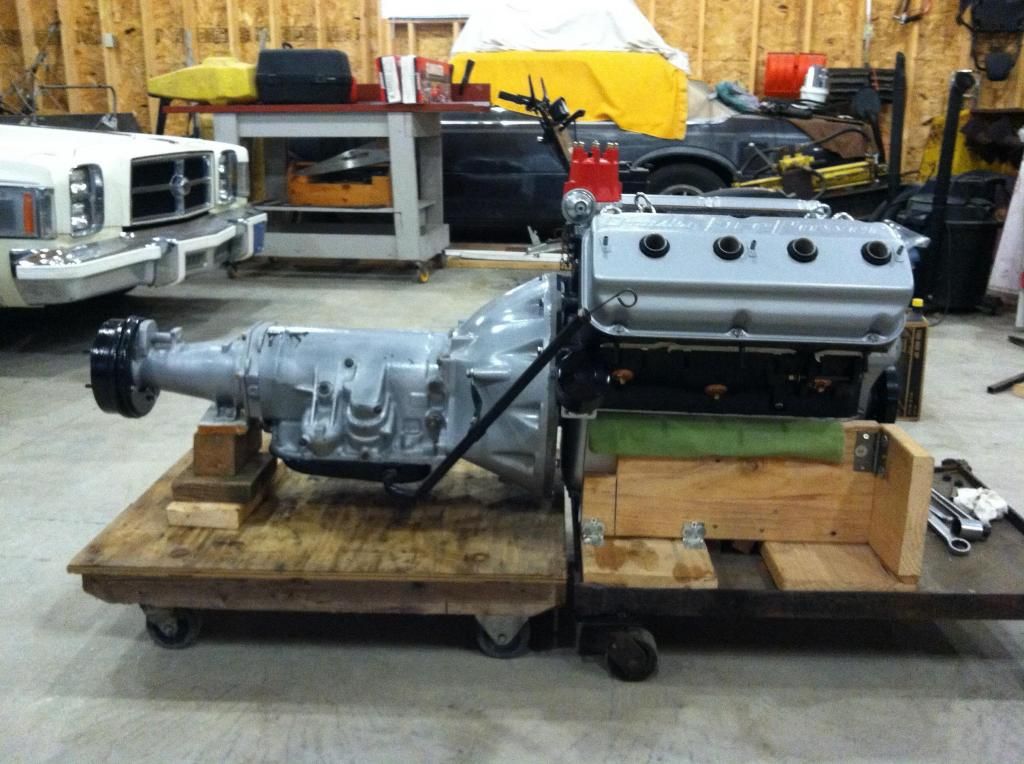 | ||
| |||
| 60 Imp |
| ||
    Location: North Australia | Very nice work. Cant wait to see it back in the Coupe. Is it the original engine and gearbox? Steve. | ||
| |||
| jboymechanic |
| ||
Expert Posts: 2196      Location: Muskego, WI | Yes, both the trans and engine are original to the car but both are slightly modified. The trans the original Torque Flite, I swapped out the original aluminum reaction shaft with a steel one from a later TF. It also has a 392 torque converter and I'll be swapping out the trans brake drum for a 1958 drum that uses a standard size U joint. | ||
| |||
| 56RoyalLancer |
| ||
Elite Veteran Posts: 608   Location: Madison, Wisconsin | Changed the oil and filter on the 1956 Dodge Royal Lancer today. Only spilled about a 1/4 quart in the street and got the oil canister back in place on the first try. I consider that a great success. Time for a Schlitz beer! (DODGE_001.jpg) Attachments ----------------  DODGE_001.jpg (344KB - 273 downloads) DODGE_001.jpg (344KB - 273 downloads) | ||
| |||
| jboymechanic |
| ||
Expert Posts: 2196      Location: Muskego, WI | The cam is broke in on the Hemi, the attached video is actually a second run after break in. Trans was shifting into all gears properly as well, but need to look into the starter. I'm using a PowerMaster XS Torque starter and it just doesn't sound right. https://www.youtube.com/watch?v=wTcHdQeQJd4 | ||
| |||
| di_ch_NY56 |
| ||
Expert Posts: 1530    Location: ZH, Switzerland | jboymechanic - 2014-10-02 3:19 AM The cam is broke in on the Hemi, the attached video is actually a second run after break in. Trans was shifting into all gears properly as well, but need to look into the starter. I'm using a PowerMaster XS Torque starter and it just doesn't sound right. https://www.youtube.com/watch?v=wTcHdQeQJd4
Sounds good - of course the starter sounds like a past 60ies Mopar. But so does mine as well (354 cid Firepower, same starter). At the journey and later (at Wizard's) the engine started like a brand new engine due to the higher crankshaft speed.
Happy Motoring!
Dieter Edited by di_ch_NY56 2014-10-03 2:13 AM | ||
| |||
| 58sportsuburban |
| ||
Extreme Veteran Posts: 449      Location: jersey | Got NOS tail light assemblies. | ||
| |||
| jboymechanic |
| ||
Expert Posts: 2196      Location: Muskego, WI | Put the Hemi and TF in the Imperial this past weekend. (Imperial with Hemi 25%.jpg) Attachments ----------------  Imperial with Hemi 25%.jpg (158KB - 266 downloads) Imperial with Hemi 25%.jpg (158KB - 266 downloads) | ||
| |||
| di_ch_NY56 |
| ||
Expert Posts: 1530    Location: ZH, Switzerland | jboymechanic - 2014-10-22 7:05 PM Put the Hemi and TF in the Imperial this past weekend.
Congratulation! Looks wonderful! | ||
| |||
| di_ch_NY56 |
| ||
Expert Posts: 1530    Location: ZH, Switzerland | Finally I did nothing else than searching for parts. Thanks to Wizard my Chrysler is back on it's wheels. Now He starts with desludging the engine. Some pictures of the engine? Here I got some - thank you very much, Wizard.
Happy Motoring! Dieter (IMG_9617_resized.JPG) (IMG_9618_resized.JPG) Attachments ----------------  IMG_9617_resized.JPG (87KB - 290 downloads) IMG_9617_resized.JPG (87KB - 290 downloads) IMG_9618_resized.JPG (109KB - 275 downloads) IMG_9618_resized.JPG (109KB - 275 downloads) | ||
| |||
| 58coronet |
| ||
Veteran Posts: 139   | Replaced my right front upper bumper that was rusted, with the very good condition used one I purchased from Moore's Auto Salvage in South Dakota a few years ago. (FullSizeRender(6).jpg) Attachments ----------------  FullSizeRender(6).jpg (121KB - 277 downloads) FullSizeRender(6).jpg (121KB - 277 downloads) | ||
| |||
| big m |
| ||
Expert 5K+ Posts: 7808       Location: Williams California | Drove to my office, as heavy fog was forming. Took this pic at the end of my driveway- (Hallloween '14 004.JPG) Attachments ----------------  Hallloween '14 004.JPG (135KB - 287 downloads) Hallloween '14 004.JPG (135KB - 287 downloads) | ||
| |||
| 1960fury |
| ||
Expert 5K+ Posts: 7409       Location: northern germany | that green dash light looks awesome! kinda spooky! | ||
| |||
| Jump to page : < ... 49 50 51 52 53 54 55 56 57 58 59 60 ... > Now viewing page 55 [50 messages per page] |
| Search this forum Printer friendly version E-mail a link to this thread |
| (Delete all cookies set by this site) | |