|
|
Expert
Posts: 2996
   
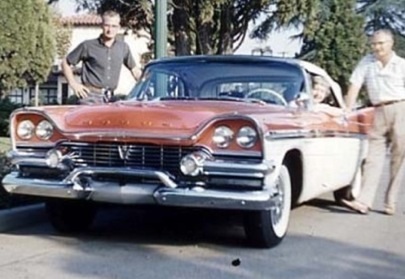
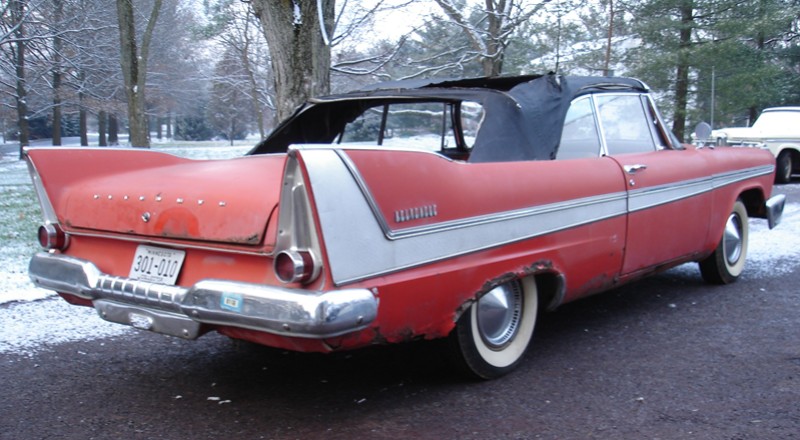
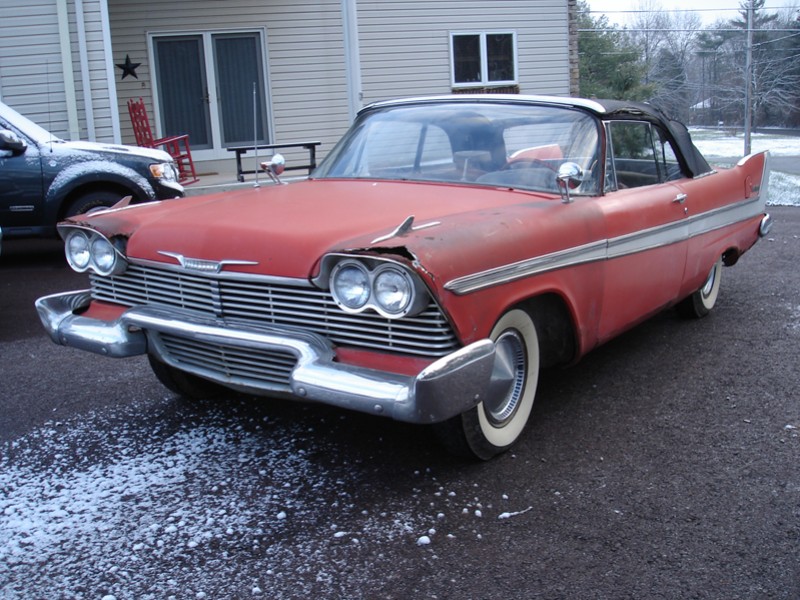
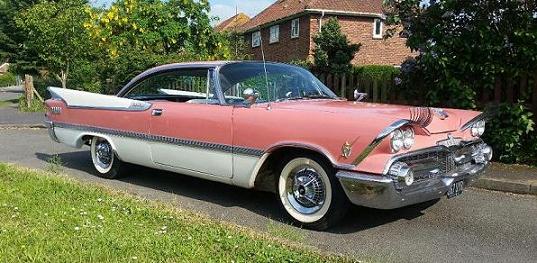
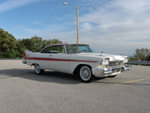
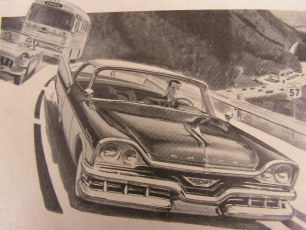
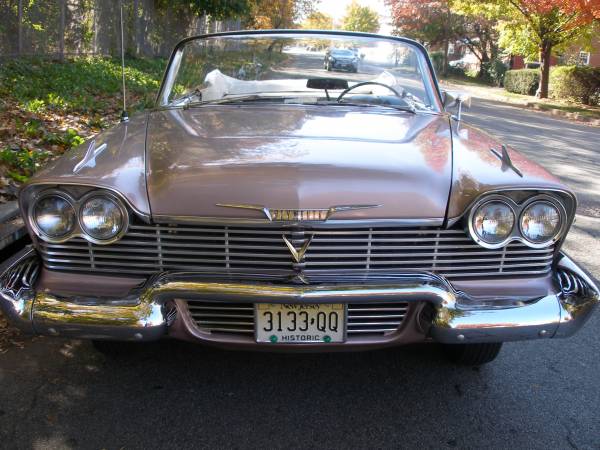
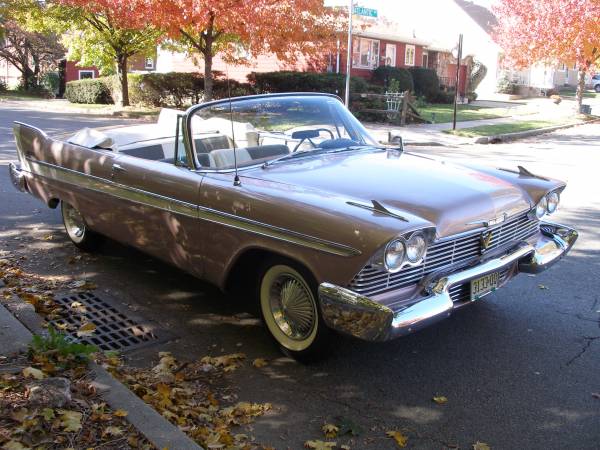
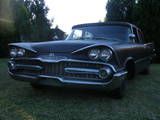
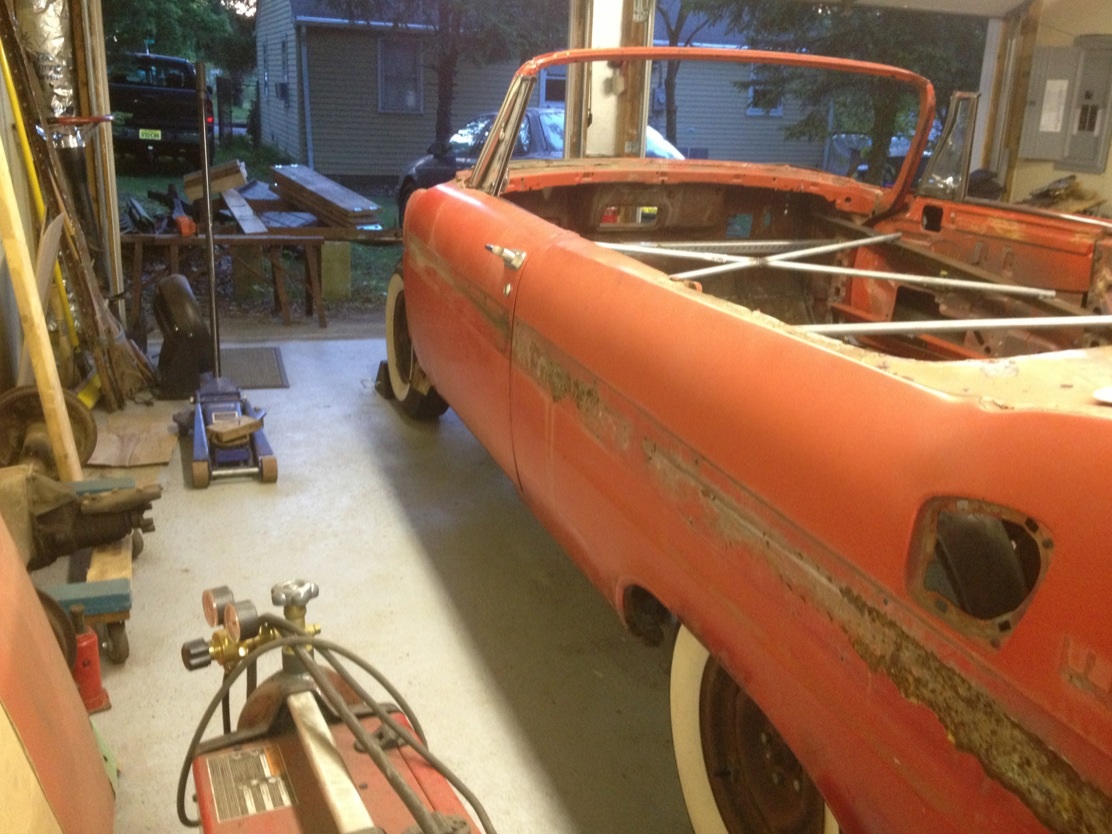
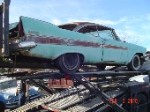
Location: Sept. 1958 | I recently bought a 1958 Plymouth Belvedere Convertible. First, I'd like to thank Rebels-59 Coronet for giving me the information so I could contact the owner of this car. At first, the owner didn't want to sell but then called me about a month later and told me he would sell it.
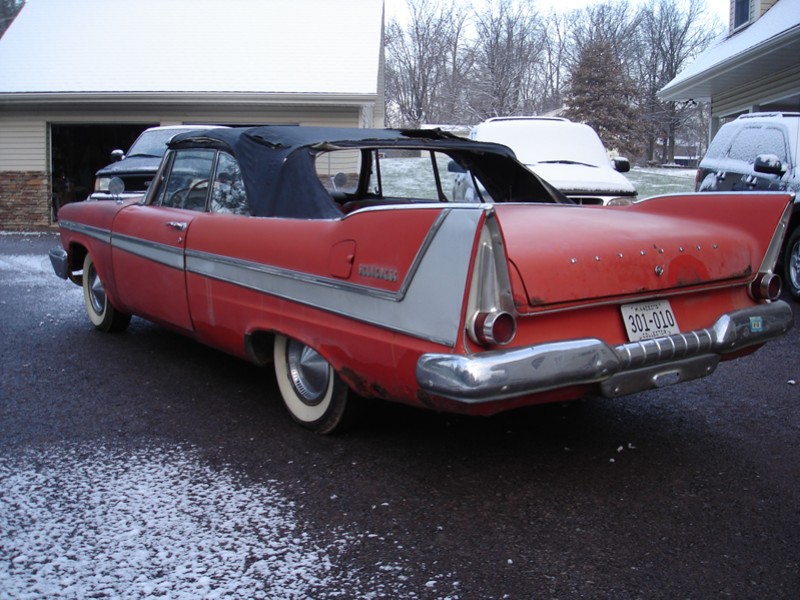
Car is factory Toreador Red with Aluminum Sportone Trim, and has a Red and Black Interior. It's equipped with a 318 4 bbl and Torqueflite Transmission. Rear bumper has a parking sticker from a college in Bowling Green from 1969-70 and I was told it was put in storage in Ohio around 1969, taken out of storage in 2006.
Vehicle runs and drives but will need some work make it a dependable summer car to have fun with, which is what I plan on doing. It will need total restoration someday, but right now I'm not in a position to do that.
Vehicle also came with a 58 Savoy 4 DR SD parts car that is fairly solid. That car has factory A/C.
Matt Dorschug |
|
| |
|
Expert
Posts: 2996
Location: Sept. 1958 | I seem to have trouble uploading photos. Says they must be less than 200KB but I cropped one photo down I have to 1.2MB. Has anybody ever had problems uploading photos? |
|
| |
|

Location: Parts Unknown | Rather than crop the photo, go to images on your program and resize by chopping your image numbers to an appropriate size to get you under the wire. I hope that makes sense with your program.  |
|
| |
|
Expert
Posts: 3575

Location: Netherlands | Just change the image-width to 800 pixels wide, then save as a JPG with setting "8" orso.
Then upload again.
|
|
| |
|
Expert
Posts: 2996
Location: Sept. 1958 |
 (1958 plymouth belvedere convertible1 001 (2).jpg) (1958 plymouth belvedere convertible1 001 (2).jpg)
Attachments
----------------
 1958 plymouth belvedere convertible1 001 (2).jpg (110KB - 9296 downloads) 1958 plymouth belvedere convertible1 001 (2).jpg (110KB - 9296 downloads)
|
|
| |
|
Expert
Posts: 2996
Location: Sept. 1958 |
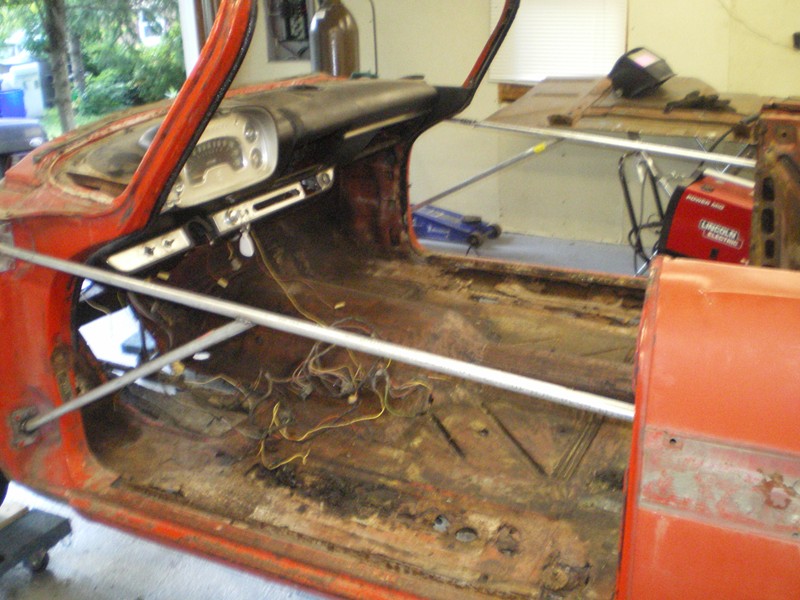
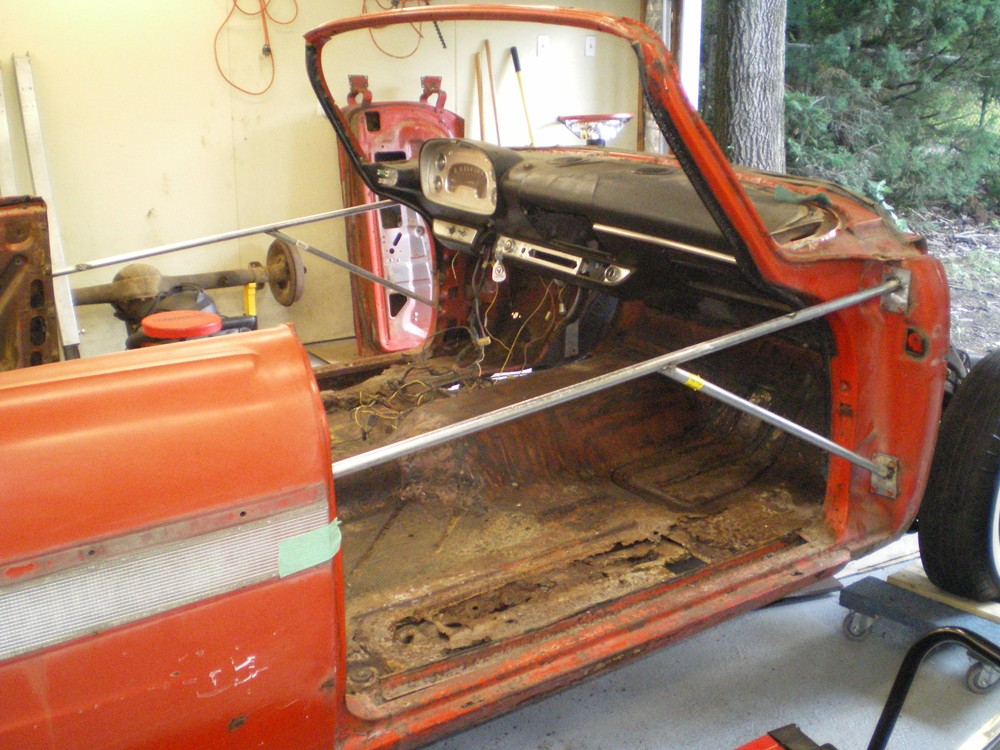
 (1958 Plymouth Belvedere Convertible1 002.jpg) (1958 Plymouth Belvedere Convertible1 002.jpg)
 (1958 Plymouth Belvedere Convertible1 003.jpg) (1958 Plymouth Belvedere Convertible1 003.jpg)
 (1958 Plymouth Belvedere Convertible1 004.jpg) (1958 Plymouth Belvedere Convertible1 004.jpg)
 (1958 Plymouth Belvedere Convertible1 005.jpg) (1958 Plymouth Belvedere Convertible1 005.jpg)
Attachments
----------------
1958 Plymouth Belvedere Convertible1 002.jpg (162KB - 7297 downloads)
1958 Plymouth Belvedere Convertible1 003.jpg (141KB - 829 downloads)
1958 Plymouth Belvedere Convertible1 004.jpg (181KB - 1789 downloads)
1958 Plymouth Belvedere Convertible1 005.jpg (115KB - 780 downloads)
|
|
| |
|
Expert
Posts: 2996
Location: Sept. 1958 | Thank you guys, that worked out great. |
|
| |
|
Expert
Posts: 3575
Location: Netherlands | Awesome car and project. Cool find!
It doesn't get much better than this.
|
|
| |
|
Board Moderator & Exner Expert 10K+
Location: .Norfolk..Mafia.. ,England UK | christine-lover - 2008-12-08 12:13 AM
I recently bought a 1958 Plymouth Belvedere Convertible. First, I'd like to thank Rebels-59 Coronet for giving me the information so I could contact the owner of this car. At first, the owner didn't want to sell but then called me about a month later and told me he would sell it.
Vehicle also came with a 58 Savoy 4 DR SD parts car that is fairly solid.
Matt Dorschug
CONGRATULATIONS MATT....
The Car is Exactly the Same as i remember it, Doesn,t appear they done much to it except store it,, As you have found out , Richie and his Son are great Car People ,, I am Really Pleased you got what seemed a Impossible Car to find and i was able to Help in your Quest.. I believe from memory the Parts car was also there as i remember them saying they had some donor panels,, But Richie,s Son was Also driving a 57 / 58 Plymouth about that needed work and a respray..
Did you get to look in the Top Barn where the Cuda,s and other Cars were Locked away, That was where the 58 Convertible was Originally...
Keep us updated with PICs as you bring her back to her former glory..
CLIVE..
. |
|
| |
|
Expert
Posts: 1918
Location: Hell's Outhouse - a.k.a. Buckeye, Arizona | What a find - a real hen's tooth these days.
One thing, though - you say she's got a 318, yet the "V" on the grille (indicating a V-8 model) is missing. Do you know if the 318 is original and the "V" is either off the car in a box or was it originally a flathead 6 ragtop?
(I see she's got the V-8 only Torqueflite tranny, but that could've been switched sometime down the line as well)
Even if the 318 isn't original, can't blame you a bit if you want to stick with it, as, IMO, the 6's are vastly underpowered for these cars.....
Edited by 1955Coronado 2008-12-08 7:04 AM
|
|
| |
|
Extreme Veteran
Posts: 499
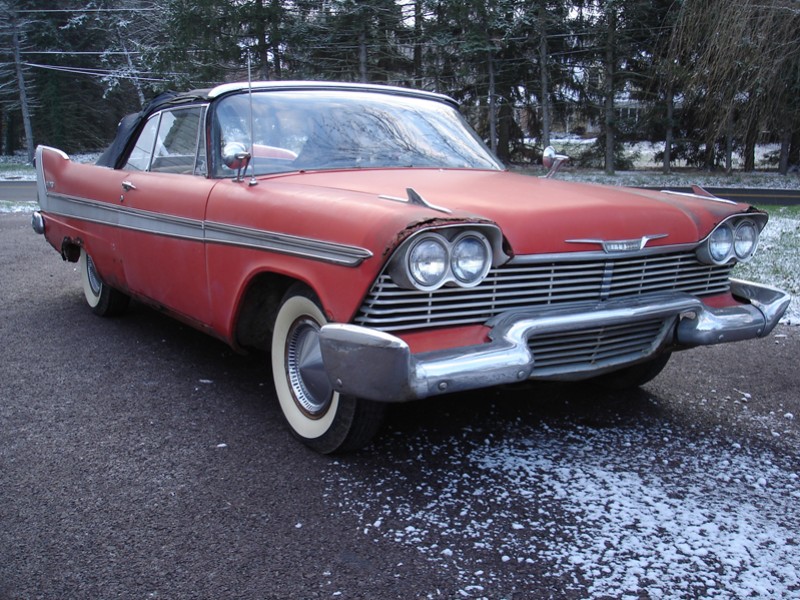
Location: A proud Canadian | What a truly remarkable find. I love the black roof, with the matching Red/Black interior. That's a more uncommon colour combo for one of these. Congratulations Matt, Good luck and keep the pics coming.
|
|
| |
|
Expert
Posts: 3156
Location: NY & VT | NICE FIND!! I presume you're not going to weld on a hardtop!? Hee hee.  |
|
| |
|
Account Suspended
Posts: 2827
Location: At "The Rock" in upper East Tennessee | Great car you found there. Looks to be pretty solid for coming from that part of the country. |
|
| |
|
Expert
Posts: 2996
Location: Sept. 1958 | Clive-
The Plymouth was in that barn, Tony has just had a new floor put in. His 57 Plymouth was tucked away in a corner next to a 58 Saratoga. His muscle cars are in there as well, the Savoy as well as a couple of other cars he has are a few miles away. Richie was not around while I was there.
Matt Dorschug |
|
| |
|
Expert
Posts: 2996
Location: Sept. 1958 | From the VIN, this car had a V8 originally. Going through the factory literature like the owner's manual and sales brochure, it states convertibles could not have a 6 cyl.
Saw a "V" emblem on eBay last week, but it got kinda high, over $150.
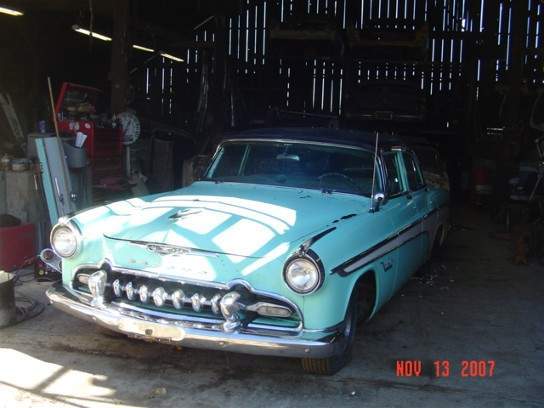
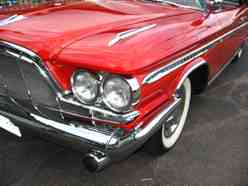
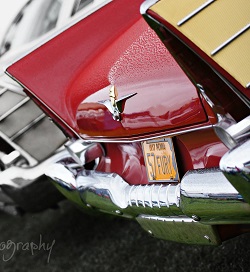
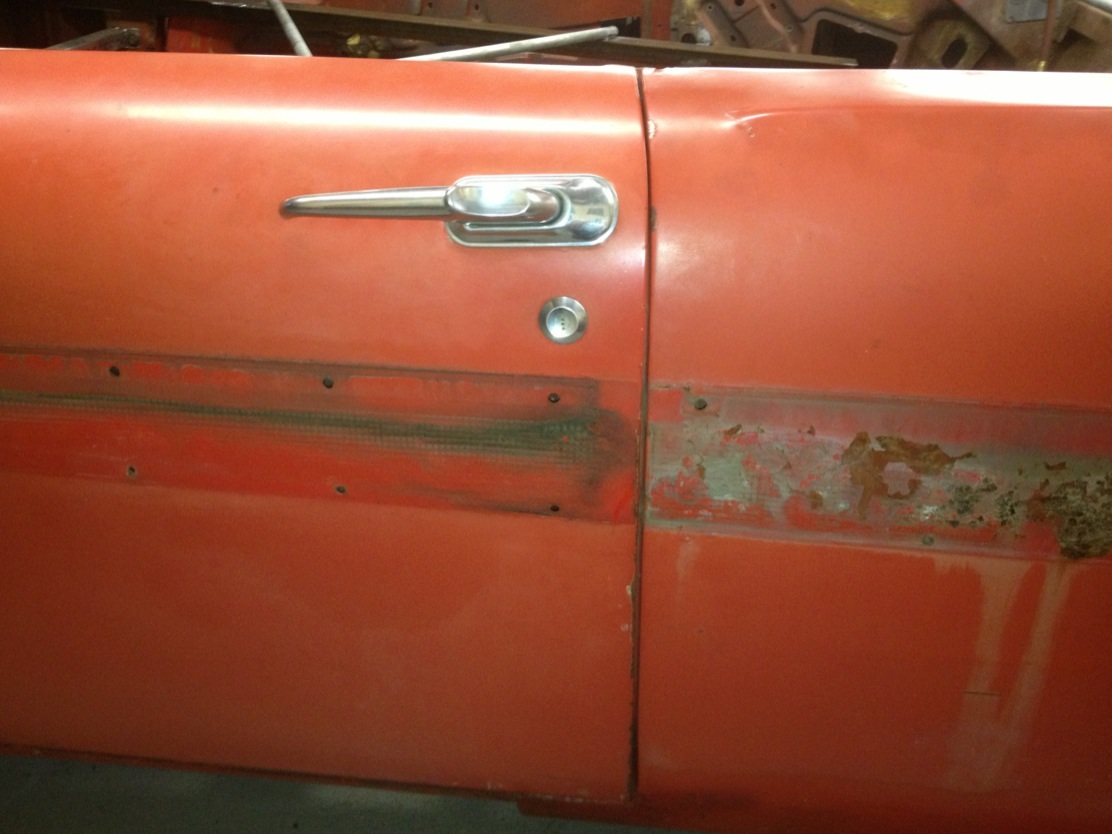
This car was in a fender bender sometime in it's past, but not sure how much was damaged. The driver's side front fender was replaced as you can see a turquiose/green color underneath the red.
Matt Dorschug |
|
| |
|
Expert
Posts: 4109
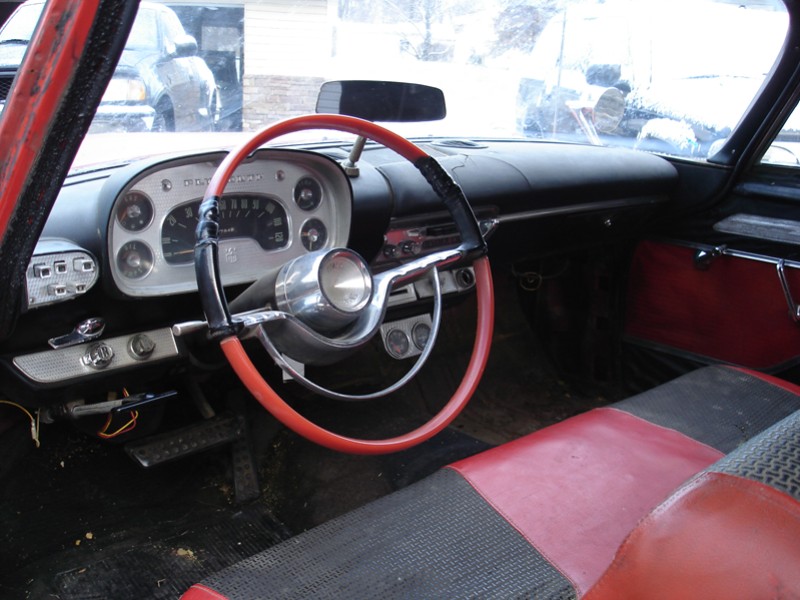
Location: Connecticut | Great find !  How rusty are the floors and trunk ? I noticed the gauges under the dash. Is the engine original ? Ron |
|
| |
|
Expert
Posts: 2996
Location: Sept. 1958 | It has had some floor patches install back in the 60s, but it doesn't look too bad. Not sure if the engine is original, but looks to be all there and correct.
Matt |
|
| |
|

Expert
Posts: 2598
Location: Upplands Väsby, Sweden | Congratulations! What a wonderful convertible project.
Edited by Windsor59 2008-12-09 7:12 AM
|
|
| |
|
Veteran
Posts: 168
Location: Nebraska | Holy Schnikes! What an incredible find!!! Congratulations and keep us in the loop on your progress!
 |
|
| |
|
Elite Veteran
Posts: 636
| That is a nice nice car. It looks great just as it sits now!
I think you can still get patch panels for the rear wheel scallops.
Sparky
|
|
| |
|
Elite Veteran
Posts: 638
Location: Johns Creek, Georgia |
This car was in a fender bender sometime in it's past, but not sure how much was damaged. The driver's side front fender was replaced as you can see a turquiose/green color underneath the red.
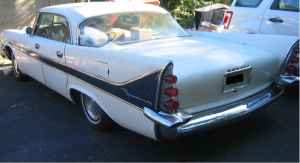
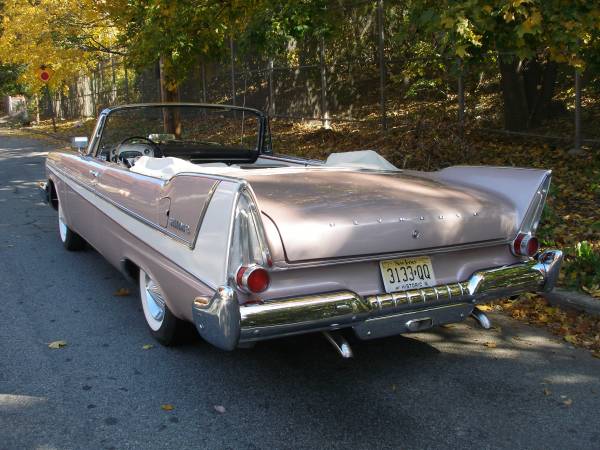
I wonder if the front bumper was replaced during the fender bender. It has wings, but none on the rear, nor holes where they would have mounted.
Edited by h-bomb 2008-12-09 2:27 PM
|
|
| |
|
Expert
Posts: 1508
Location: new york | GOOD LUCK MATT! You found what you wanted ! The car looks great and I'm sure you can find lots of reasonable parts with a little patience.Again Congrats and HAPPY MOTORING! Victor... |
|
| |
|
Veteran
Posts: 168
Location: Nebraska |
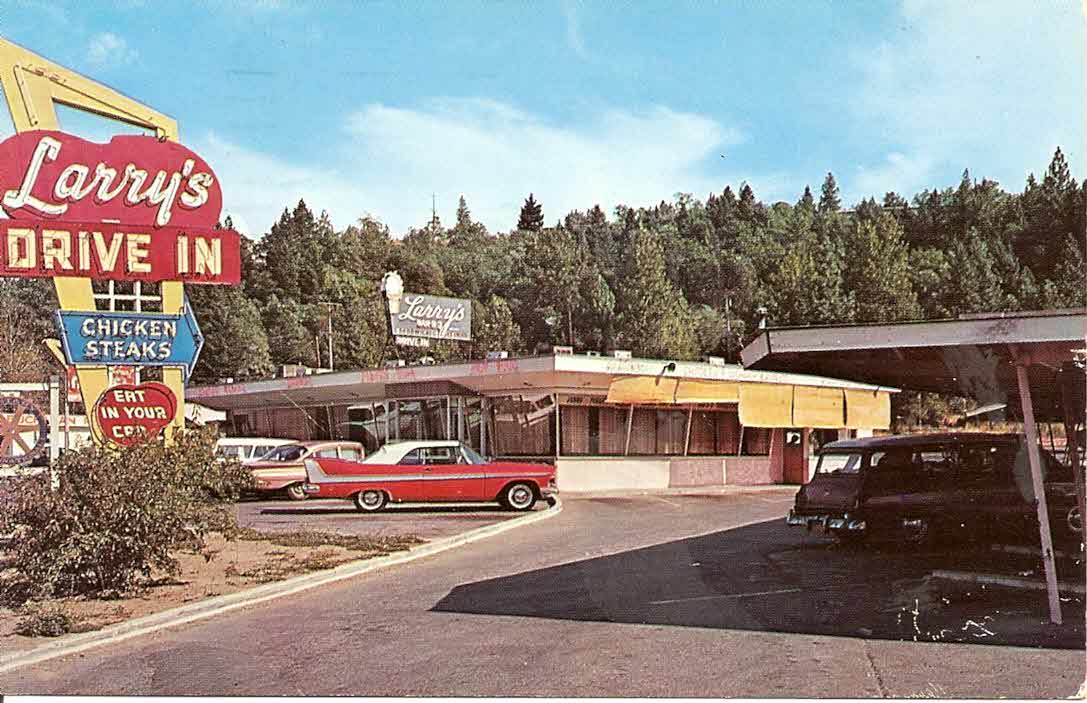 (GrantsPassLarrys0001.jpg) (GrantsPassLarrys0001.jpg)
Attachments
----------------
GrantsPassLarrys0001.jpg (93KB - 402 downloads)
|
|
| |
|
Veteran
Posts: 163
Location: Metro Detroit | Congrats on finding this beatiful car! it looks like a great project to start with, Im sure it will be a real head turner when you get done with it...... |
|
| |
|
Regular
Posts: 74
Location: Falicon 06 France | Looks a bit rusty but Man, I'll like to be behind the wheel. Is the engine running ?? |
|
| |
|
Expert
Posts: 2996
Location: Sept. 1958 | Car runs and drives, but it will need some work to make it more reliable. |
|
| |
|
Location: Parts Unknown | mangodart - 2008-12-15 1:49 AM
Looks a bit rusty but Man, I'll like to be behind the wheel. Is the engine running ??
*******************************
A guy must always remember ....
Crushing it is always an option.
UNcrushing it is never an option !
Rusty or not, it is still here and still possible to fix up.
Keep your eyes on da prize ! |
|
| |
|
Exner Expert 19,174 posts. Neil passed away 18 Sep 2015. You will be missed, Neil!
Posts: 19146
Location: bishop, ca | ...Didn't you ever see "Christine" ???? |
|
| |
|
Expert
Posts: 2996
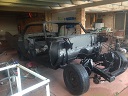
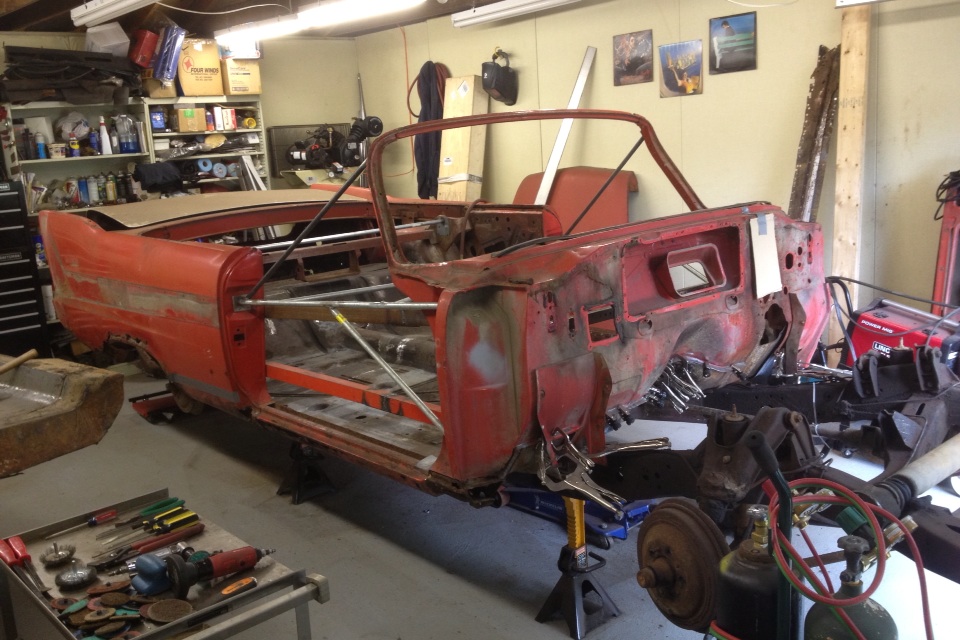
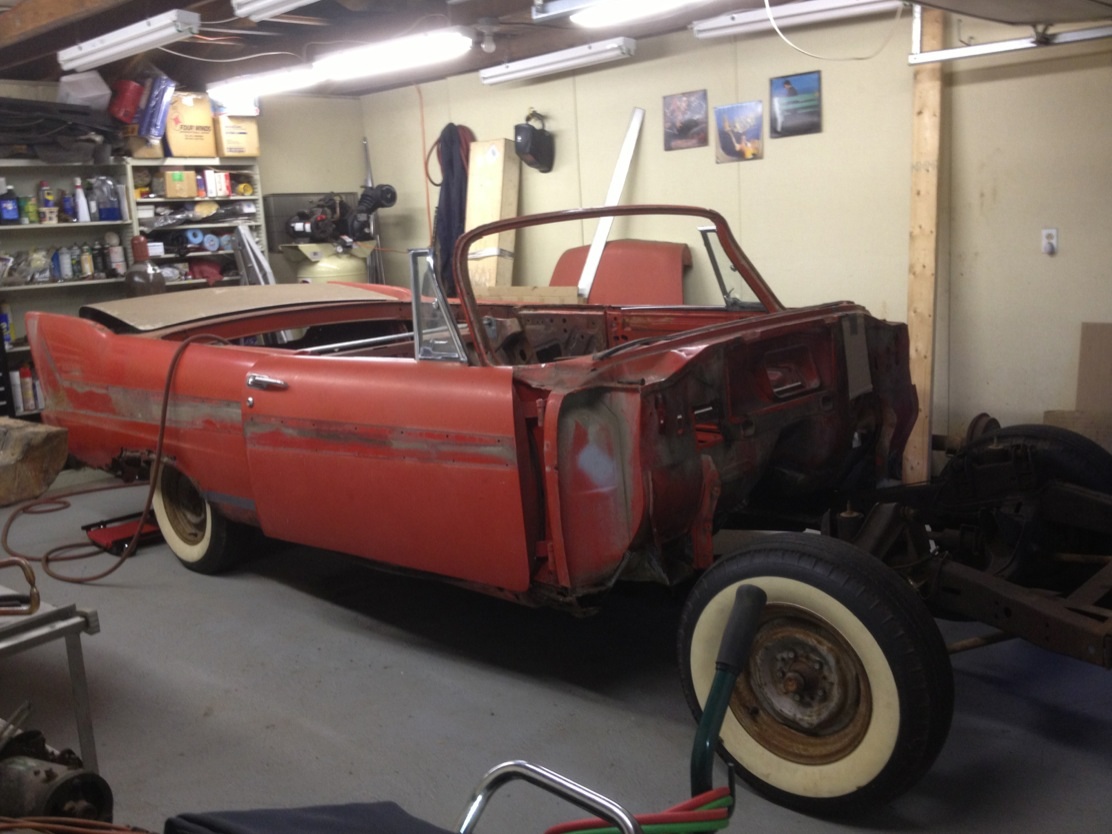
Location: Sept. 1958 | I want to update this thread, as I have started to work on this car. I had planned for earlier in the year but that didn’t happen. But now I got my garage into a shop where I have room to work. When I bought this car, I really didn’t know the future as I was living with my parents and my father was looking for a job, this was end of 2008. But now with my own house and garage, which is set up with the proper equipment, I'm getting started on this rot bucket of a car.
Among practicing welding and getting better at it, I started trimming down the left side floor section I got from a donor car to use it in the convertible. I still have some more things to do to get to that point. But it will be nice to finally see some progress on this car.
This car is pretty rough, but it's pretty much what I would have ordered, as in factory colors and options. I want a beautifully restored car when I am done, top and bottom, with attention to detail. It's just one of the most beautiful FLs made along with a 58 Fireflite Conv and a black 61 300G Conv. |
|
| |
|
Expert
Posts: 2996
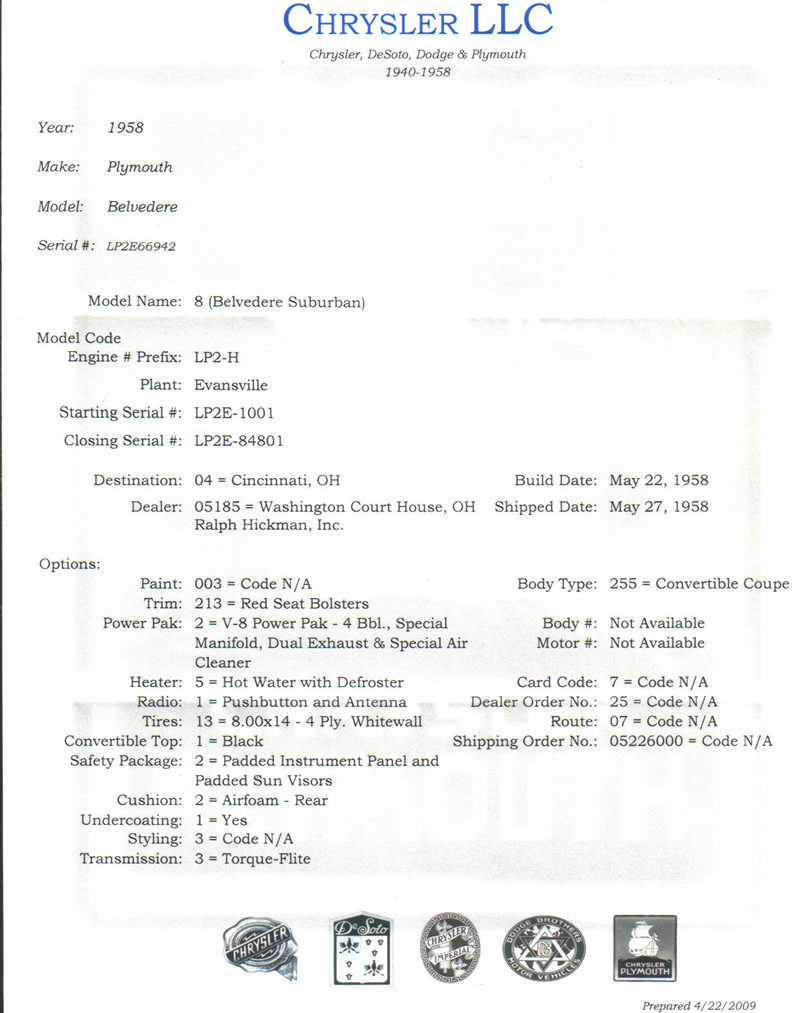
Location: Sept. 1958 | Here is the Production Record I received from Chrysler Historical.
 (Production Record.jpg) (Production Record.jpg)
Attachments
----------------
Production Record.jpg (147KB - 414 downloads)
|
|
| |
|
Expert
Posts: 2996
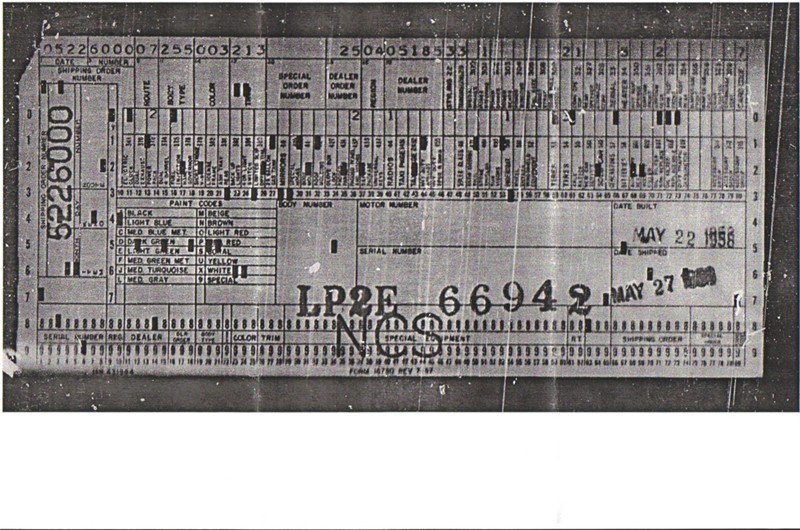
Location: Sept. 1958 | Here is the copy of the IBM sheet from Chrysler Historical.
 (IBM Card.jpg) (IBM Card.jpg)
Attachments
----------------
IBM Card.jpg (157KB - 462 downloads)
|
|
| |
|

Expert 5K+
Posts: 7819
Location: Williams California | Matt, good to see you've started on your ragtop! That will be a really nice car once completed. I'll be eagerly watching your progress here!!
---John |
|
| |
|

Elite Veteran
Posts: 957
Location: Signal Mountain, TN | Nice color combo... i don't see too many in that from what I can remember. Looking forward to watching this little project. |
|
| |
|
Exner Expert 19,174 posts. Neil passed away 18 Sep 2015. You will be missed, Neil!
Posts: 19146
Location: bishop, ca | Motor number is NOT AVAILABLE....what's up, with that (not recording the engine number on the IBM card???) ?
Matt, your engine's casting date should appear at the upper rear of the engine block----iirc----you should try to photo-
document that date, which should correlate to its stamping number, on the front of the block, which should correlate
to the VIN, which appears to be from 5/22/58.
Dunno if/when the upper-rear area of the engine block will be accessible, but, you should try to remember to document
the casting date, because it should be somewhere in the time-vicinity of the car's build date.
You'll note that your car was equipped with the optional "Power Pak", which provided the optional 4-bbl carb and dual exhausts.
Also, both the front and the rear seats were foam padded; otherwise, the rear seat would have been merely 'padded' by a piece
of jute-material; fairly uncomfortable.
|
|
| |
|
Exner Expert 19,174 posts. Neil passed away 18 Sep 2015. You will be missed, Neil!
Posts: 19146
Location: bishop, ca | Just noticed that there's no key-codes or any inspectors' initialing on the IBM card.....those details do appear on Dodge's
IBM cards.
Wonder if this IBM card might be some sort of duplicate card, that accompanied the car along the production line, altho
the car's build and shipping dates are recorded on the card.
That "NCS" stamping probably refers to "New Car Service", where the factory aligned the wheels and installed
all the fluids, etc, so that the car could be immediately driven away, upon its arrival at the selling dealership.
And, maybe, they just did things 'differently' at the Evansville assembly plant!
Edited by d500neil 2011-08-03 8:51 PM
|
|
| |
|
Expert
Posts: 2996
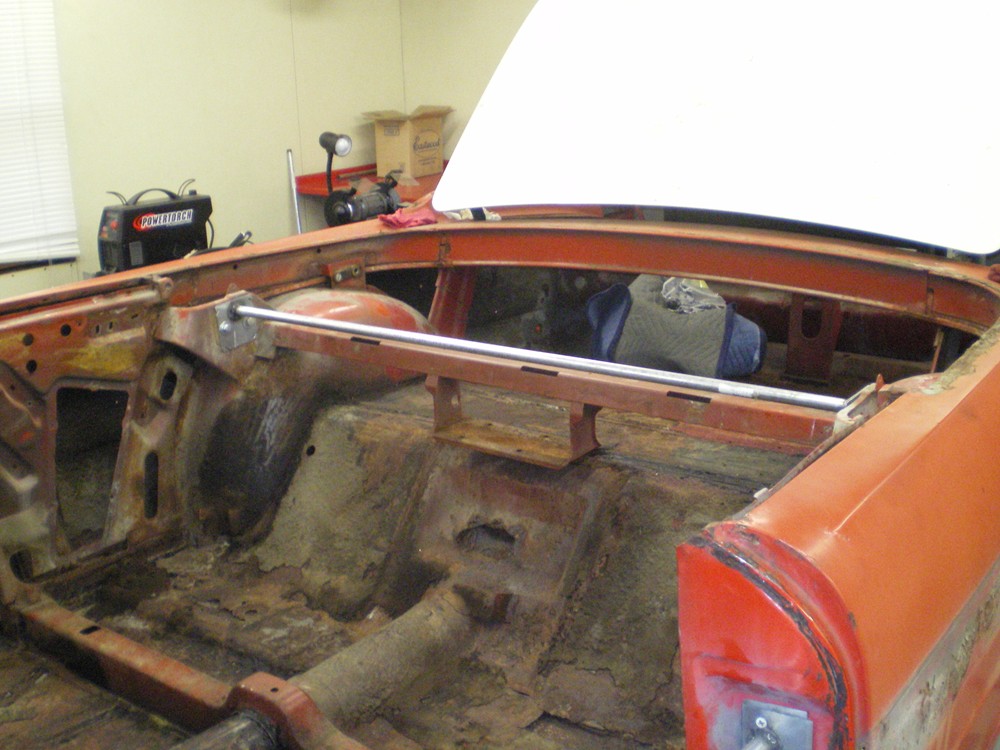
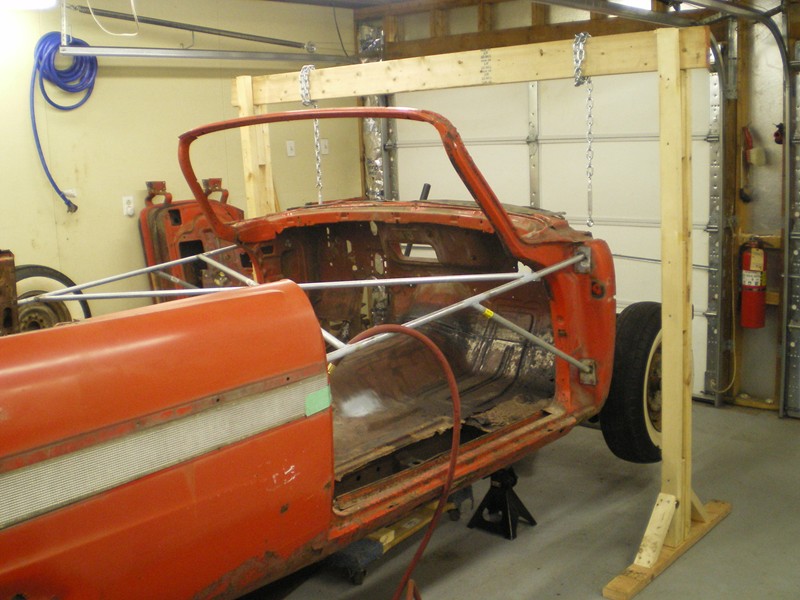
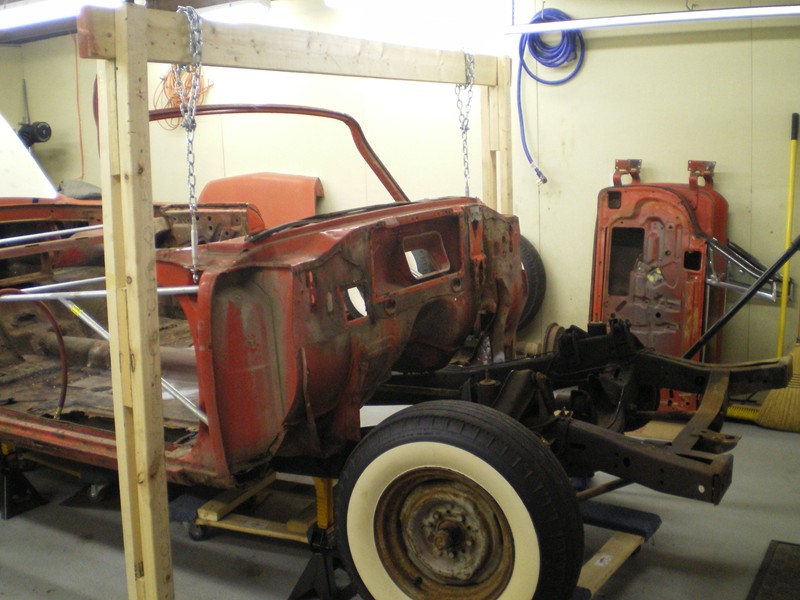
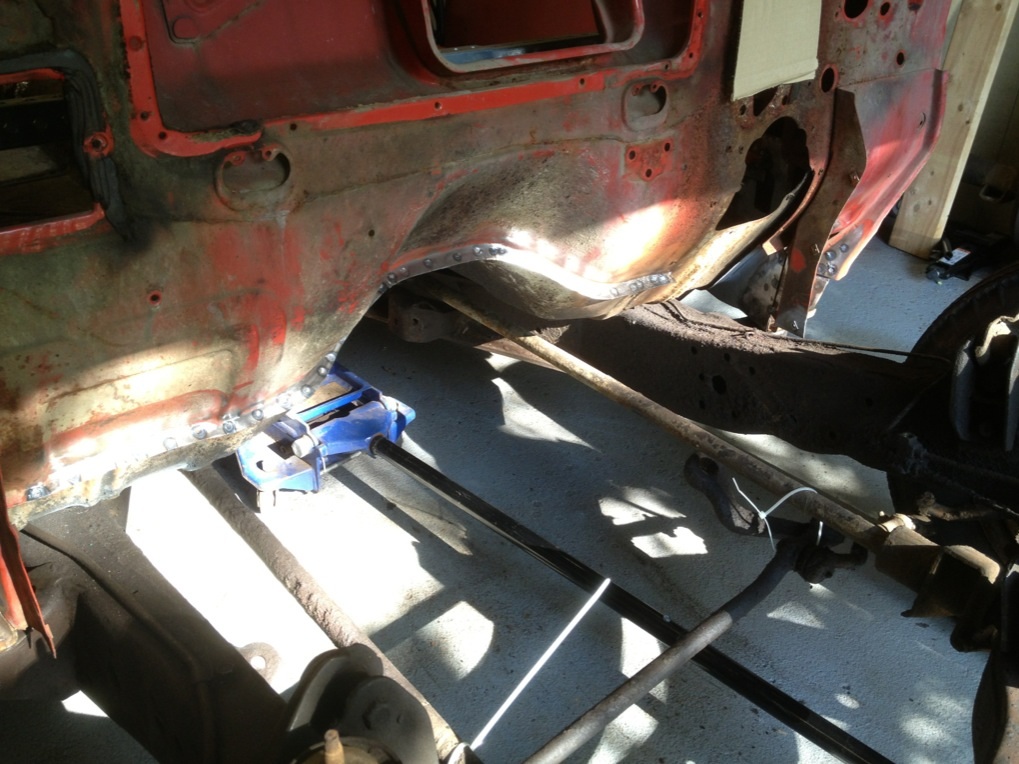
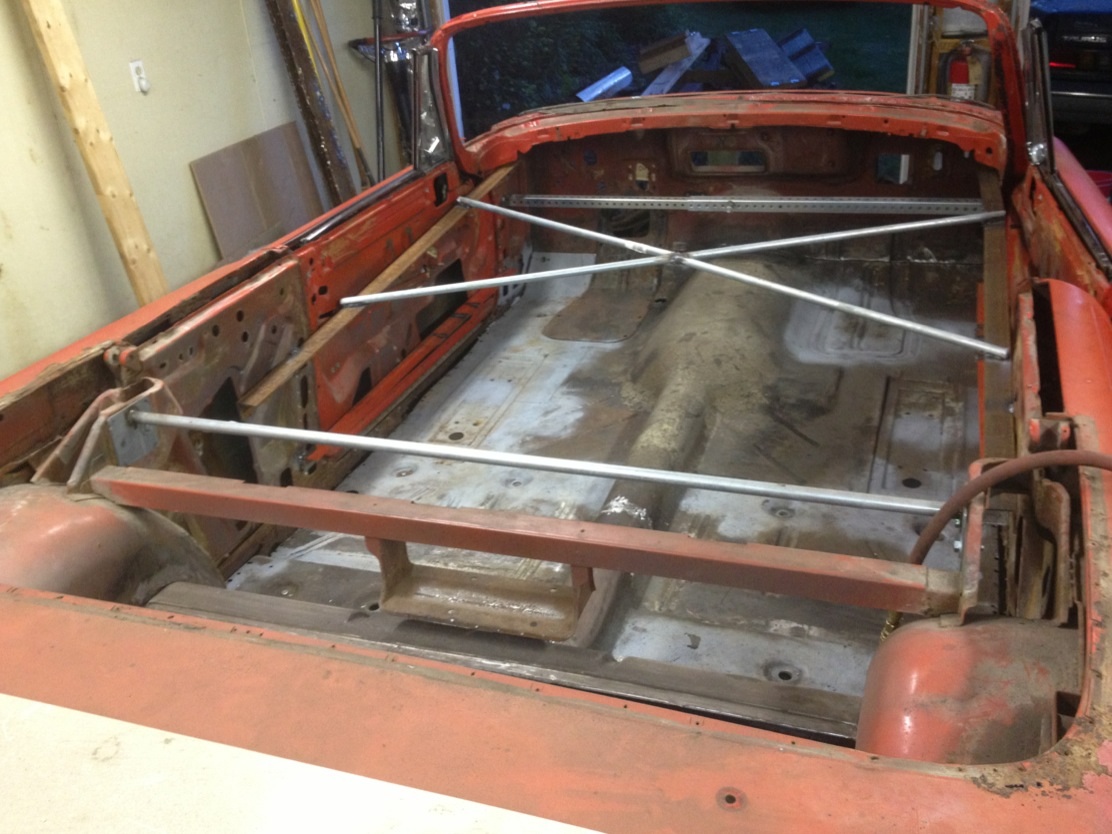
Location: Sept. 1958 | Today I started bracing the body, modified electrical box junction plates where the hinges and strikers go to weld to and started on the passenger side with the first brace. At first the welds didn't hold, but I worked with it and got it. Still have to add another on that side, then go to the driver's side, then cross brace it. |
|
| |
|
Extreme Veteran
Posts: 481
Location: The Netherlands | You got a really nice project there!
Where in jersey are you? Visiting jersey tomorrow |
|
| |
|
Expert
Posts: 2996
Location: Sept. 1958 | Matthew Keij - 2011-08-07 8:33 PM
You got a really nice project there!
Where in jersey are you? Visiting jersey tomorrow
Thanks, it would be better if mother nature didn't claim so much of the body.
I live in Burlington. Where are you going to be at? |
|
| |
|
Extreme Veteran
Posts: 481
Location: The Netherlands | I'll be very close if my map is not lying! I'll be in mt holly |
|
| |
|
Expert
Posts: 2996
Location: Sept. 1958 | Matthew Keij - 2011-08-07 8:55 PM
I'll be very close if my map is not lying! I'll be in mt holly
PM sent. |
|
| |
|
Expert
Posts: 2996
Location: Sept. 1958 | d500neil - 2011-08-03 4:14 PM
Motor number is NOT AVAILABLE....what's up, with that (not recording the engine number on the IBM card???) ?
Thank you Neil, my guess is possibly only high performance engine numbers were listed on the IBM cards.
I had no idea what NCS stood for, but it makes sense. I though it had something to do with Chrysler Historical Society. |
|
| |
|
Expert
Posts: 2996
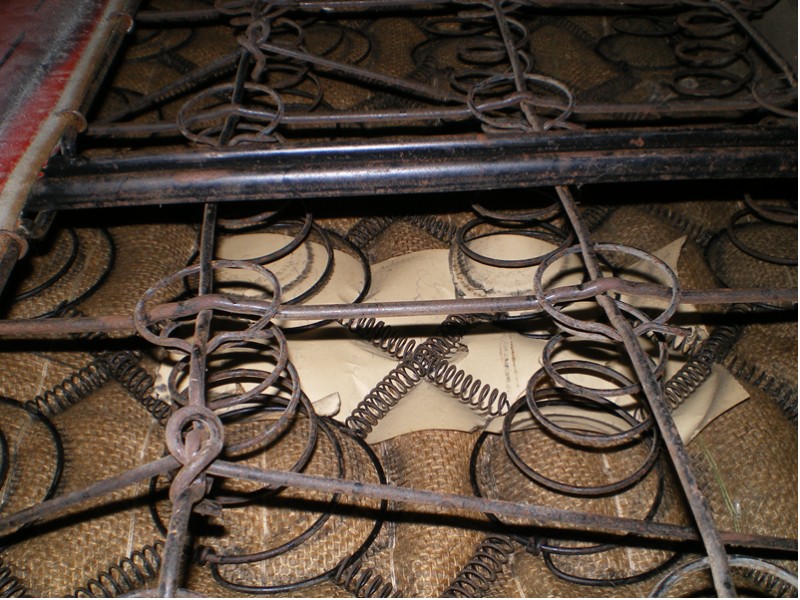
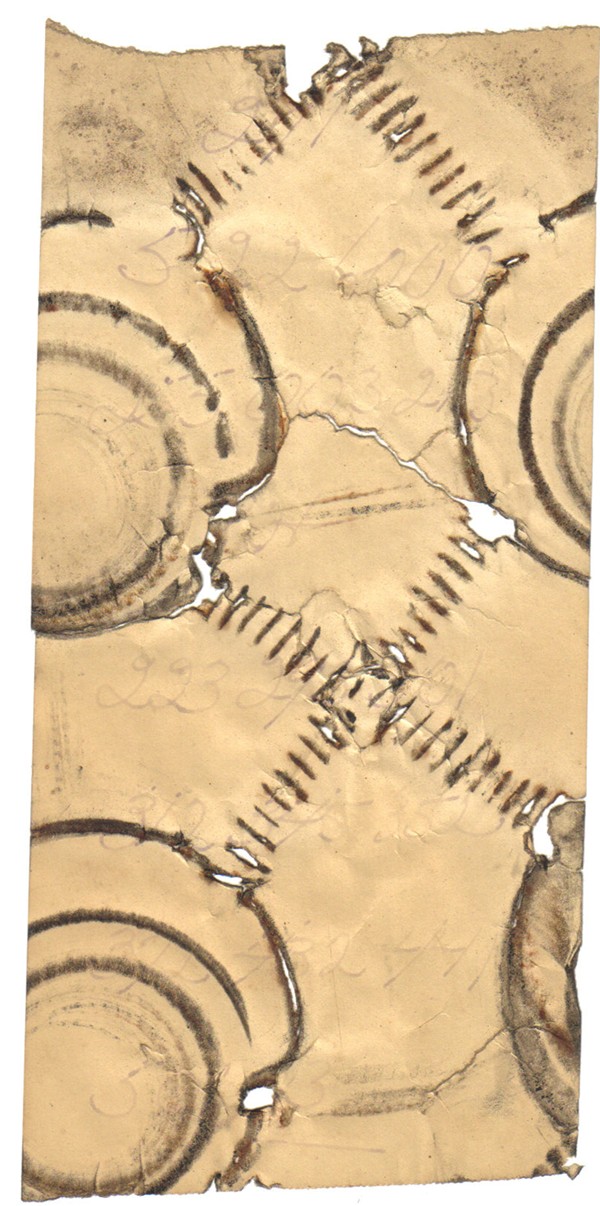
Location: Sept. 1958 | Also, forgot to add this with the information posted earlier about the car, here's the list of what my car had on it's hand written built sheet found in the rear seat cushion.
271 - Possible Rotation Number
522 - Build Date - May 22, 1958
6000 - Body Number - 5,000th Convertible Body
255 - Body Type Number - Convertible Coupe
OO3 - Exterior Color - Toreador Red with Sportone Aluminum Insert Trim
213 - Interior Color - Red and Black Interior
321 - Convertible Top Color - Black
223 - ?
293 - Torqueflite 3 Speed Transmission
301 - Power Steering with Deluxe Wheel
312 - Accessory Group - Back-up Light, Windshield Washer, and Variable Speed Wipers
345 - Hot Water Heater and Defroster
352 - Airfoam Rear Seat
372 - V8 Power Pak - 4 bbl. Carburetor, Dual Exhausts
432 - Safety Package - Padded Dash and Padded Visors
441 - Pushbutton Radio and Antenna
501 - Undercoating and Hood Insulation
13 - 8.00 X 14 Wide Whitewall Tires
 (Buildsheet 001.jpg) (Buildsheet 001.jpg)
Attachments
----------------
Buildsheet 001.jpg (167KB - 518 downloads)
|
|
| |
|
Expert
Posts: 2996
Location: Sept. 1958 | This week I started to brace the body. Having trouble with getting the welds to hold, I switched to .035" flux core that I had, but flux sucks, so I went out and bought .035" to use with gas. Welds aren't "pretty", but are strong. The welds for the sheet metal will be much better. Still have to "X" between both door openings, but can't do that until I get another set of hands.
I also removed the surface rust that is on my replacement floor for the driver's side. It has some surface rust on the interior side only but I want to remove all that so it won't make any problems in the future.
 (1958 Plymouth Convertible Photos 282.jpg) (1958 Plymouth Convertible Photos 282.jpg)
 (1958 Plymouth Convertible Photos 283.jpg) (1958 Plymouth Convertible Photos 283.jpg)
 (1958 Plymouth Convertible Photos 284.jpg) (1958 Plymouth Convertible Photos 284.jpg)
Attachments
----------------
1958 Plymouth Convertible Photos 282.jpg (131KB - 465 downloads)
1958 Plymouth Convertible Photos 283.jpg (209KB - 692 downloads)
1958 Plymouth Convertible Photos 284.jpg (161KB - 464 downloads)
|
|
| |
|
Expert
Posts: 4109
Location: Connecticut | If your welds aren't sticking, it means either your wire speed is too slow, you don't have enough heat or the area that you are trying to weld is contaminated (rust, grease, even those 'weld thru primers', which IMHO you should NOT use, except after welding is completed). The metal that you are welding should be perfectly clean. .023 wire with the right size tip should be fine for what you are trying to do. What were you trying to weld where the welds weren't sticking ? Ron
|
|
| |
|
Expert
Posts: 2996
Location: Sept. 1958 | ronbo97 - 2011-08-12 1:08 PM
If your welds aren't sticking, it means either your wire speed is too slow, you don't have enough heat or the area that you are trying to weld is contaminated (rust, grease, even those 'weld thru primers', which IMHO you should NOT use, except after welding is completed). The metal that you are welding should be perfectly clean. .023 wire with the right size tip should be fine for what you are trying to do. What were you trying to weld where the welds weren't sticking ? Ron
I was using the same voltage and speed but just went from .025" to .035" and they stuck. I am welding on new metal, cut up electrical junction plates and steel tubes from Home Depot, I clean up where I weld using a cookie wheel. I didn't want to weld any bracing on the body. Like I said, still have to diagonally brace between the doors before I can cut out metal from the body. And then I will make sure I will weld to virgin metal, which will be hard to do because my floor is holier than the Vatican. |
|
| |
|

Expert 5K+
Posts: 6552
Location: Newark, Texas (Fort Worth) | I see whats happening. You are welding galvanized metal. It will weld, but you will need it to be hotter and/ or grind off all the zinc. It won't be pretty but should work wth practice. Mild steel parts would have been better to use. H.D. has a selection of angle iron and flat steel. Marc. |
|
| |
|
Expert
Posts: 4109
Location: Connecticut | IF you were welding galvanized steel, the zinc fumes from the welding are poisonous. You may end up coughing for days if you didn't use a respirator. Ron PS - Ask me how I know this.
Edited by ronbo97 2011-08-12 7:50 PM
|
|
| |
|
Location: Parts Unknown | Hardware stores gouge the hell out of the buyer on steel stock. Get in the phone book and find a
steel / metals company, ... i.e. Ryerson, Jorgenson, CDA, etc. or better still, go to a scrap yard and
ask. They often have new material brought in for scrap that they resell. Far better pricing.
If you are going to weld galvanized, make sure the shop is all closed up and keep the car running
while doing the work. If the car doesn't run, set a tire on fire.
|
|
| |
|
Exner Expert 19,174 posts. Neil passed away 18 Sep 2015. You will be missed, Neil!
Posts: 19146
Location: bishop, ca | Matt; you must have had to get to that Broadcast Sheet from 'above' the springs!
Can you post up an image or two of it, over on our Fender tag Decoding board?
Hand-written, huh; wow....
Broadcast Sheets installed under the rear seats did not occur in Dodges until the 1960 model year.
Your Broadcast Sheet must have pertained only to the creation of the upholstery---just as the B.-Sheets that are
found taped to the back of the glove boxes pertained only to the creation of the dashboards.
You should get your B.-Sheet laminated, to preserve it.
|
|
| |
|
Location: Parts Unknown | Just crumple up that paper junk with the candy bar wrappers and clean the car out.
No one cares about that stuff !
|
|
| |
|
Expert
Posts: 2996
Location: Sept. 1958 | d500neil - 2011-08-13 7:57 PM
Matt; you must have had to get to that Broadcast Sheet from 'above' the springs!
Can you post up an image or two of it, over on our Fender tag Decoding board?
Hand-written, huh; wow....
Broadcast Sheets installed under the rear seats did not occur in Dodges until the 1960 model year.
Your Broadcast Sheet must have pertained only to the creation of the upholstery---just as the B.-Sheets that are
found taped to the back of the glove boxes pertained only to the creation of the dashboards.
You should get your B.-Sheet laminated, to preserve it.
This broadcast sheet pertains to things about and on the car, all the numbers I posted above are on this sheet. I'd post a photo of it, but the camera will not capture the numbers as they are pencil written and light.
Edited by christine-lover 2011-08-14 9:30 PM
|
|
| |
|
Exner Expert 19,174 posts. Neil passed away 18 Sep 2015. You will be missed, Neil!
Posts: 19146
Location: bishop, ca | PLEASE try....scan it, maybe, and send the PDF to someone (me) so we can arrange to post its image on the Fender Tag
board!
Maybe even a straight jpeg photo of it.
|
|
| |
|
Expert
Posts: 2996
Location: Sept. 1958 | d500neil - 2011-08-14 11:12 PM
PLEASE try....scan it, maybe, and send the PDF to someone (me) so we can arrange to post its image on the Fender Tag
board!
Here it is.
 (Buildsheet 002.jpg) (Buildsheet 002.jpg)
Attachments
----------------
Buildsheet 002.jpg (185KB - 381 downloads)
|
|
| |
|
Expert
Posts: 2996
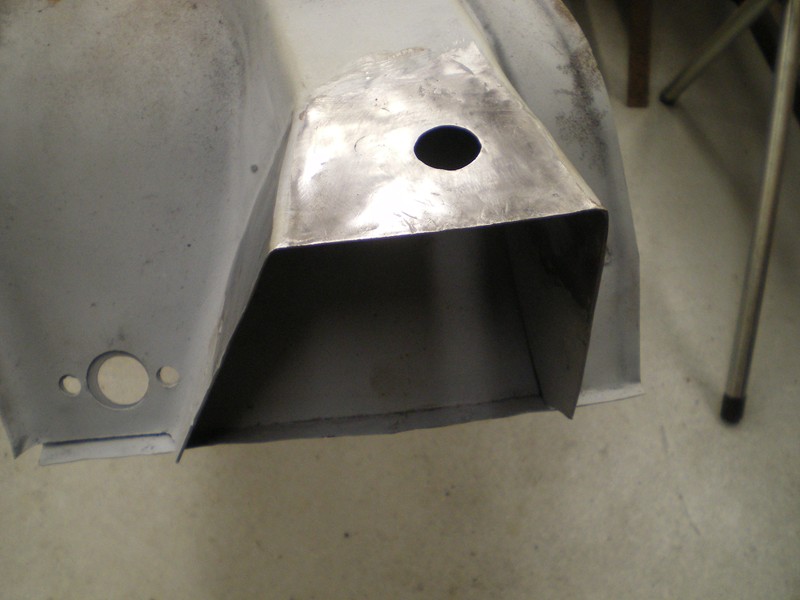
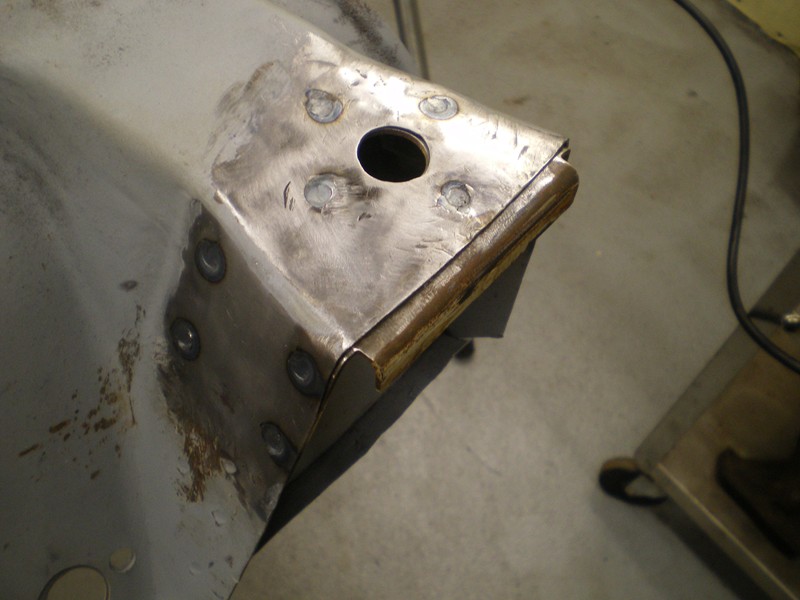
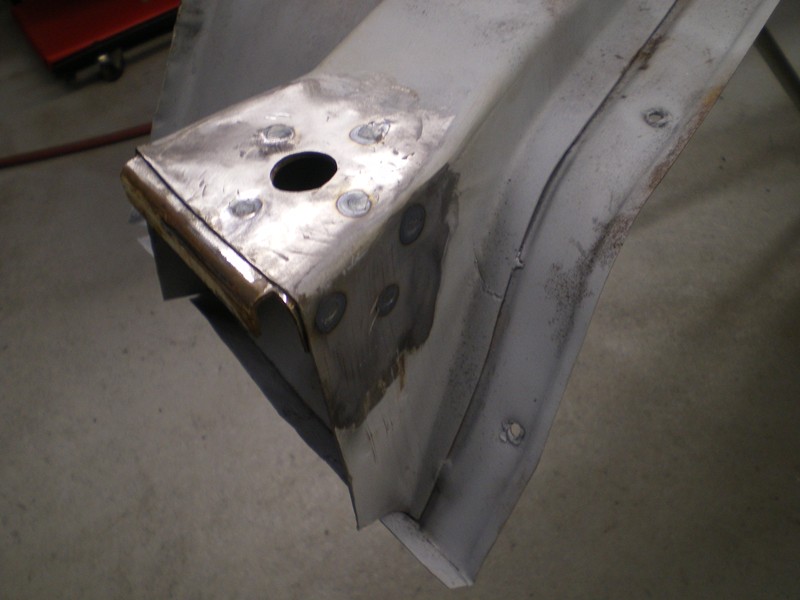
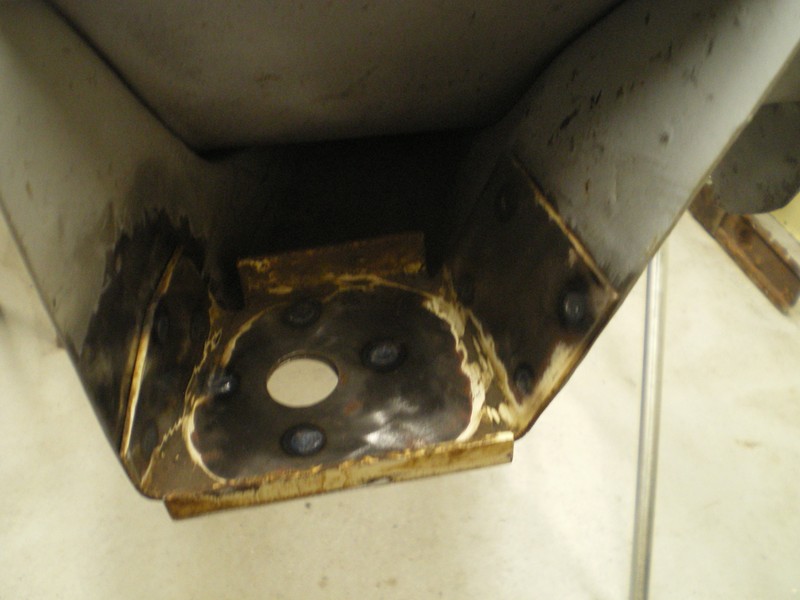
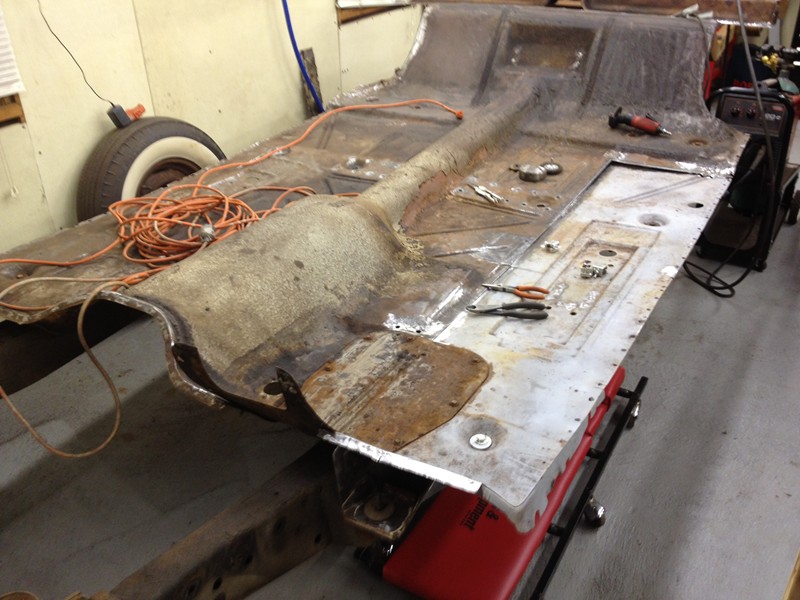
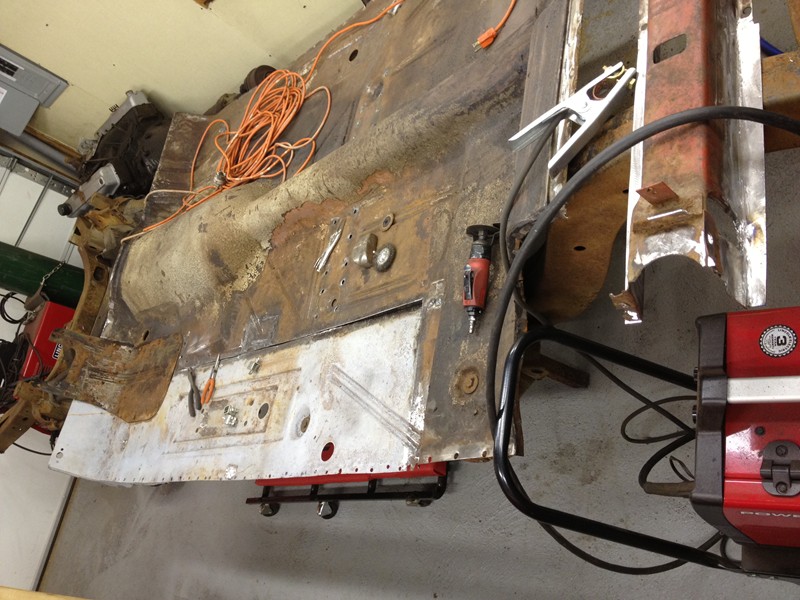
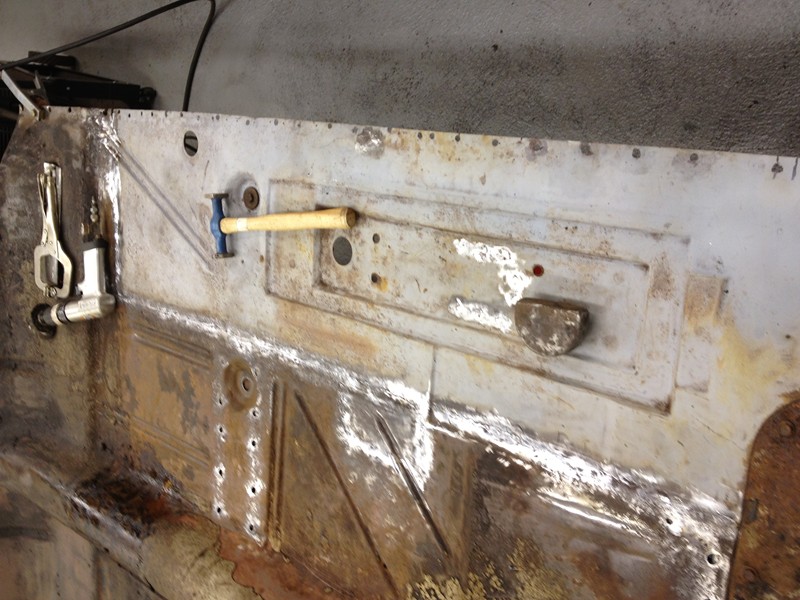
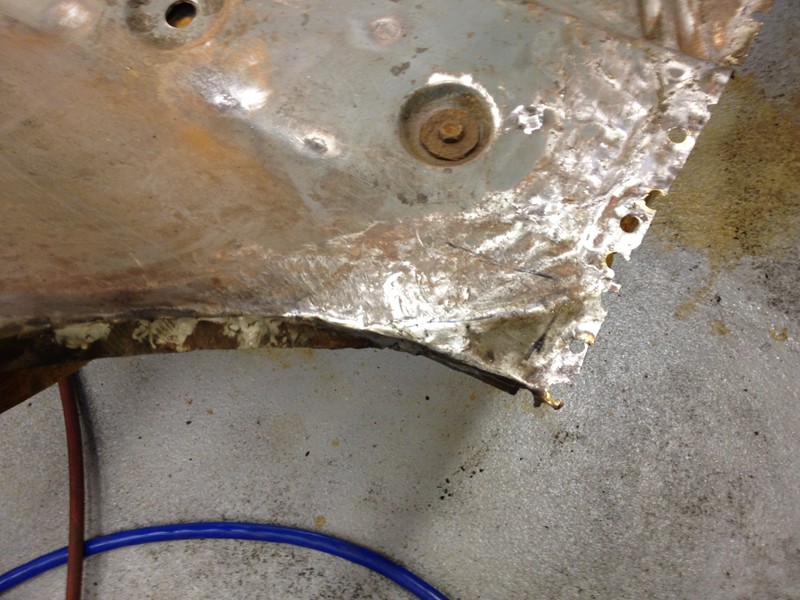
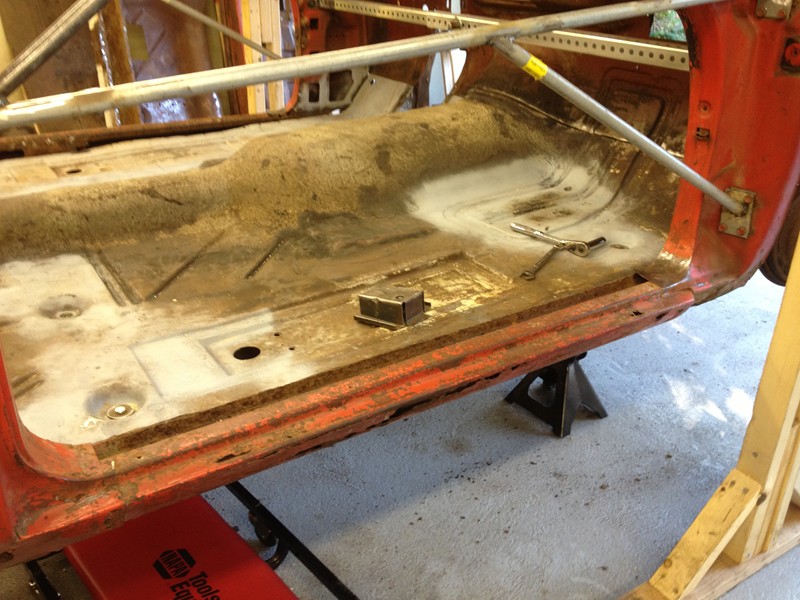
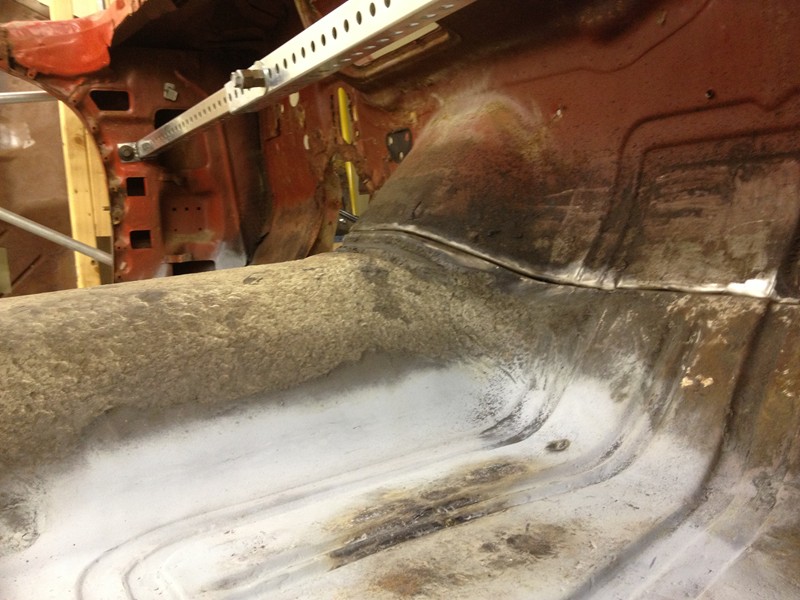
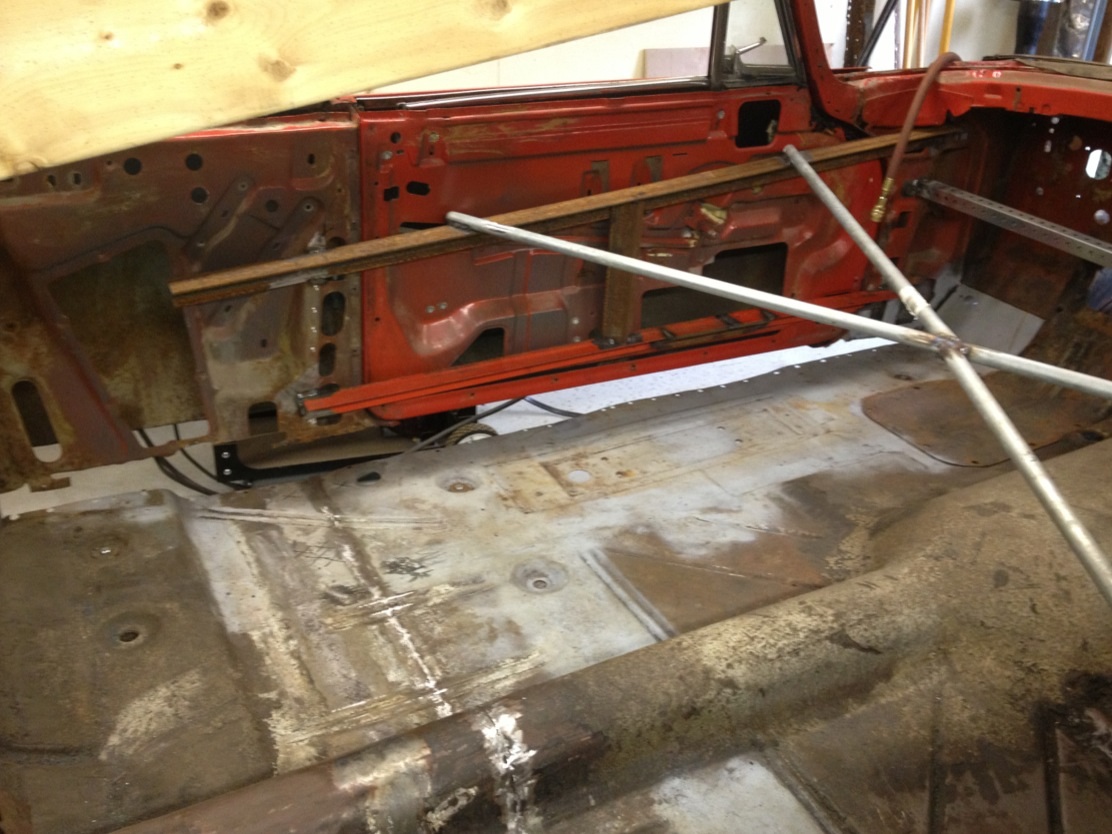
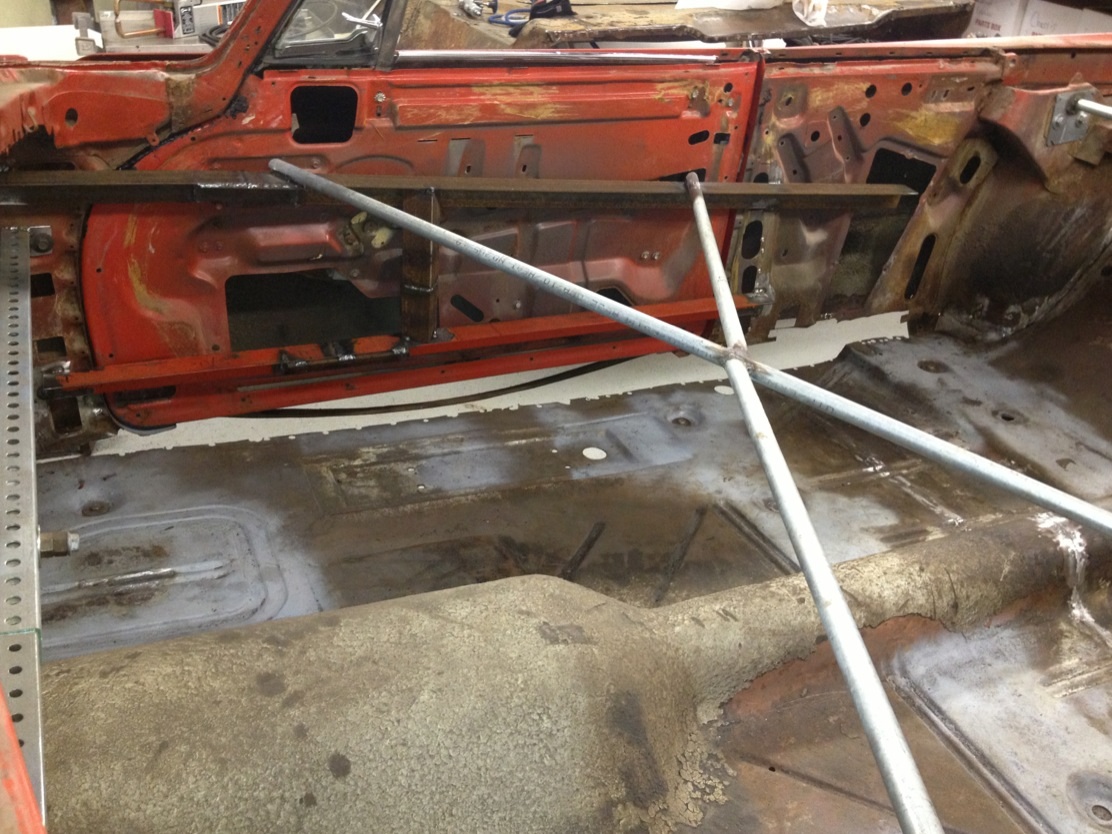
Location: Sept. 1958 | I am going to make a wooden jig to support the cowl, need to do this to remove and install the floor panels. Until I can get around to building that, this week after work, I have been patching the rear seat floor brace. Still have more work to it, I patched one side of it. A lot of time is in this.
 (1958 Plymouth Convertible Photos 343.jpg) (1958 Plymouth Convertible Photos 343.jpg)
 (1958 Plymouth Convertible Photos 345.jpg) (1958 Plymouth Convertible Photos 345.jpg)
 (1958 Plymouth Convertible Photos 346.jpg) (1958 Plymouth Convertible Photos 346.jpg)
 (1958 Plymouth Convertible Photos 344.jpg) (1958 Plymouth Convertible Photos 344.jpg)
 (1958 Plymouth Convertible Photos 347.jpg) (1958 Plymouth Convertible Photos 347.jpg)
Attachments
----------------
1958 Plymouth Convertible Photos 343.jpg (101KB - 360 downloads)
1958 Plymouth Convertible Photos 345.jpg (112KB - 351 downloads)
1958 Plymouth Convertible Photos 346.jpg (110KB - 366 downloads)
1958 Plymouth Convertible Photos 344.jpg (107KB - 373 downloads)
1958 Plymouth Convertible Photos 347.jpg (81KB - 365 downloads)
|
|
| |
|
Expert
Posts: 2996
Location: Sept. 1958 | Today with the help of my dad, we built a wooden jig so the cowl can be supported. Turned out well, just need some hardware to mount it. I got the idea of it after the one Bob Beck built during restoration for his '55 Buick Convertible that was featured in Hemmings Classic Car back in 2007.
 (1958 Plymouth Convertible Photos 348.jpg) (1958 Plymouth Convertible Photos 348.jpg)
Attachments
----------------
1958 Plymouth Convertible Photos 348.jpg (119KB - 353 downloads)
|
|
| |
|
Expert
Posts: 2996
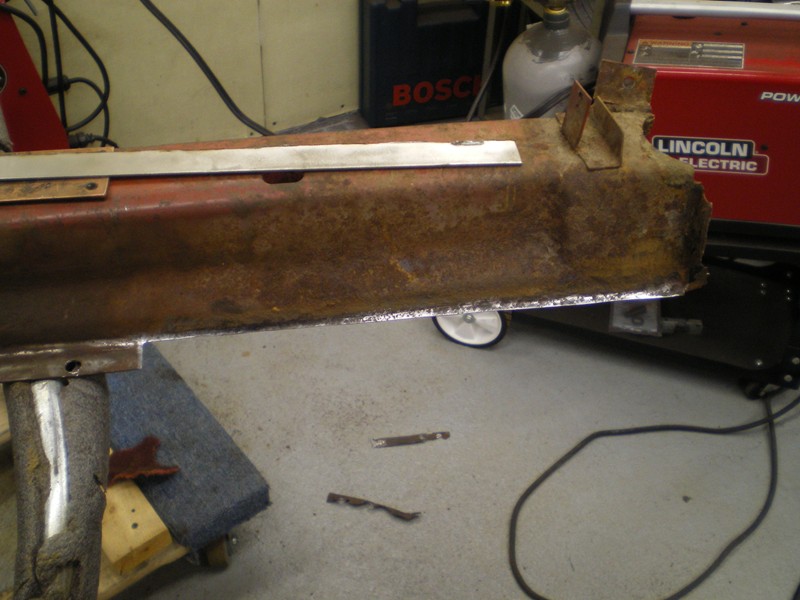
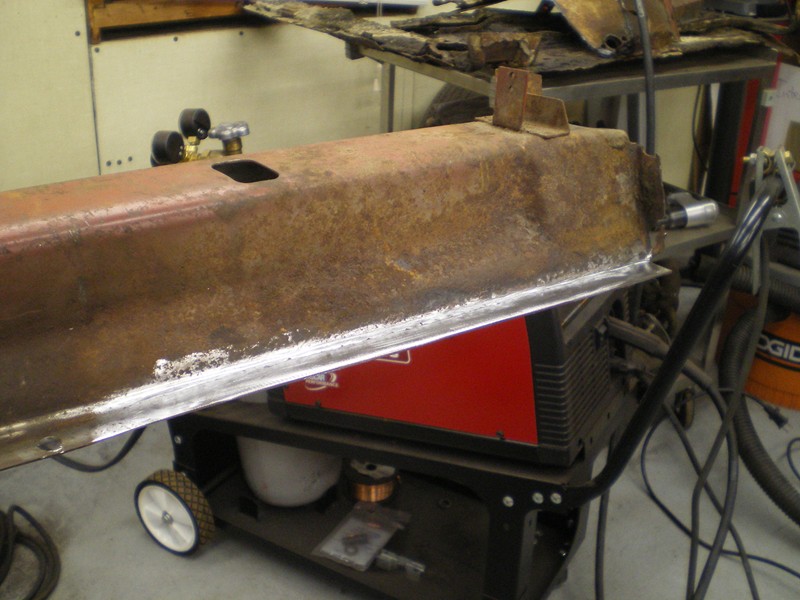
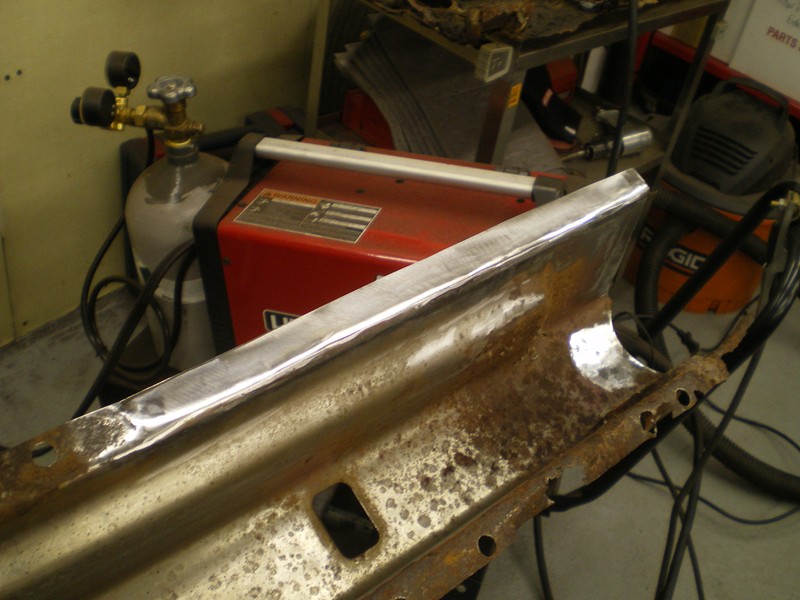
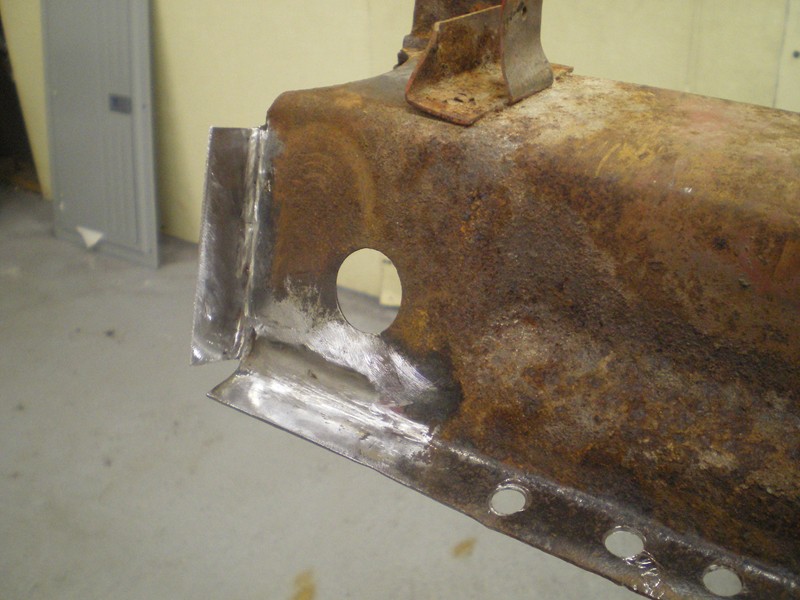
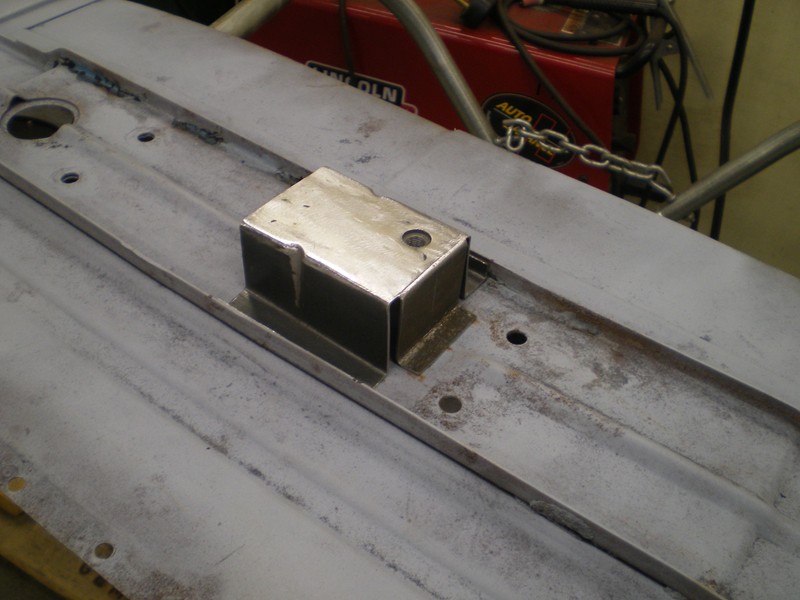
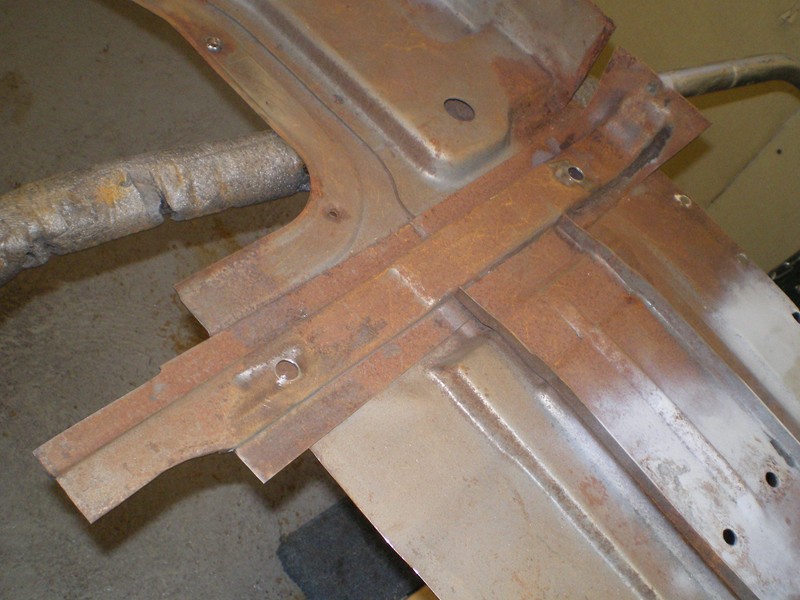
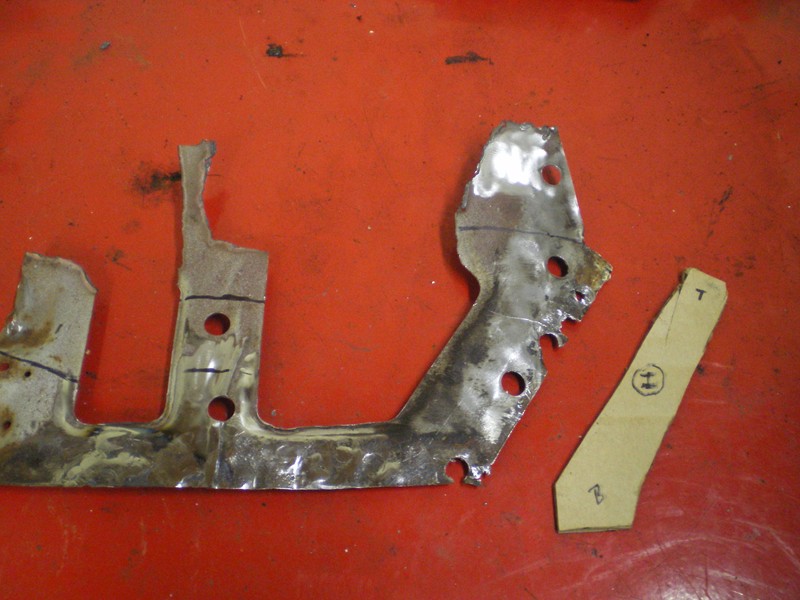
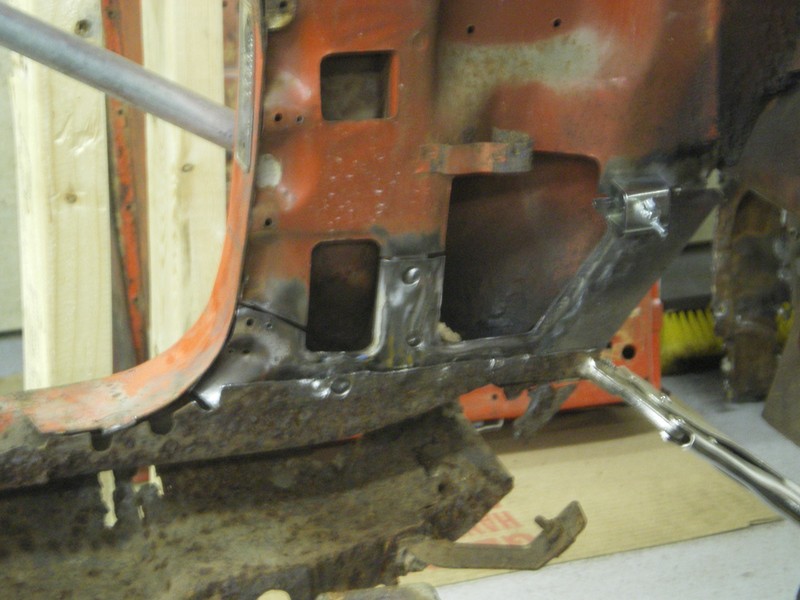
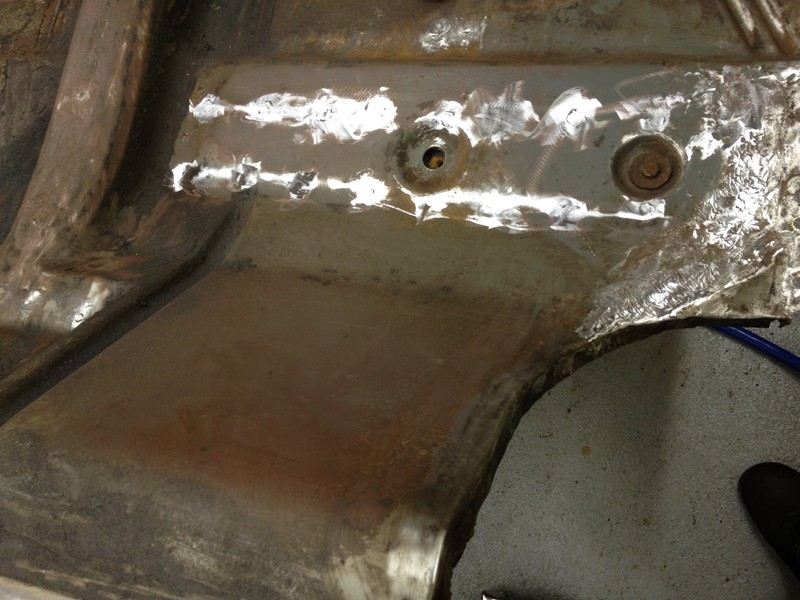
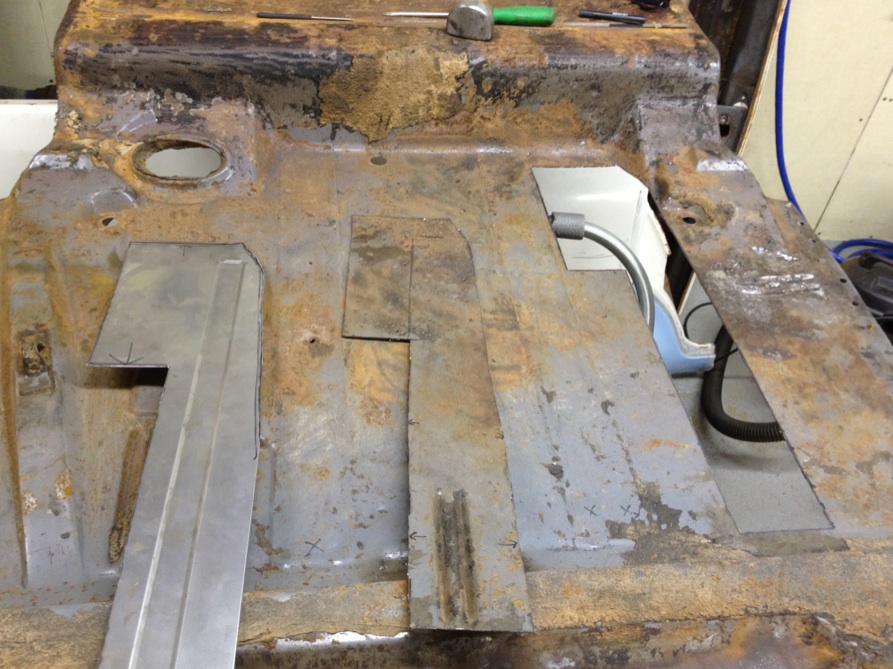
Location: Sept. 1958 | Recently I started finishing up the driver's side patch panel I will be using. This came off a 57, which differs from a 58. While the floor sheet metal itself is the same, the outriggers go from rocker to rocker on 57s, while 58s are shorter. Also, the reinforcement at the first body mount location differs. So I trimmed the outriggers down to the exact size that 58s were and spotwelded the 58-style body mount reinforcement. Also, the 3rd body mount brackets, which are convertible only items were made up, still need to weld these to the floor. Before I install this floor panel, I am going to patch the lower cowl area behind where the kick panel would go, it seems to be easier to do that and clean up the welding with the floor section out of the way, then it would be to do later.
 (1958 Plymouth Convertible Photos 351.jpg) (1958 Plymouth Convertible Photos 351.jpg)
 (1958 Plymouth Convertible Photos 349.jpg) (1958 Plymouth Convertible Photos 349.jpg)
 (1958 Plymouth Convertible Photos 369.jpg) (1958 Plymouth Convertible Photos 369.jpg)
 (1958 Plymouth Convertible Photos 371.jpg) (1958 Plymouth Convertible Photos 371.jpg)
 (1958 Plymouth Convertible Photos 372.jpg) (1958 Plymouth Convertible Photos 372.jpg)
 (1958 Plymouth Convertible Photos 373.jpg) (1958 Plymouth Convertible Photos 373.jpg)
 (1958 Plymouth Convertible Photos 336.jpg) (1958 Plymouth Convertible Photos 336.jpg)
 (1958 Plymouth Convertible Photos 335.jpg) (1958 Plymouth Convertible Photos 335.jpg)
Attachments
----------------
1958 Plymouth Convertible Photos 351.jpg (116KB - 330 downloads)
1958 Plymouth Convertible Photos 349.jpg (94KB - 337 downloads)
1958 Plymouth Convertible Photos 369.jpg (75KB - 346 downloads)
1958 Plymouth Convertible Photos 371.jpg (83KB - 354 downloads)
1958 Plymouth Convertible Photos 372.jpg (74KB - 331 downloads)
1958 Plymouth Convertible Photos 373.jpg (78KB - 328 downloads)
1958 Plymouth Convertible Photos 336.jpg (112KB - 356 downloads)
1958 Plymouth Convertible Photos 335.jpg (119KB - 357 downloads)
|
|
| |
|
Expert
Posts: 2996
Location: Sept. 1958 | This is the kick panel area.
 (1958 Plymouth Convertible Photos 358.jpg) (1958 Plymouth Convertible Photos 358.jpg)
Attachments
----------------
1958 Plymouth Convertible Photos 358.jpg (104KB - 337 downloads)
|
|
| |
|
Expert
Posts: 1508
Location: new york | Hey Matt! Thats some restoration your doing! Thanks for the photos , it will look great on the road! Can't wait to see it. HAPPY MOTORING! Victor. |
|
| |
|
Veteran
Posts: 107
Location: Australia | Gee I like your work with steel, It's fun isn't it. |
|
| |
|
Expert
Posts: 2996
Location: Sept. 1958 | old mopar guy - 2011-11-29 7:45 PM
Hey Matt! Thats some restoration your doing! Thanks for the photos , it will look great on the road! Can't wait to see it. HAPPY MOTORING! Victor.
Thanks Vic. Would like to see your 58 too. |
|
| |
|
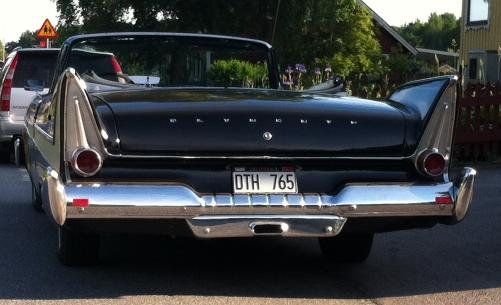
Expert
Posts: 1508
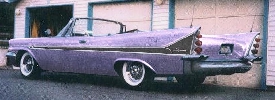
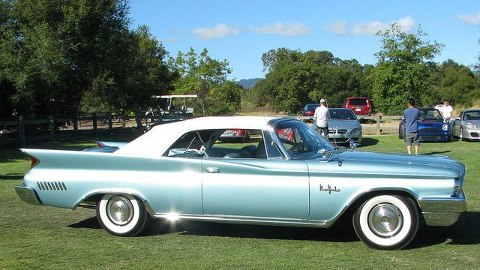
Location: new york | Matt.Here,s a recent photo, The car getting old we restored it almost 30 years ago but its very solid, the engine is a little tired, and the 1980"s incorrect interior is still nice but the seats are starting to yellow & sag so I am planning on doing alot of the car over . Even a possible color change, my interior shop has already ordered a new top , But its a great car and i love it! I can't believe i have it so long! Time flies. Happy Motoring! Victor..
Edited by old mopar guy 2011-11-30 8:10 PM
 (phpMdYPT6PM.jpg) (phpMdYPT6PM.jpg)
 (phpJvAFMtPM.jpg) (phpJvAFMtPM.jpg)
 (phpHAR29IPM.jpg) (phpHAR29IPM.jpg)
Attachments
----------------
phpMdYPT6PM.jpg (67KB - 363 downloads)
phpJvAFMtPM.jpg (71KB - 366 downloads)
phpHAR29IPM.jpg (66KB - 341 downloads)
|
|
| |
|
Expert
Posts: 2996
Location: Sept. 1958 | old mopar guy - 2011-11-30 8:07 PM
Matt.Here,s a recent photo, The car getting old we restored it almost 30 years ago but its very solid, the engine is a little tired, and the 1980"s incorrect interior is still nice but the seats are starting to yellow & sag so I am planning on doing alot of the car over . Even a possible color change, my interior shop has already ordered a new top , But its a great car and i love it! I can't believe i have it so long! Time flies. Happy Motoring! Victor..
Nice, thanks for the photos. Sounds like you owned it for a long time, you don't look like you could have owned it all those years, you must have bought it young. Keep us posted on the work your doing to her. I like the color. |
|
| |
|
Veteran
Posts: 229
Location: georgia | Victor, my 58 Plymouth convertible has the same wheel covers,they were on it when I bought it 8years ago.what did they come off of? Thanks Chad |
|
| |
|
Expert
Posts: 1508
Location: new york | I bought the car when I was 22 and I'm going on 50, I was very into doing the original thing back than now i prefer to do it my way.as an answer to the question above I put the hub caps on ,there 1973 Plymouth satellite sebring caps. I like them almost as much as a 57 Plymouth cap. Happy motoring! Victor. |
|
| |
|
Location: Parts Unknown | Victor,
Is the color of this car of yours close to original ?
|
|
| |
|
Board Moderator & Exner Expert 10K+
Location: .Norfolk..Mafia.. ,England UK | Hi Matt..
I,m real pleased to see you finally restoring this Rag Top.. I wish i knew the real condition of it before i passed the Info to you , as it didnt appear that bad from 2 feet away, I guess when you strip down you get the real Picture on condition, Still you have a Real " Needle in a Haystack " Plymouth and should be proud, Please keep the Updates regular , i am pleased to see you progress and i know when you finally finish the restore you will feel Proud..
Clive |
|
| |
|
Expert
Posts: 2996
Location: Sept. 1958 | Rebels-59 Coronet - 2011-12-02 3:19 PM
Hi Matt..
I,m real pleased to see you finally restoring this Rag Top.. I wish i knew the real condition of it before i passed the Info to you , as it didnt appear that bad from 2 feet away, I guess when you strip down you get the real Picture on condition, Still you have a Real " Needle in a Haystack " Plymouth and should be proud, Please keep the Updates regular , i am pleased to see you progress and i know when you finally finish the restore you will feel Proud..
Clive
Thanks Clive. I wouldn't have this car if it wasn't for your help. Yeah, it needs everything and then some, but that's really the only way I'll be happy with a car is if it's all gone through. I am updating this thread regular now, I am working on it on average about 15 hours a week. |
|
| |
|
Expert
Posts: 2996
Location: Sept. 1958 | Within the last couple days, I got the patch from the kick panel area made up and fitting good. I had to patch the patch panel. Just need to weld it in place.
 (1958 Plymouth Convertible Photos 374.jpg) (1958 Plymouth Convertible Photos 374.jpg)
 (1958 Plymouth Convertible Photos 375.jpg) (1958 Plymouth Convertible Photos 375.jpg)
 (1958 Plymouth Convertible Photos 376.jpg) (1958 Plymouth Convertible Photos 376.jpg)
Attachments
----------------
1958 Plymouth Convertible Photos 374.jpg (106KB - 347 downloads)
1958 Plymouth Convertible Photos 375.jpg (108KB - 342 downloads)
1958 Plymouth Convertible Photos 376.jpg (101KB - 344 downloads)
|
|
| |
|
Expert
Posts: 2996
Location: Sept. 1958 | This evening I got the kick panel area welded up and smoothed out.
 (1958 Plymouth Convertible Photos 377.jpg) (1958 Plymouth Convertible Photos 377.jpg)
Attachments
----------------
1958 Plymouth Convertible Photos 377.jpg (103KB - 317 downloads)
|
|
| |
|
Location: Parts Unknown | Geesh ! When you first shared pix of this car, I thought "That's a pretty nice car"
It is almost bad enough to make my DeSoto look rust free ! 
OK, ... not quite. But it sure does need some *deep* work. Wow !
Coming along nicely, though.
|
|
| |
|
Expert
Posts: 2996
Location: Sept. 1958 | Doctor DeSoto - 2011-12-04 10:36 PM
Geesh ! When you first shared pix of this car, I thought "That's a pretty nice car"
It is almost bad enough to make my DeSoto look rust free !
OK, ... not quite. But it sure does need some *deep* work. Wow !
Coming along nicely, though.
Thank you Brent. I know what Syracuse can do to cars, I'm from there, but moved away when I was about 4. My father's cars were not good, like his 62 Bonneville Conv, he would have to "bondo up" the lower part of it about every year. My mother's parents had a 54 Plymouth and by 1960, sitting in the car looking down they could see the road. |
|
| |
|
Expert
Posts: 2996
Location: Sept. 1958 | Here are some photos of the patch I made for the lower kick panel area on the passenger side. Had to also patch the patch I used. Also, I have been working on the replacement floor, but still got much to do there. Lots of work!
Edited by christine-lover 2012-02-24 7:59 PM
 (1958 Plymouth Convertible Photos 383.JPG) (1958 Plymouth Convertible Photos 383.JPG)
 (1958 Plymouth Convertible Photos 384.JPG) (1958 Plymouth Convertible Photos 384.JPG)
 (1958 Plymouth Convertible Photos 390.jpg) (1958 Plymouth Convertible Photos 390.jpg)
Attachments
----------------
1958 Plymouth Convertible Photos 383.JPG (110KB - 372 downloads)
1958 Plymouth Convertible Photos 384.JPG (125KB - 380 downloads)
1958 Plymouth Convertible Photos 390.jpg (122KB - 367 downloads)
|
|
| |
|
Expert
Posts: 2996
Location: Sept. 1958 | This is where I am now. I am going to patch the donor floor I have, repair some areas and install it into the convertible.
 (1958 Plymouth Convertible Photos 391.jpg) (1958 Plymouth Convertible Photos 391.jpg)
 (1958 Plymouth Convertible Photos 392.jpg) (1958 Plymouth Convertible Photos 392.jpg)
Attachments
----------------
1958 Plymouth Convertible Photos 391.jpg (123KB - 379 downloads)
1958 Plymouth Convertible Photos 392.jpg (145KB - 377 downloads)
|
|
| |
|
Regular
Posts: 74
Location: Falicon 06 France | Very impressive work !!!! |
|
| |
|

Regular
Posts: 74
Location: San Antonio,Texas | Wow what a great car great work too, I likr the way you pulled the floor complete at all the factory seams ,gonna look very clena when your done with her. |
|
| |
|
Expert
Posts: 2996
Location: Sept. 1958 | Thank you. You are doing quite a job on your 58 too. Yeah, I am hiding any welding I do, even if it's underneath the vehicle. And will spotweld panels together where it's possible. |
|
| |
|
Expert
Posts: 2996
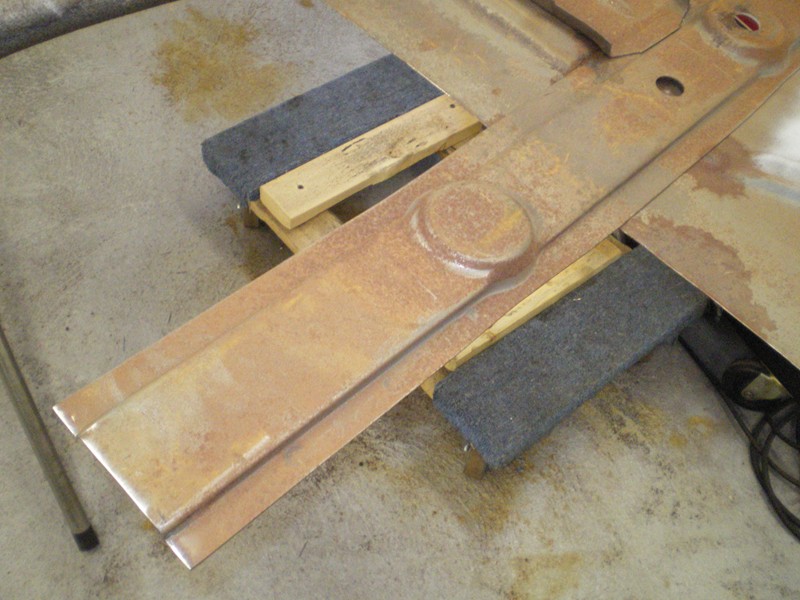
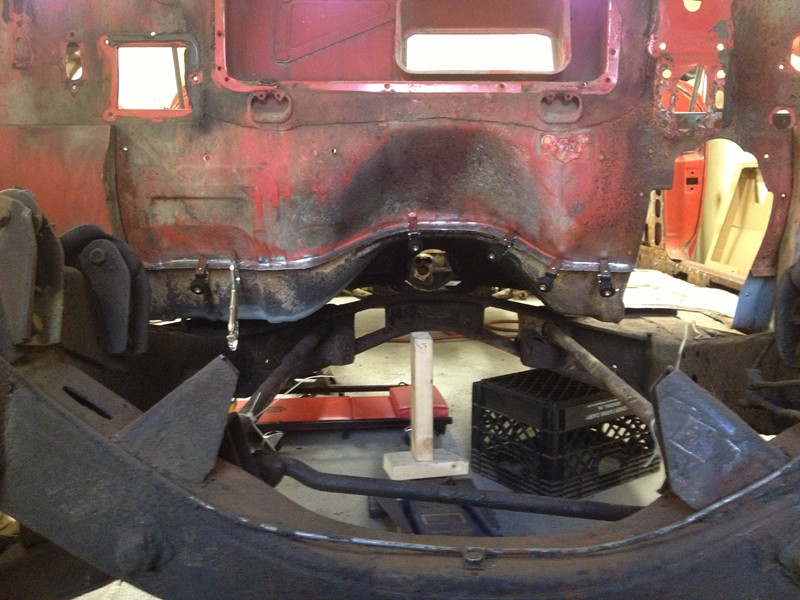
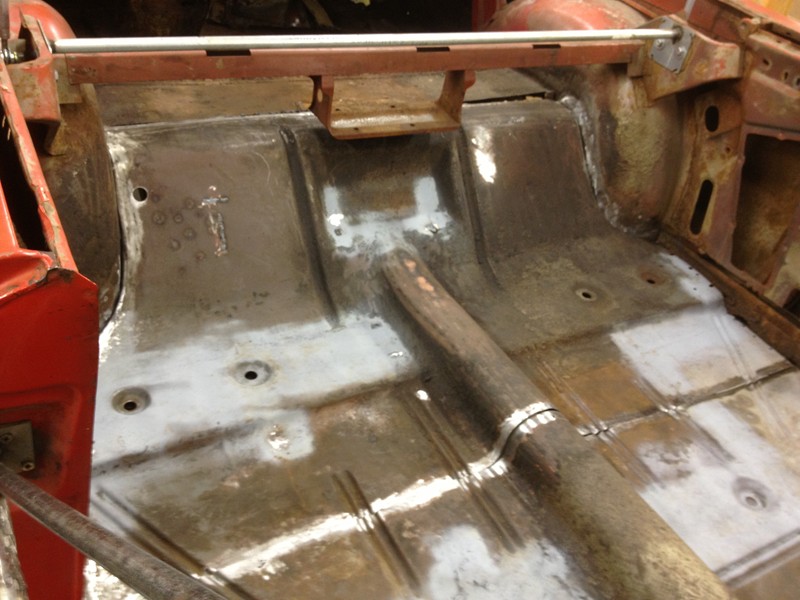
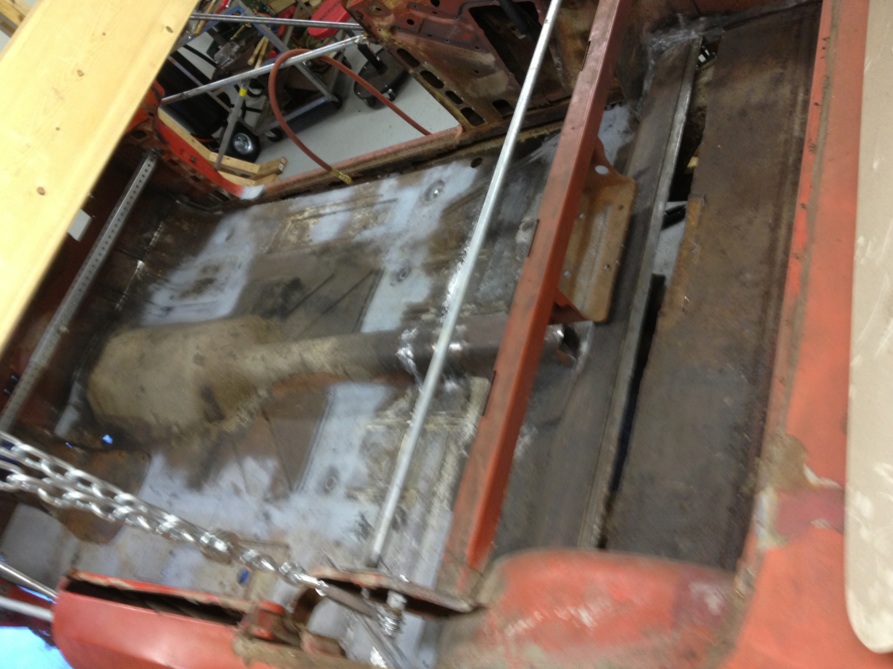
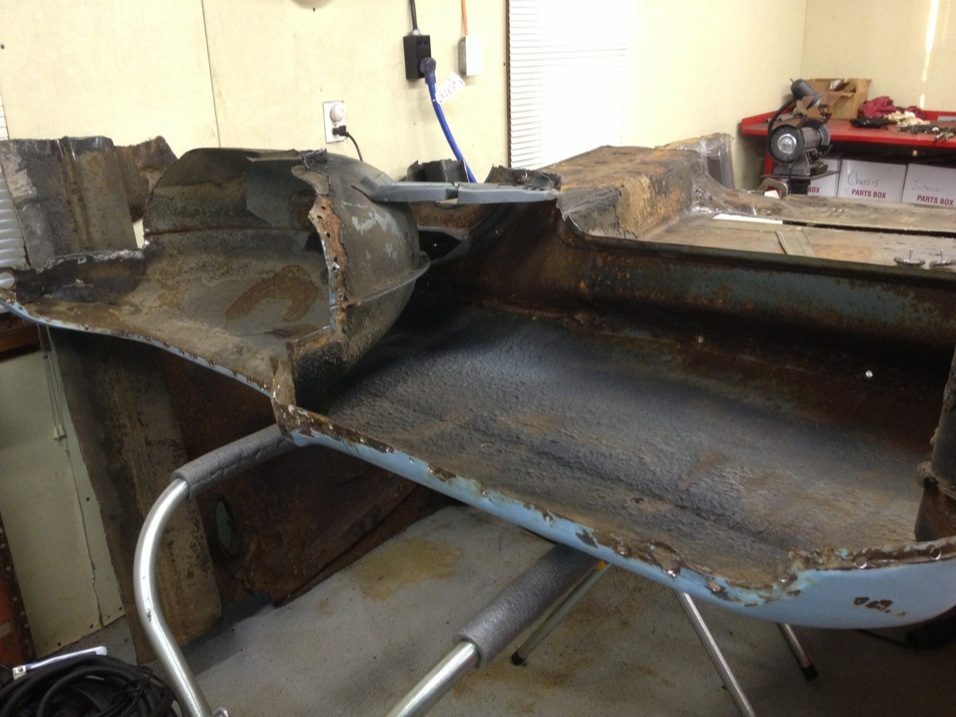
Location: Sept. 1958 | I've been working on the floor. It had some damage to it on the passenger side. Had to remove the rear outrigger, repair it, and remove some dents in the floor, then reinstall. Also, 4 dr sdn cars had the rear part of the trans tunnel pounded down at the factory, so I had to pound them out.
 (1958 Plymouth Convertible Photos 394.jpg) (1958 Plymouth Convertible Photos 394.jpg)
 (1958 Plymouth Convertible Photos 395.jpg) (1958 Plymouth Convertible Photos 395.jpg)
 (1958 Plymouth Convertible Photos 397.jpg) (1958 Plymouth Convertible Photos 397.jpg)
 (1958 Plymouth Convertible Photos 398.jpg) (1958 Plymouth Convertible Photos 398.jpg)
 (1958 Plymouth Convertible Photos 399.jpg) (1958 Plymouth Convertible Photos 399.jpg)
 (1958 Plymouth Convertible Photos 400.jpg) (1958 Plymouth Convertible Photos 400.jpg)
 (1958 Plymouth Convertible Photos 401.jpg) (1958 Plymouth Convertible Photos 401.jpg)
Attachments
----------------
1958 Plymouth Convertible Photos 394.jpg (136KB - 343 downloads)
1958 Plymouth Convertible Photos 395.jpg (138KB - 356 downloads)
1958 Plymouth Convertible Photos 397.jpg (127KB - 357 downloads)
1958 Plymouth Convertible Photos 398.jpg (115KB - 369 downloads)
1958 Plymouth Convertible Photos 399.jpg (93KB - 353 downloads)
1958 Plymouth Convertible Photos 400.jpg (85KB - 350 downloads)
1958 Plymouth Convertible Photos 401.jpg (121KB - 358 downloads)
|
|
| |
|
Expert
Posts: 2996
Location: Sept. 1958 | The inner wheelhouse area on both sides will need patching.
 (1958 Plymouth Convertible Photos 402.jpg) (1958 Plymouth Convertible Photos 402.jpg)
Attachments
----------------
1958 Plymouth Convertible Photos 402.jpg (135KB - 360 downloads)
|
|
| |
|
Expert
Posts: 2996
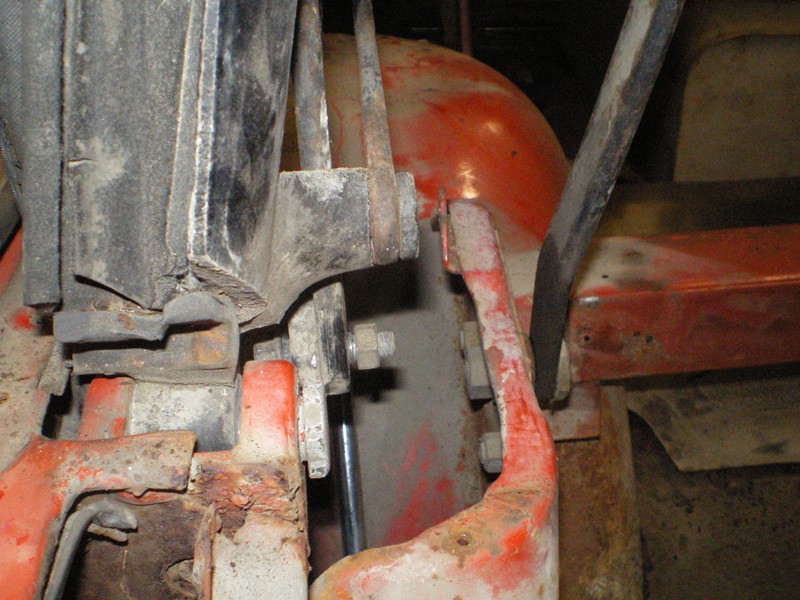
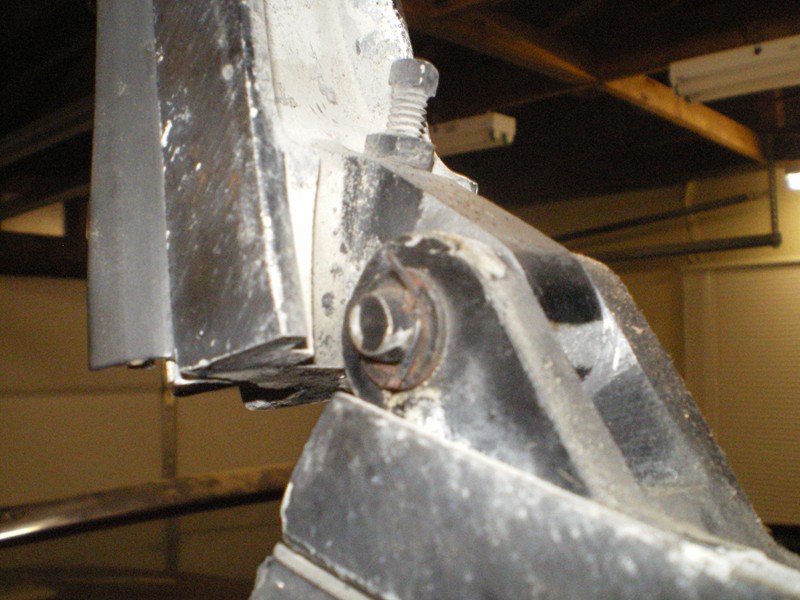
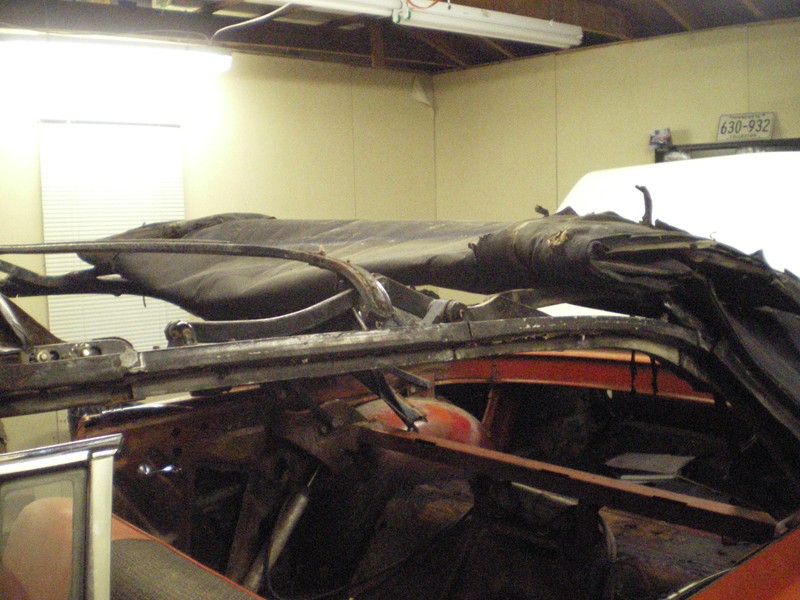
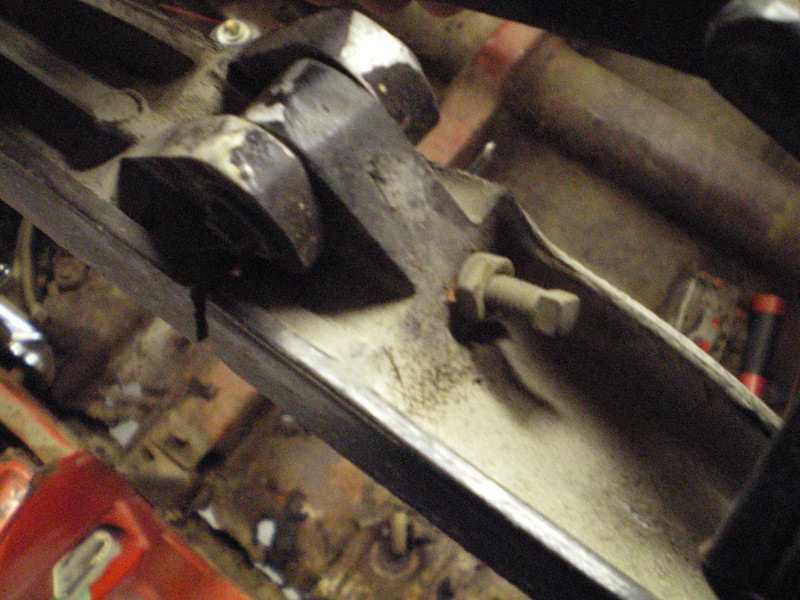
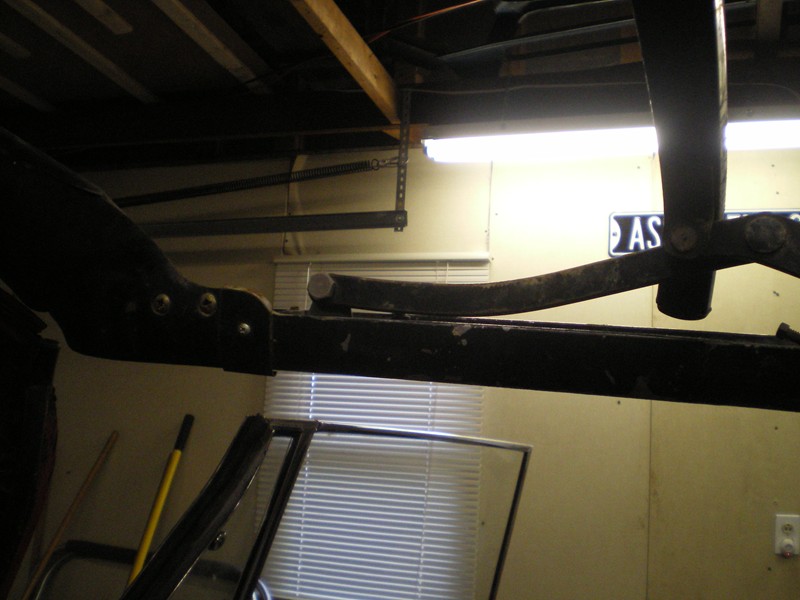
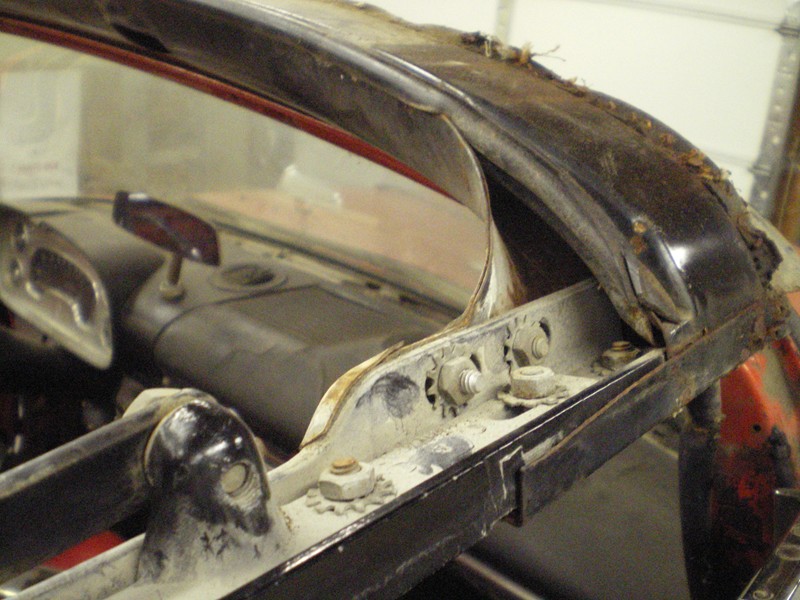
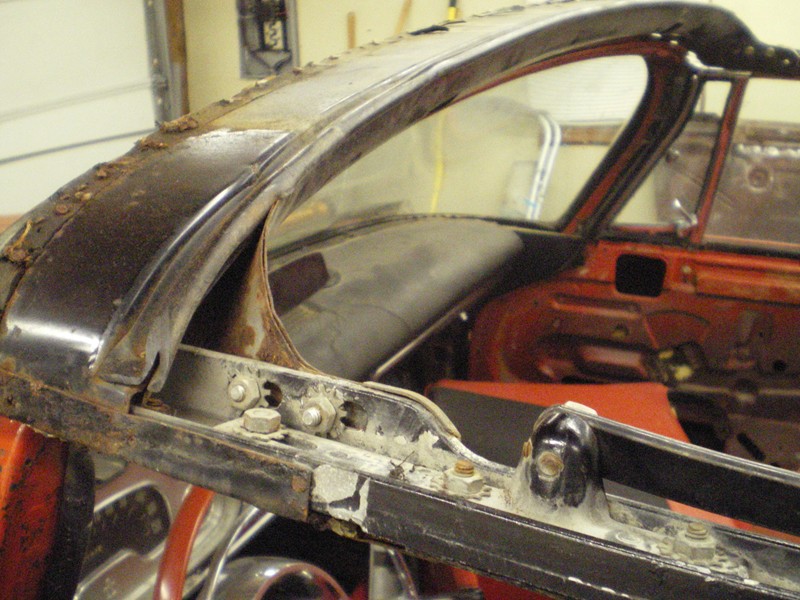
Location: Sept. 1958 | Original top frame photos, per member raffaplymouth.
 (1958 Plymouth Convertible Photos 161.jpg) (1958 Plymouth Convertible Photos 161.jpg)
 (1958 Plymouth Convertible Photos 164.jpg) (1958 Plymouth Convertible Photos 164.jpg)
 (1958 Plymouth Convertible Photos 173.jpg) (1958 Plymouth Convertible Photos 173.jpg)
 (1958 Plymouth Convertible Photos 175.jpg) (1958 Plymouth Convertible Photos 175.jpg)
 (1958 Plymouth Convertible Photos 176.jpg) (1958 Plymouth Convertible Photos 176.jpg)
 (1958 Plymouth Convertible Photos 183.jpg) (1958 Plymouth Convertible Photos 183.jpg)
 (1958 Plymouth Convertible Photos 193.jpg) (1958 Plymouth Convertible Photos 193.jpg)
 (1958 Plymouth Convertible Photos 194.jpg) (1958 Plymouth Convertible Photos 194.jpg)
Attachments
----------------
1958 Plymouth Convertible Photos 161.jpg (139KB - 377 downloads)
1958 Plymouth Convertible Photos 164.jpg (112KB - 352 downloads)
1958 Plymouth Convertible Photos 173.jpg (129KB - 351 downloads)
1958 Plymouth Convertible Photos 175.jpg (146KB - 364 downloads)
1958 Plymouth Convertible Photos 176.jpg (138KB - 365 downloads)
1958 Plymouth Convertible Photos 183.jpg (87KB - 338 downloads)
1958 Plymouth Convertible Photos 193.jpg (129KB - 364 downloads)
1958 Plymouth Convertible Photos 194.jpg (143KB - 371 downloads)
|
|
| |
|
Expert
Posts: 2996
Location: Sept. 1958 | I've started patching the passenger side inner wheelhouse.
 (1958 Plymouth Convertible Photos 419.jpg) (1958 Plymouth Convertible Photos 419.jpg)
 (1958 Plymouth Convertible Photos 422.jpg) (1958 Plymouth Convertible Photos 422.jpg)
Attachments
----------------
1958 Plymouth Convertible Photos 419.jpg (142KB - 365 downloads)
1958 Plymouth Convertible Photos 422.jpg (116KB - 393 downloads)
|
|
| |
|
Expert
Posts: 2996
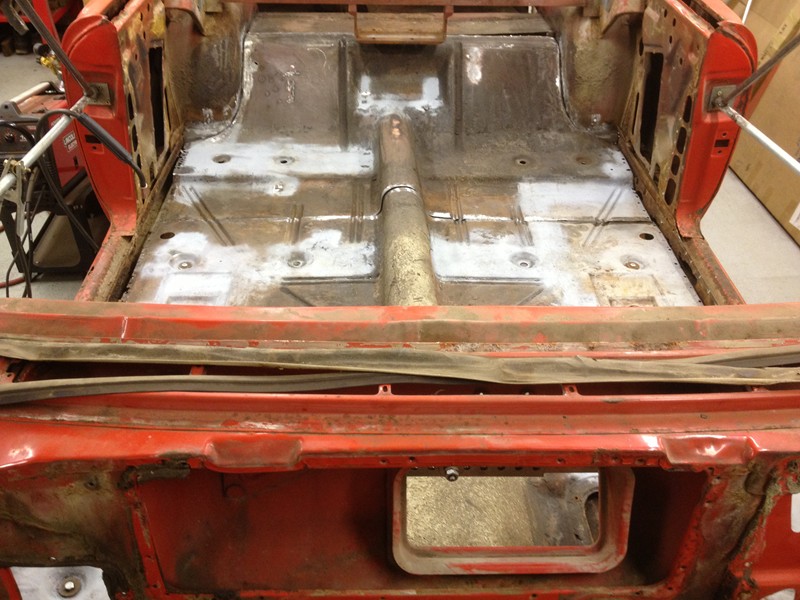
Location: Sept. 1958 | Today I installed the front floor section. The rear cut line will be centerline of the front edge of the rear seat support brace.
I included a photo of the body mount bolts, only one came out in one piece, very rusty.
 (1958 Plymouth Convertible Photos 475.jpg) (1958 Plymouth Convertible Photos 475.jpg)
 (1958 Plymouth Convertible Photos 476.jpg) (1958 Plymouth Convertible Photos 476.jpg)
 (1958 Plymouth Convertible Photos 477.jpg) (1958 Plymouth Convertible Photos 477.jpg)
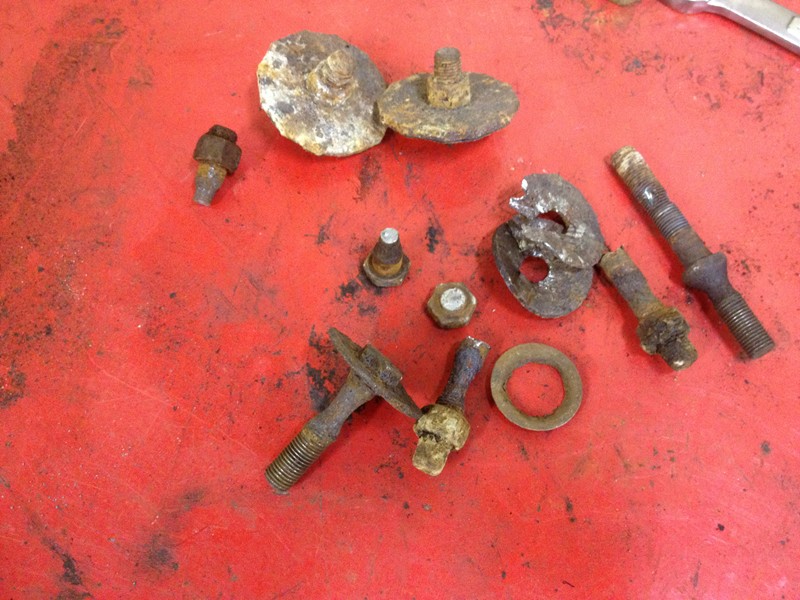 (1958 Plymouth Convertible Photos 478.jpg) (1958 Plymouth Convertible Photos 478.jpg)
Attachments
----------------
1958 Plymouth Convertible Photos 475.jpg (158KB - 363 downloads)
1958 Plymouth Convertible Photos 476.jpg (141KB - 342 downloads)
1958 Plymouth Convertible Photos 477.jpg (128KB - 346 downloads)
1958 Plymouth Convertible Photos 478.jpg (139KB - 339 downloads)
|
|
| |
|
Veteran
Posts: 114
Location: South Australia | Man,there realy is a lot of work in them rag tops...lucky they look so good finished!
Top stuff. |
|
| |
|
Expert
Posts: 2996
Location: Sept. 1958 | muddy - 2012-11-12 7:44 PM
Man,there realy is a lot of work in them rag tops...lucky they look so good finished!
Top stuff.
Thank you....yes, these cars are sooooo nice done! |
|
| |
|
Expert
Posts: 2996
Location: Sept. 1958 | Installed the #3 body mount on the passenger side.
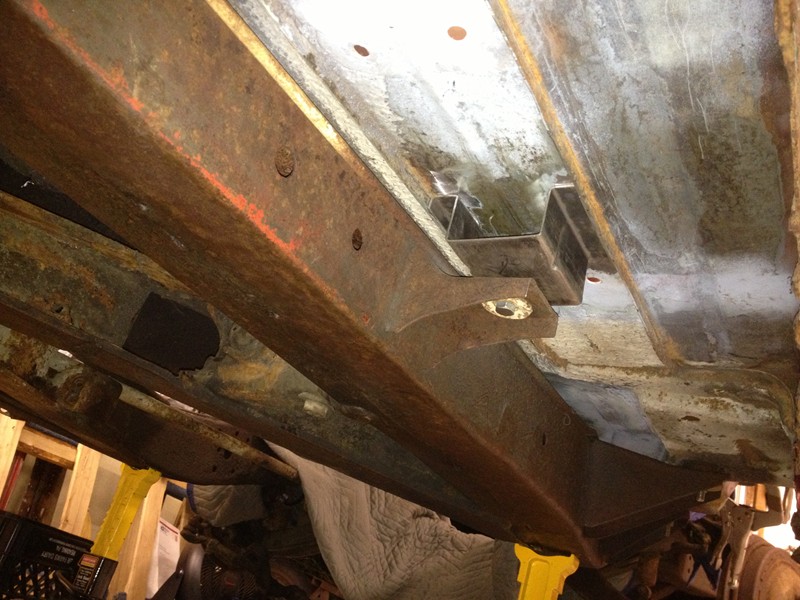 (1958 Plymouth Convertible Photos 475.jpg) (1958 Plymouth Convertible Photos 475.jpg)
 (1958 Plymouth Convertible Photos 476.jpg) (1958 Plymouth Convertible Photos 476.jpg)
 (1958 Plymouth Convertible Photos 477.jpg) (1958 Plymouth Convertible Photos 477.jpg)
Attachments
----------------
1958 Plymouth Convertible Photos 475.jpg (136KB - 337 downloads)
1958 Plymouth Convertible Photos 476.jpg (124KB - 320 downloads)
1958 Plymouth Convertible Photos 477.jpg (121KB - 329 downloads)
|
|
| |
|
Elite Veteran
Posts: 716
| I got nothing but tons of respect for you guys who put that much work into one of these cars. Wow.
Can't wait til you get her finished...I'm definitely coming up to see her in whatever show or event you have her in. |
|
| |
|
Expert
Posts: 2996
Location: Sept. 1958 | Thanks. A lot of inspiration on here like Raffa's Desoto and John's 59 Plymouth.
It's nice to see progress finally with this car, boosted my morale getting that floor section in. |
|
| |
|

Veteran
Posts: 118
Location: Kättilstorp Sweden | Impressive work.
Magnus |
|
| |
|
Expert 5K+
Posts: 7819
Location: Williams California | Excellent work, Matt!!
Did you make the third body mount, or was it something a suppllier offered?
I still have to do this, but I do have the '59 DeSoto to make measurements from.
---John
|
|
| |
|
Expert
Posts: 2996
Location: Sept. 1958 | Sideshow Bob on here...his pop made me these using my originals as patterns. He's a good friend of mine, he was the one who went to Minnesota with me to get this car and its parts car.
Another hard panels to get made up are going to those rockers. There's a lot of detail to them, even the inners. |
|
| |
|
Expert
Posts: 1508
Location: new york | Fantastic!!! Thats some job your doing! I am going to have to tear mine apart soon, not as much as you but super job! Can't wait to see you HAPPY MOTORING! Victor |
|
| |
|

Expert
Posts: 1728
Location: Fleetwood, Pa | Hey, that body mount looks familiar!! I'll have to tell my Pop you got them welded in....... |
|
| |
|
Extreme Veteran
Posts: 591
Location: West Chester, PA | Wow Matt, Things are really moving along in you garage! I don't ever recognize it! Keep up the good work! |
|
| |
|
Location: Parts Unknown | christine-lover - 2012-11-17 12:13 PM
Sideshow Bob on here...his pop made me these using my originals as patterns. He's a good friend of mine, he was the one who went to Minnesota with me to get this car and its parts car.
Another hard panels to get made up are going to those rockers. There's a lot of detail to them, even the inners.
======================================================
Talk w/ Big M. He had them made for his 59 and likely has the contact to do it again. Why re-invent the wheel ?
|
|
| |
|
Member
Posts: 32
| WOW!! That is a really cool car! Looks like you're doing a great job restoring it too!! Can't wait to see pics of it done!! |
|
| |
|
Expert
Posts: 2996
Location: Sept. 1958 | .
 (1958 Plymouth Convertible Photos 494.jpg) (1958 Plymouth Convertible Photos 494.jpg)
 (1958 Plymouth Convertible Photos 495.jpg) (1958 Plymouth Convertible Photos 495.jpg)
 (1958 Plymouth Convertible Photos 496.jpg) (1958 Plymouth Convertible Photos 496.jpg)
Attachments
----------------
1958 Plymouth Convertible Photos 494.jpg (113KB - 327 downloads)
1958 Plymouth Convertible Photos 495.jpg (138KB - 362 downloads)
1958 Plymouth Convertible Photos 496.jpg (135KB - 325 downloads)
|
|
| |
|
Expert
Posts: 1728
Location: Fleetwood, Pa | Glad to see you're back at it Matt.......... |
|
| |
|
Expert
Posts: 2996
Location: Sept. 1958 | Thanks Bob. Actually I had to take that panel back out, still need a little more metal finishing, but I just wanted to see how it would look with a solid floor. |
|
| |
|

Board Moderator & Exner Expert 10K+
Posts: 13065
Location: Southern Sweden - Sturkö island | Very impressive - you're gonna save her, that's for sure!!! |
|
| |
|
Expert
Posts: 3156
Location: NY & VT | Nice work! More than I'd want to get into, that's for sure. Makes my 58 look like a walk in the park. |
|
| |
|
New User
Posts: 1
| Hallo
Great work are anythin news about the resaturation? are you get some new pics.
Max |
|
| |
|
Expert
Posts: 2996
Location: Sept. 1958 | I am waiting on my grinder to get back so I can shrink some areas of the rear part of the floor before I install it into the car. Never tried to shrink metal this way but I got a 4 1/2" disc and will see how it goes. Doing it by a torch is overkill. Started to clean up the donor trunk floor, that will need areas of patching. You know the vehicle your restoring is so prone to rot that your best donor panels need patch panels. |
|
| |
|
Expert 5K+
Posts: 7819
Location: Williams California | Are you going to use a shrinking disc, Matt? If so, they do work wonders.
---John |
|
| |
|
Expert
Posts: 2996
Location: Sept. 1958 | Yeah John. Snap on guy today said my grinder should be back by next Friday. |
|
| |
|
Board Moderator & Exner Expert 10K+
Posts: 13065
Location: Southern Sweden - Sturkö island | Wait, wait - what is this??? Shrink disc, please explain further |
|
| |
|
Expert 5K+
Posts: 7819
Location: Williams California | Wiz, it's a serrated metal disc that is used instead of a grinding disc, it basically heats up high spots in the metal on a given panel, and shrinks the metal back. Maybe Matt can show a pic of the one he has bought. BTW Matt, thank you for the measurements on the ram mounts.
---John |
|
| |
|
Expert
Posts: 2996
Location: Sept. 1958 | Here's the eBay link to the one I bought:
http://www.ebay.com/itm/220792075020?redirect=mobile
Any tips on it you got John, using it on say 19 gauge metal?
Glad the measurements worked out. Your car is now nice and solid! Nice work! |
|
| |
|
Expert
Posts: 2996
Location: Sept. 1958 | I spent hours this weekend doing what I did last Sunday, drilling spotwelds in the donor trunk floor and the rear clip that I plan on using panels from. I got my grinder back last Friday, but didn't get the wrenches for it.
I am using 5/16" cutter from Blue Point. The hole saw cutter tool I use has a pointed awl, whereas the Blair one has a drill bit which at times walks. |
|
| |
|
Location: Sweden | Very nice work, Matt! I am eagerly watching your thread for progress, it inspires a lot to work on my own car. I love the icy pics where she is parked in the driveway among the trucks!
Edited by henricthornsund 2013-06-02 2:03 AM
|
|
| |
|
Expert
Posts: 2996
Location: Sept. 1958 | Thanks for the kind words Henric. There's a lot of inspiration on this site, it's helped me many times! This part of restoration is hard since a lot of this is new to me. Chassis and undercarriage restoration is what I'm looking forward too.
You should start a thread on your car. I'd love to see it! You have a convertible, correct? And do you own the hardtop in your avatar? |
|
| |
|
Location: Sweden | You are welcome, Matt. Yes, i really do admire your work, your car really landed in the right hands. The car on My avatar is sold to a fellow swedish Christine fan, very solid car without any repairs or needs of it. I sold the car to him about six months ago. I have now settled for a car that i think you are already familiar with; the black convertible that has been around on the forums for a while. The car is now registered and all here in Sweden and i have driven it a lot this far. We went to a big car show in Hässleholm in may 25th and everything has gone well this far. I have done a little work to it such as new wheel bearings, water pump, polishing and a nice set of bumper wings. I got the build record with the car and have done a bit of investigation by now. It was canyon gold with a white top originally with sport tone trim, power pack, tinted glass, power steering, padded dash and torqueflite. It needs a new floor but besides from that, she is quite healthy. Her panels, hood, doors and trunk are original and unpatched, besides the rear wheel arches, and her current paint is over 20 years old with no bubbles. My expectations were quite low about the car due to the Several short ownerships and negative comments about the car. So i was pleasentely surprised when i got the car. It Will be a Rolling resto, and i am very happy with the car. Right now i am trying to get hold of a new set of custom super cushions for her. I will start a thread on her in time, feels like i have already begun with this long post:) but soon she Will be viewable in members rides. Keep up the good work and talk to you soon. Best, Henric
Edited by henricthornsund 2013-06-02 4:46 PM
|
|
| |
|
Expert
Posts: 2996
Location: Sept. 1958 | Yes, I have seen that car on here many times. I'm glad it's better than what you were expecting. Sounds nice, bumper wings alone really make a 58 convertible look even more awesome, from its profile view the wings mirror the body shape and the aluminum Sportone just sets it off.
How far do you plan on going with restoration? Do you plan on repainting it in Canyon Gold? That's a seldom seen color for a convertible, can't say I've seen another. Black and red seem to be the most common. |
|
| |
|

Expert 5K+
Posts: 9874
Location: So. Cal | I have had success shrinking panels by using a mig welder and welding a small spot in the panel and dousing with water. It works quite well and is more controllable than an oxy-acetylene torch. Of course the blob must be ground off afterward. Let us know how well the 4.5" shrinking disc works when you get to try it out.
Edited by Powerflite 2013-06-02 8:43 PM
|
|
| |
|
Location: Sweden | Matt, no i have not seen one in gold either. And i searched the net also. I am planning to repaint her in the future. My first alternative is original canyon gold, the other is very tempting and it is toreador red like your own car. But i am planning on starting with the interior and floors, its not really rusty but it is incorrectly repaired with pieces from a closed car. A 58 is quite some car in red See this post http://dallas.craigslist.org/dal/cto/3833217390.html |
|
| |
|
Expert
Posts: 2996
Location: Sept. 1958 | Yeah, that is a nice one. Would love to have that as a driver until mine is finished. |
|
| |
|
Location: Sweden | Do you have a thread about your Dodge also? Would be fun to see it! |
|
| |
|
Expert
Posts: 2996
Location: Sept. 1958 | Dodge is here:
http://forwardlook.net/forums/forums/thread-view.asp?tid=41913 |
|
| |
|
Expert
Posts: 2996
Location: Sept. 1958 | Powerflite - 2013-06-02 8:42 PM
I have had success shrinking panels by using a mig welder and welding a small spot in the panel and dousing with water. It works quite well and is more controllable than an oxy-acetylene torch. Of course the blob must be ground off afterward. Let us know how well the 4.5" shrinking disc works when you get to try it out.
Thanks, I'll have to try that. I used the shrink disc, I need a longer bolt to hold the disc down, I had to shave off some of the rubber backing piece of it to fit on my grinder too. The little bit of it I used, I think it may work, fingers crossed. |
|
| |
|
Expert
Posts: 2996
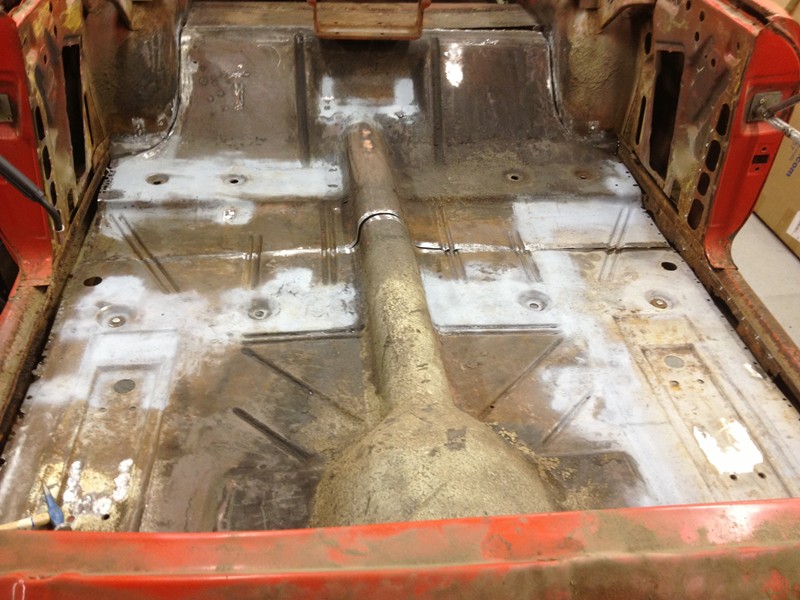
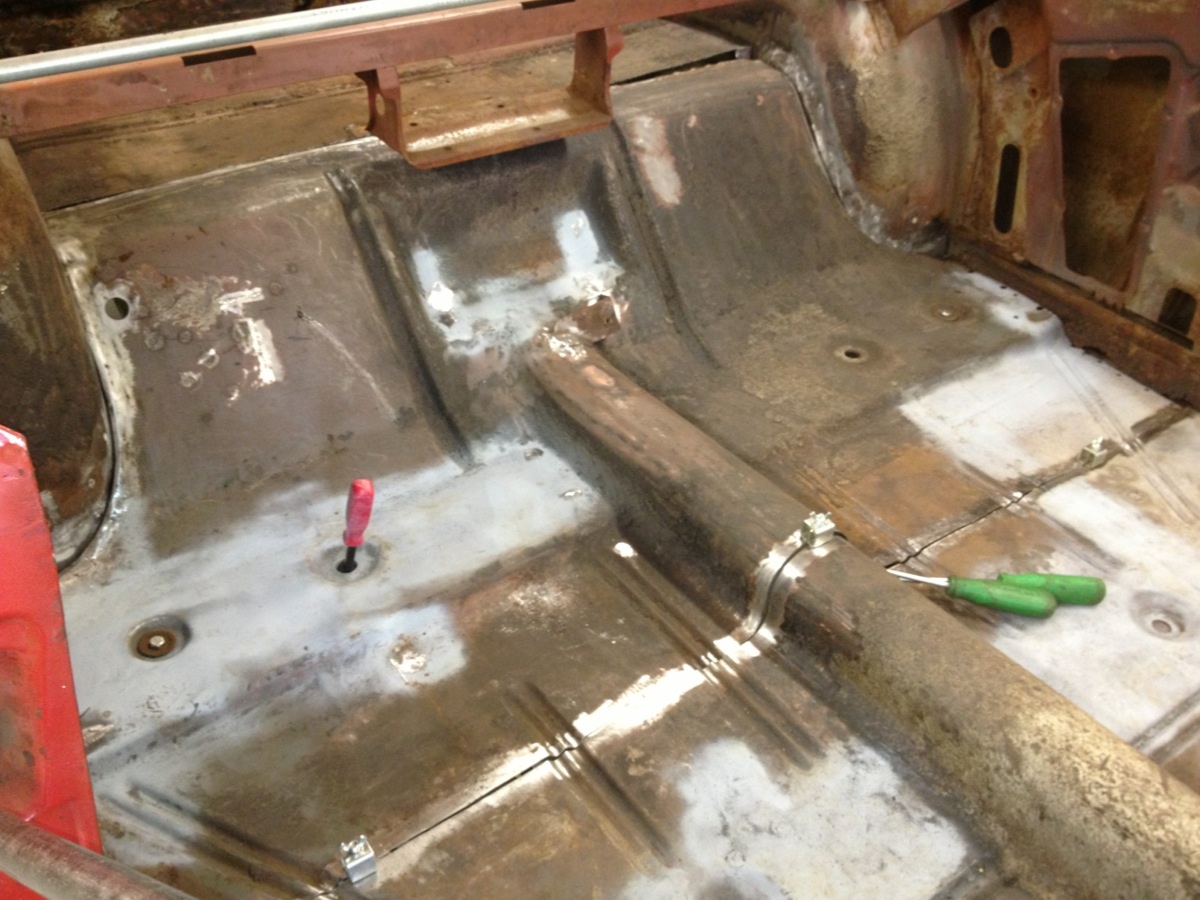
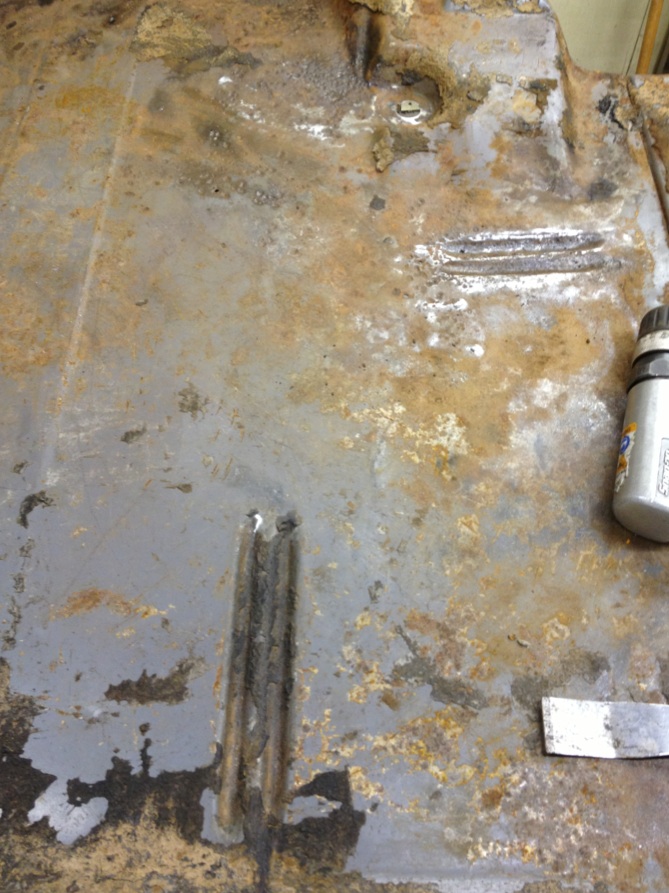
Location: Sept. 1958 | Today I worked on the Plymouth. Using my grinder with shrinking disc I worked out the oiling canning on the rear floor section. I got it back in the car, now to get it lined up and weld it in.
The convertible well drain hole is in the exact spot as on the vert floor as well as the holes for the wiring hold downs for the top motor.
Edited by christine-lover 2013-06-16 5:16 PM
 (image.jpg) (image.jpg)
Attachments
----------------
image.jpg (275KB - 291 downloads)
|
|
| |
|
Expert
Posts: 2996
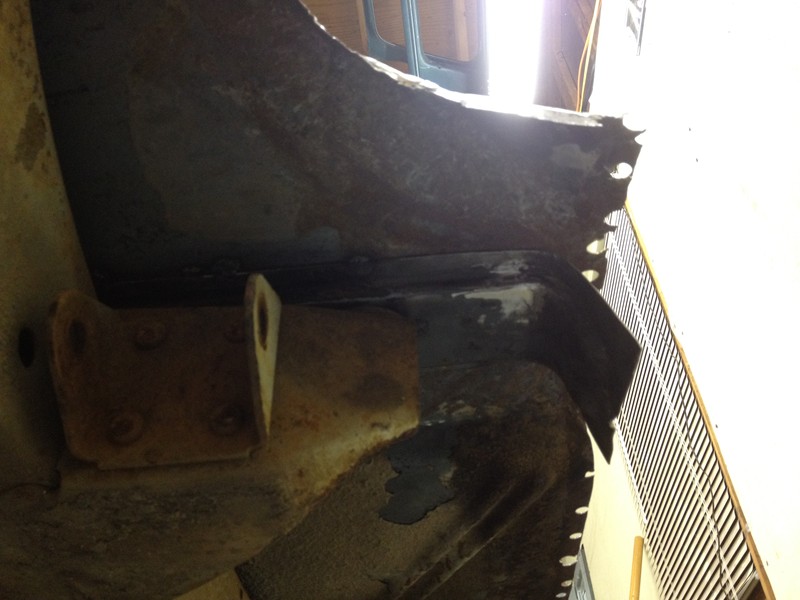
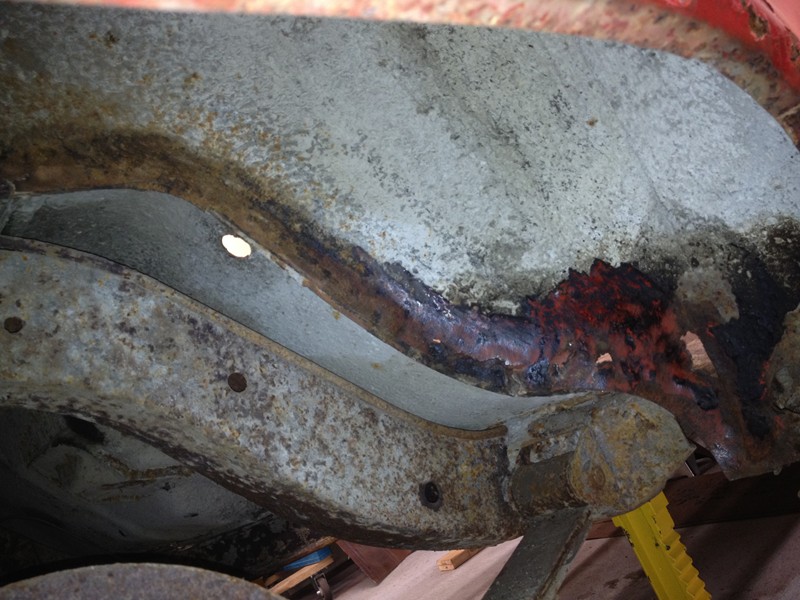
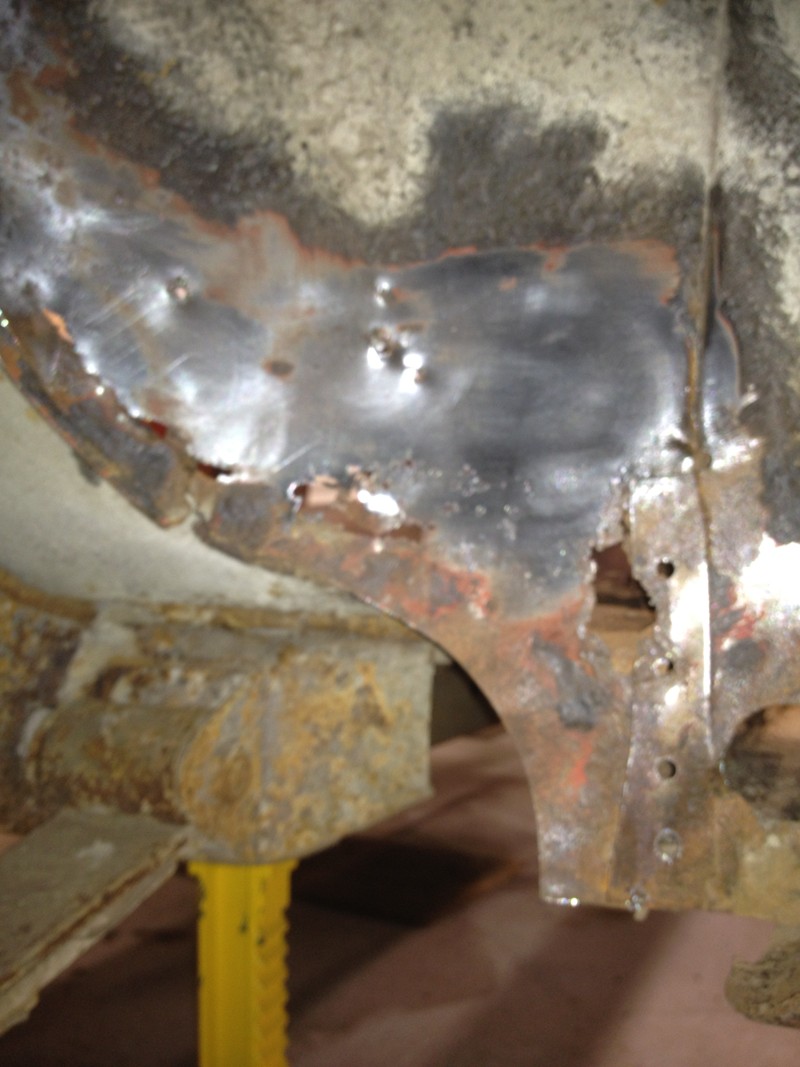
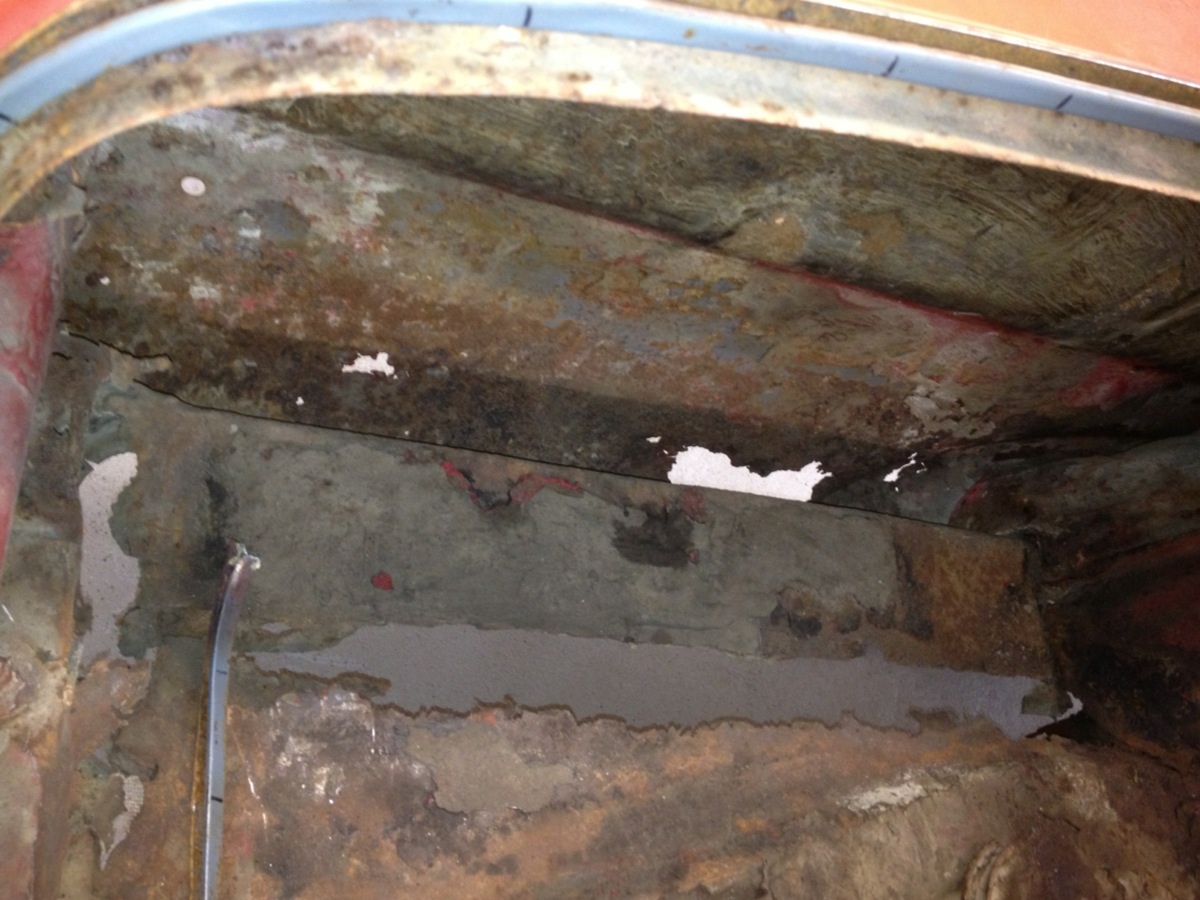
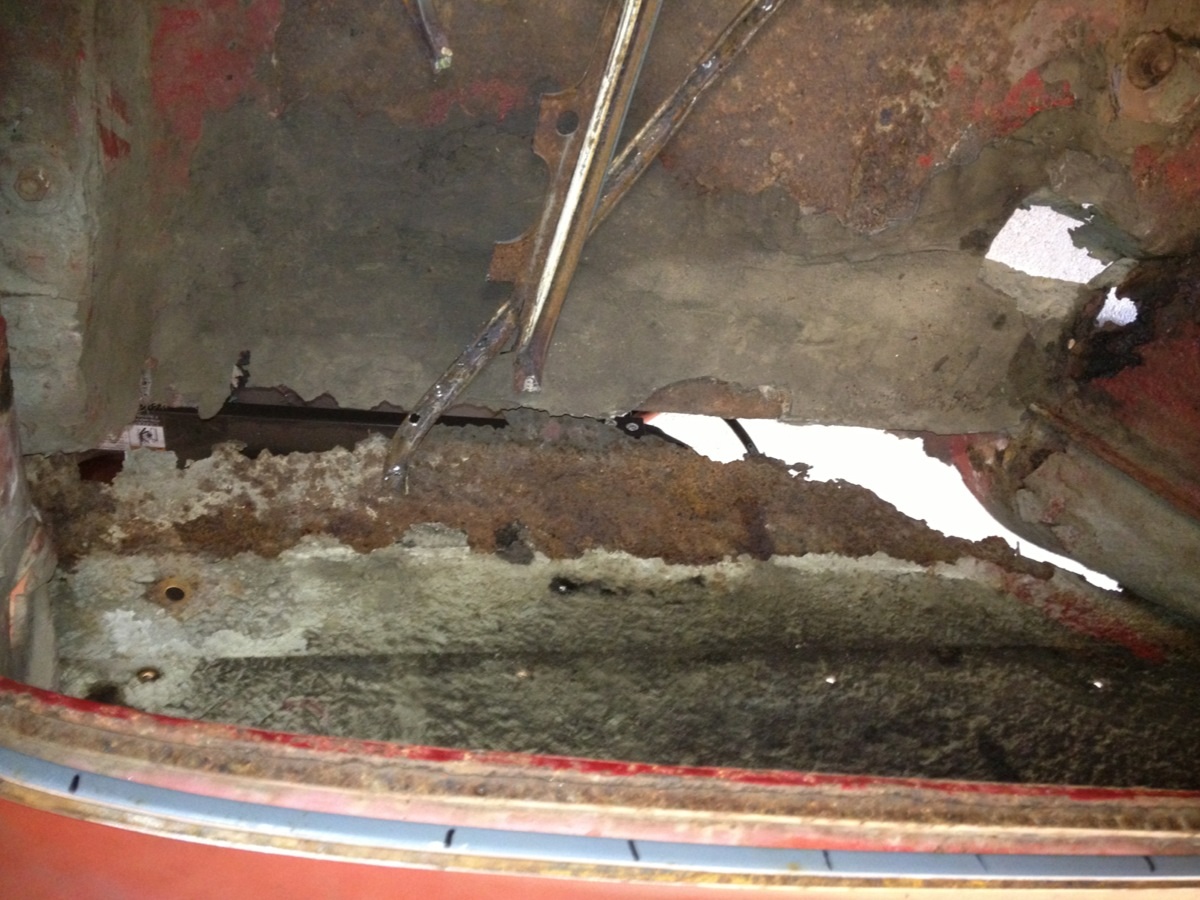
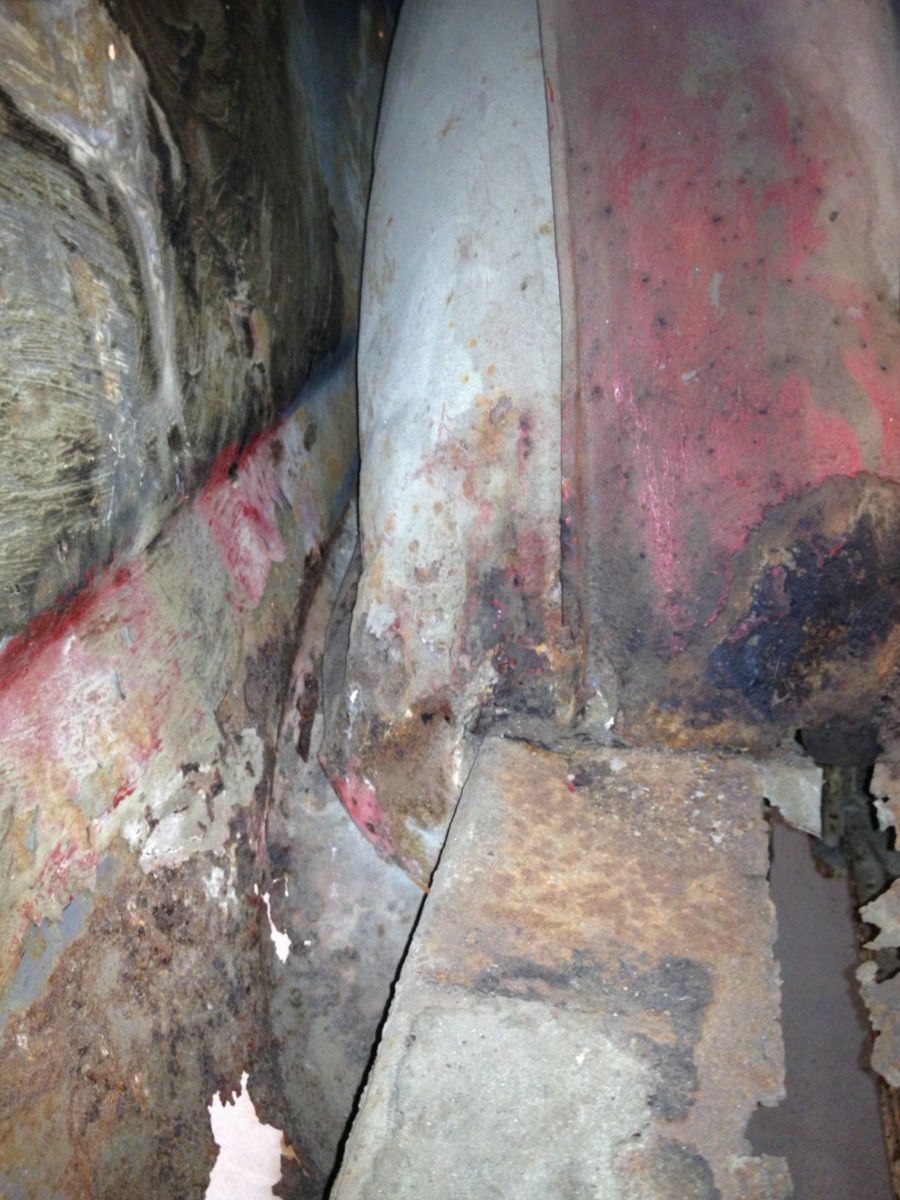
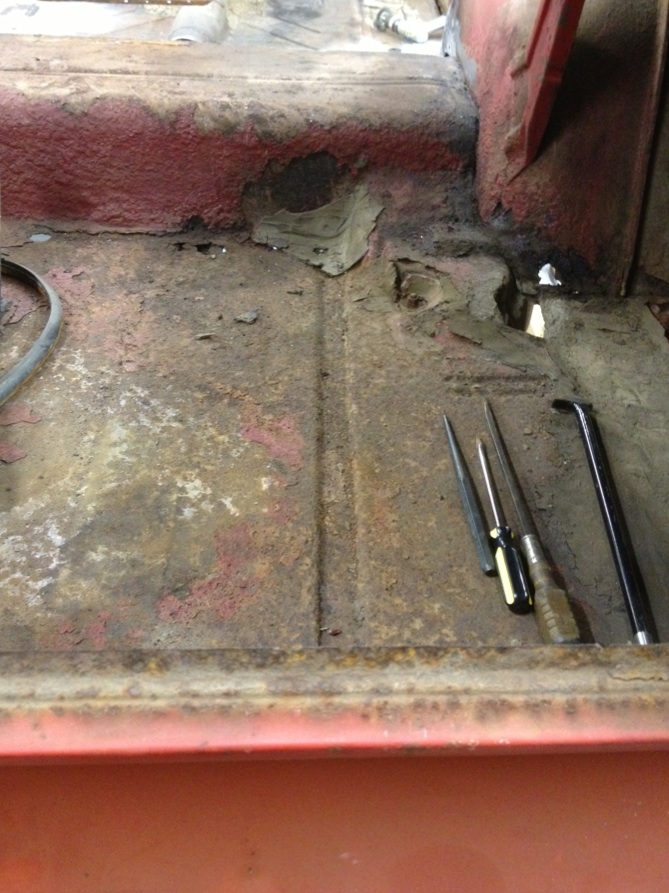
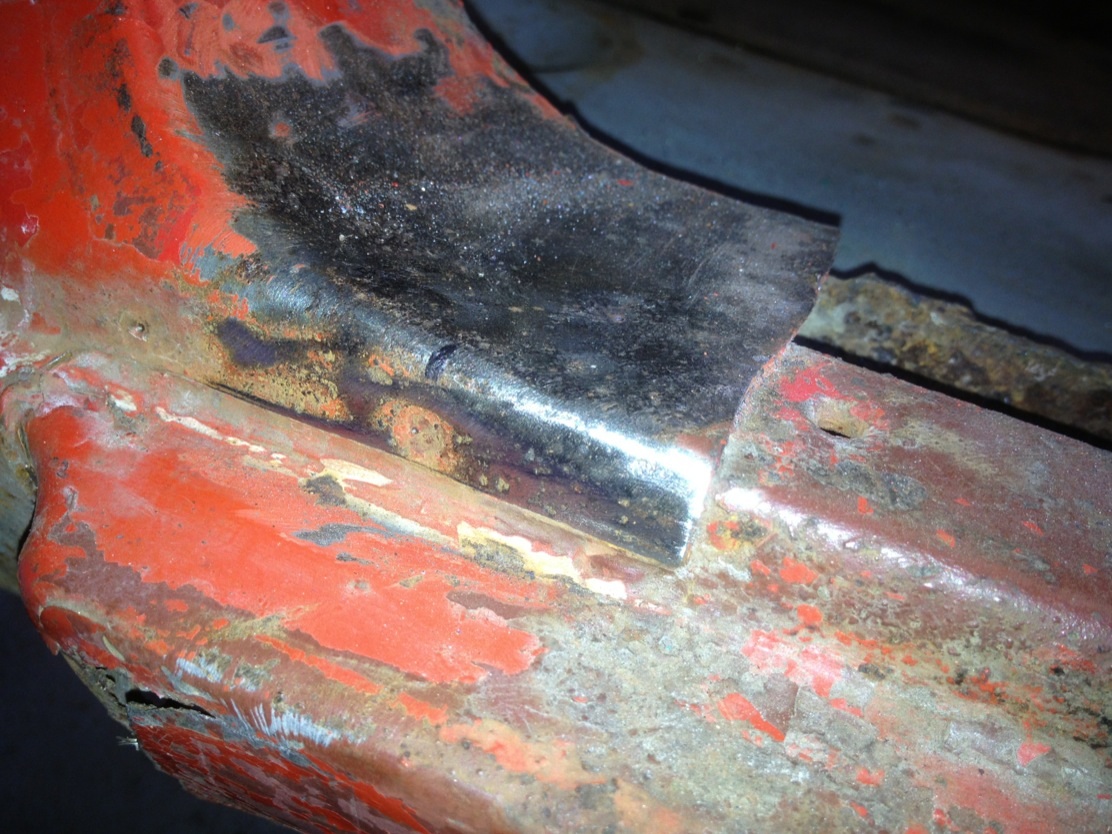
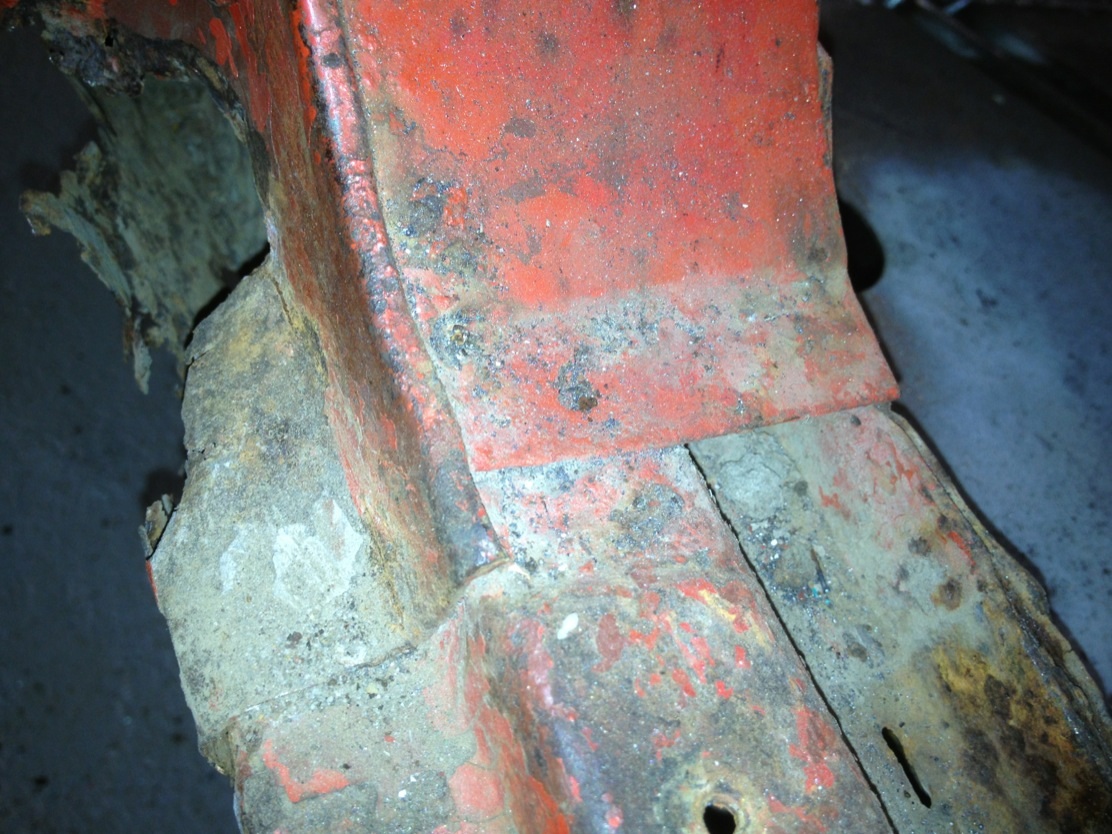
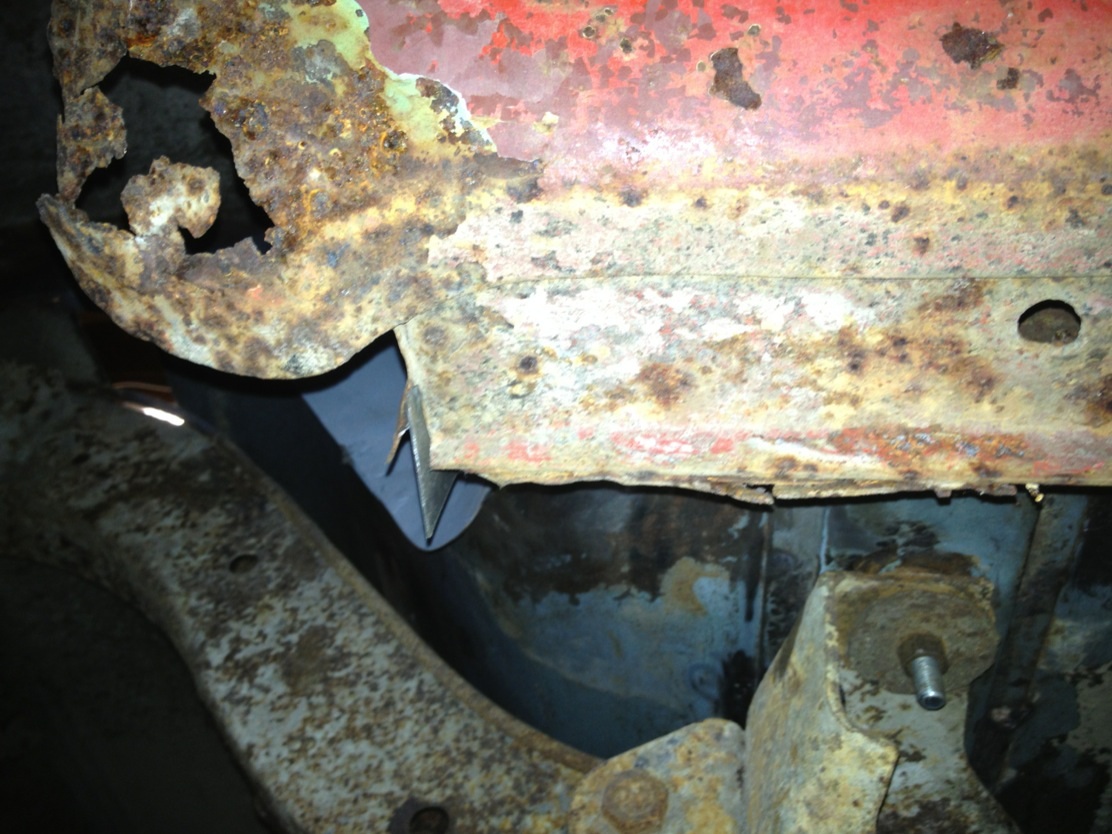
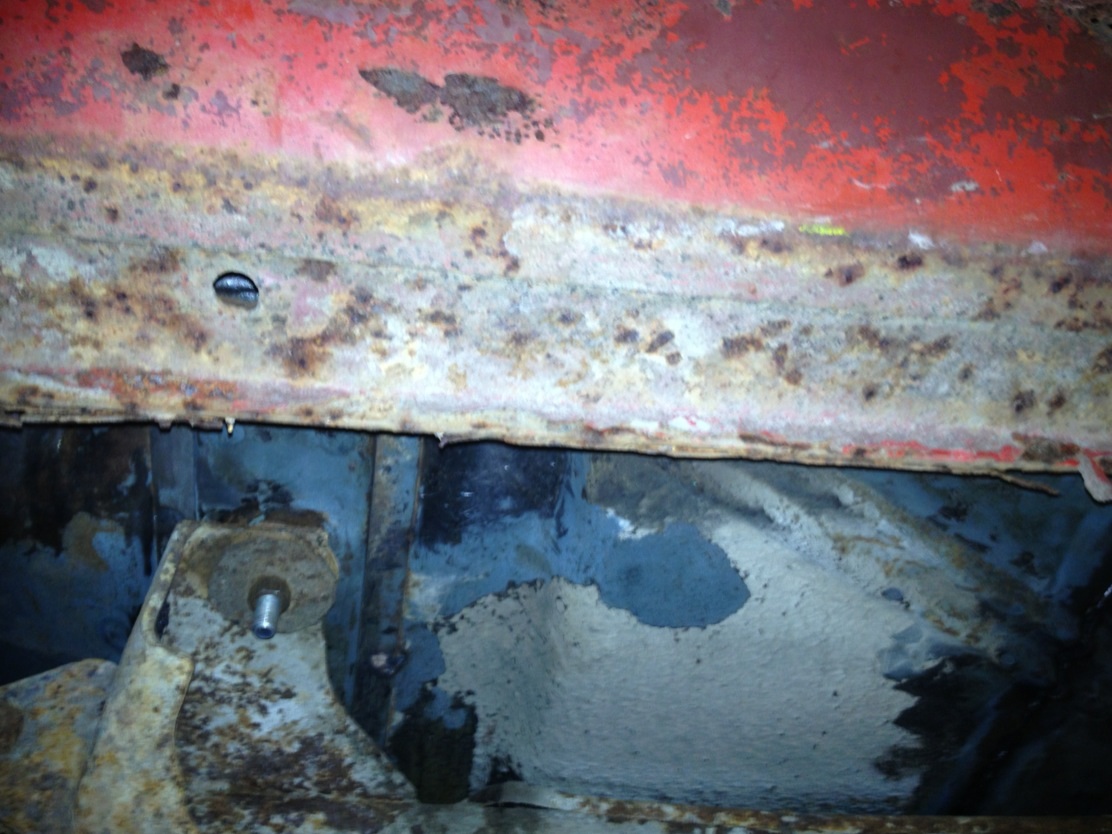
Location: Sept. 1958 | Here's some photos of the rusted and damaged metal in the trunk area. Hope none of you guys get tetanus from looking at these photos.
 (image.jpg) (image.jpg)
 (image.jpg) (image.jpg)
 (image.jpg) (image.jpg)
 (image.jpg) (image.jpg)
Attachments
----------------
image.jpg (263KB - 268 downloads)
image.jpg (299KB - 271 downloads)
image.jpg (314KB - 267 downloads)
image.jpg (312KB - 280 downloads)
|
|
| |
|
Expert
Posts: 2996
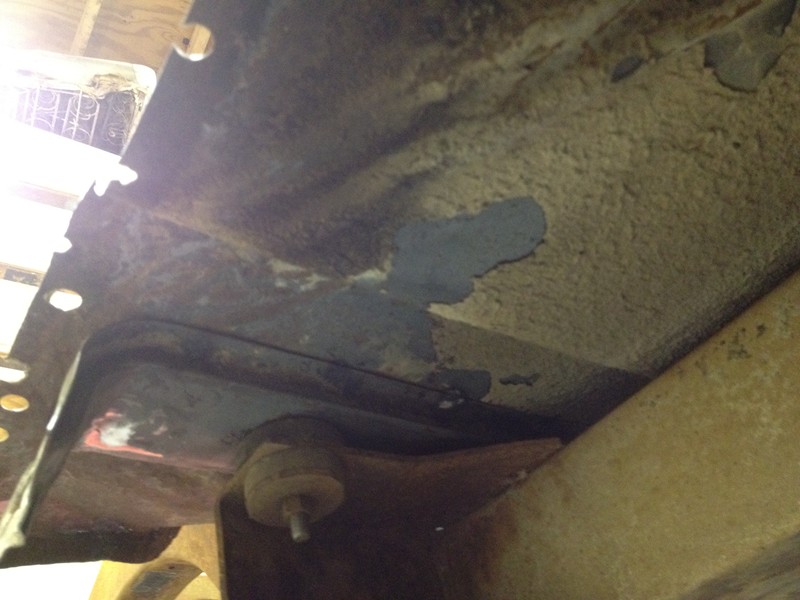
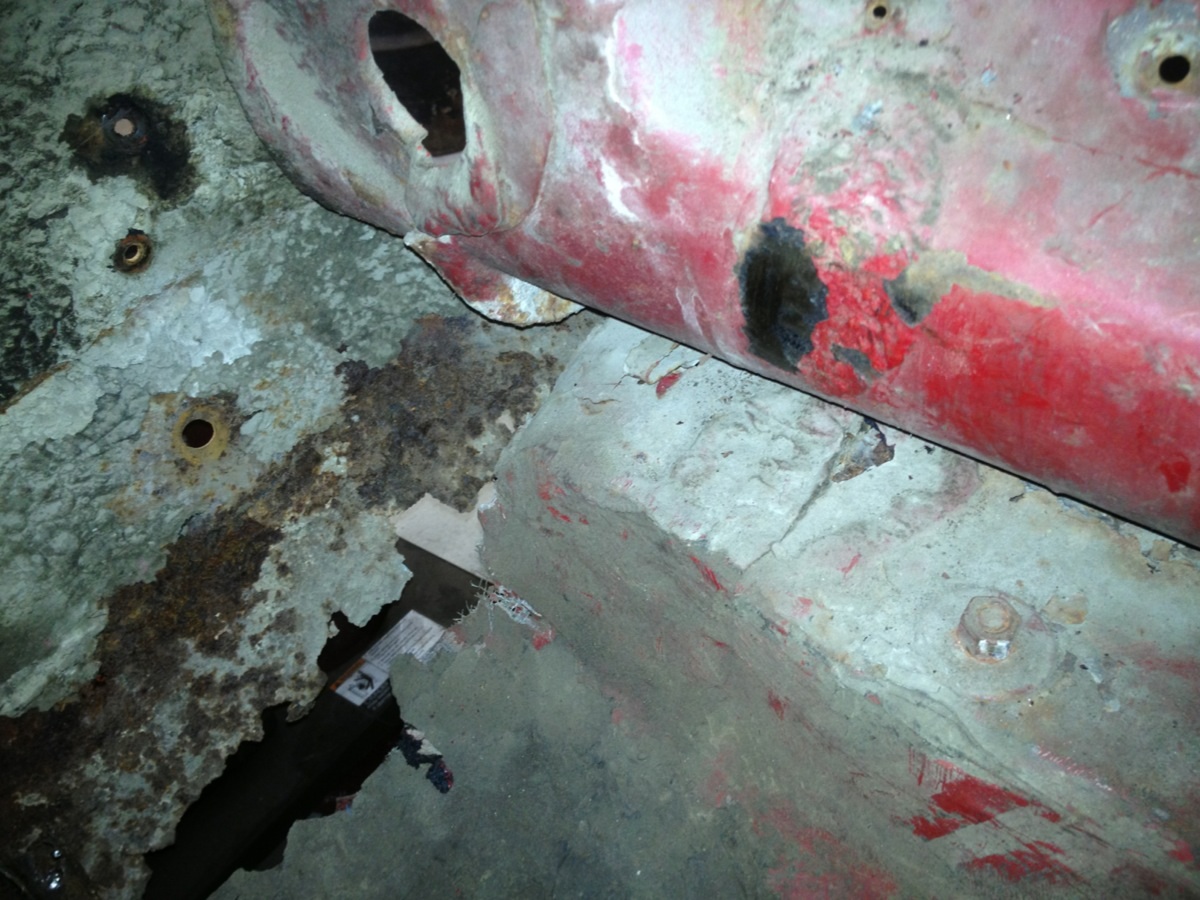
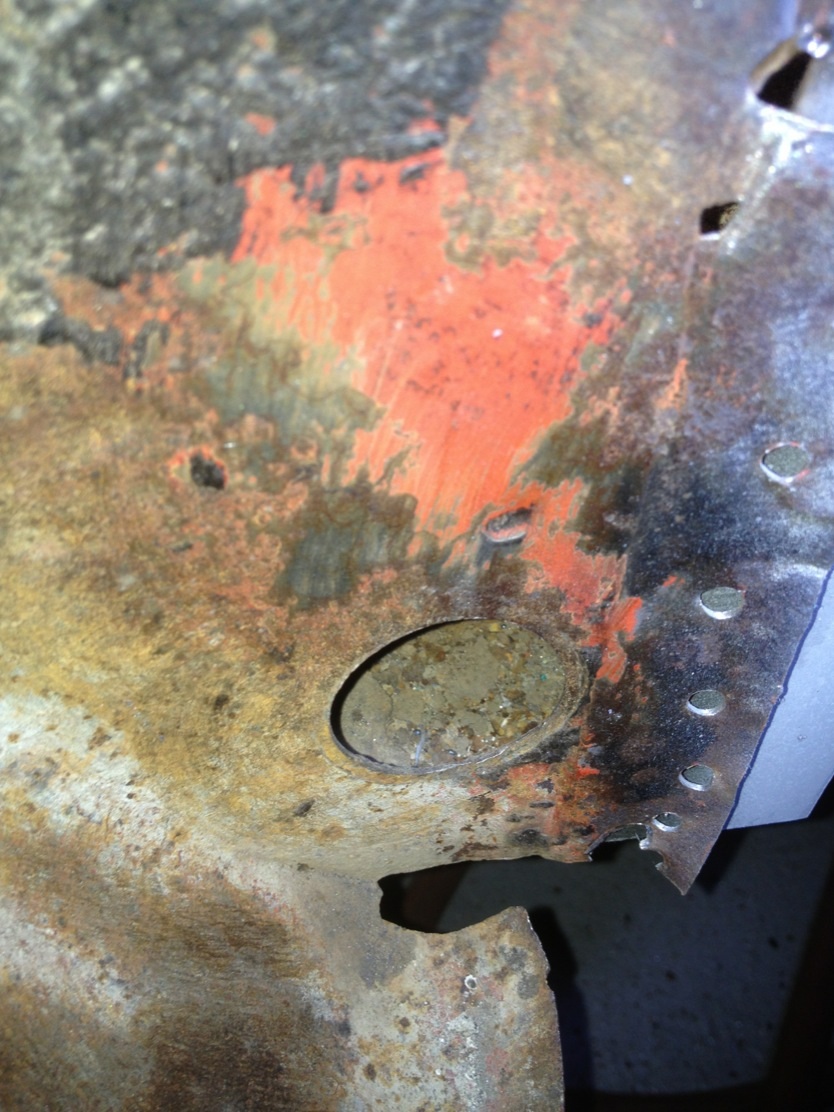
Location: Sept. 1958 | Here's a photo of the trunk area I received when the seller sent me a whole bunch of photos way back. The stuff between the trunk extension and quarter panel is concrete, it was on both sides.
 (image.jpg) (image.jpg)
Attachments
----------------
image.jpg (272KB - 276 downloads)
|
|
| |
|
Expert
Posts: 2996
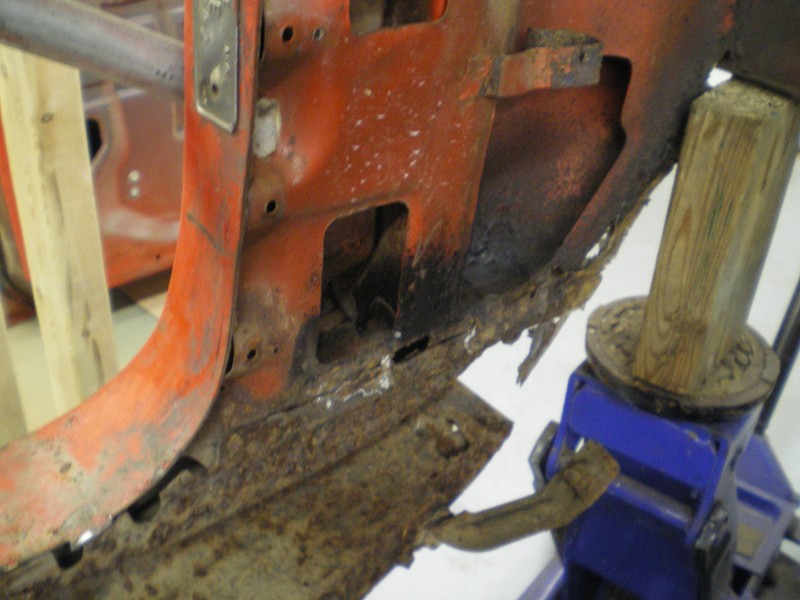
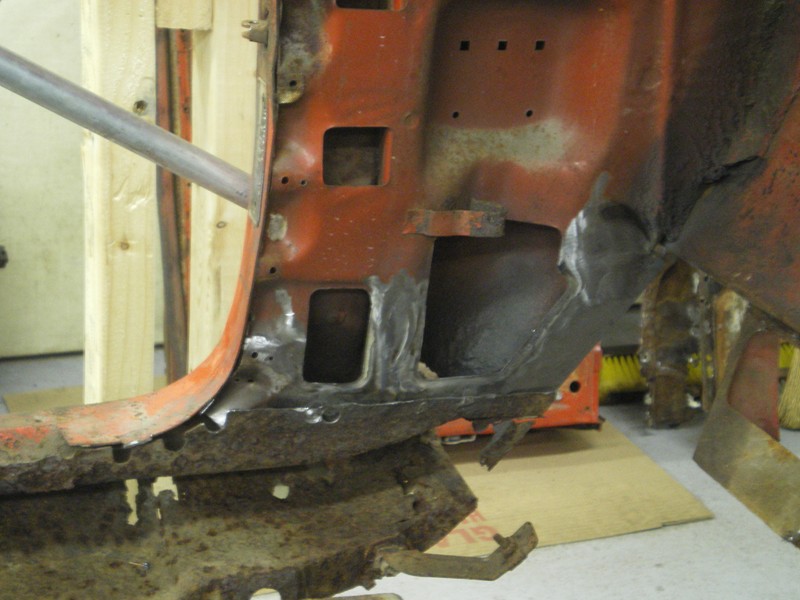
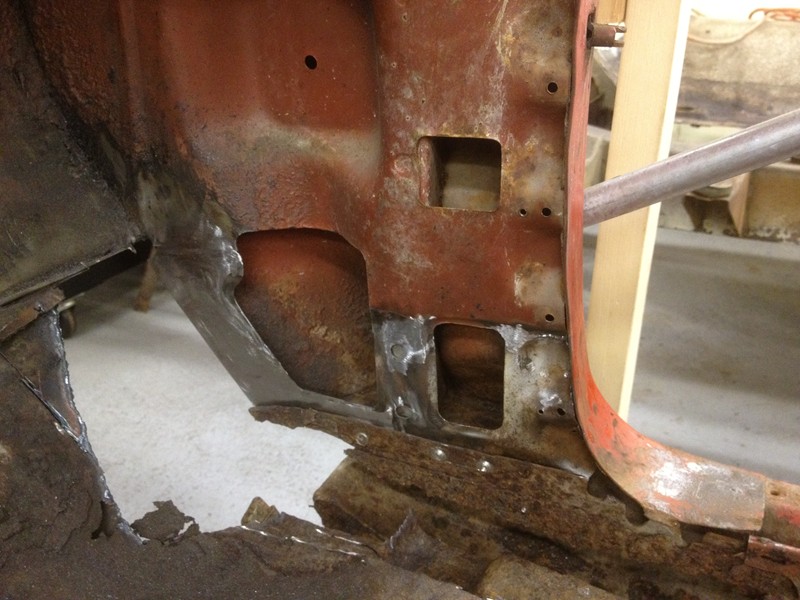
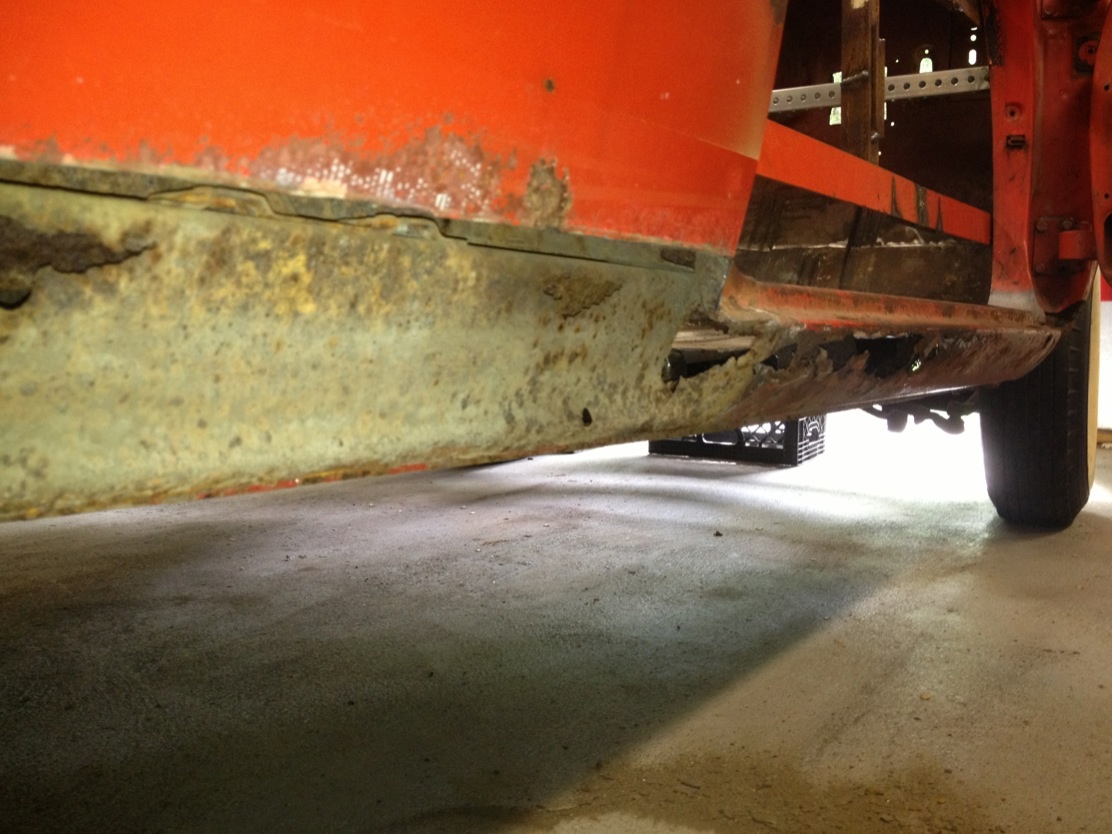
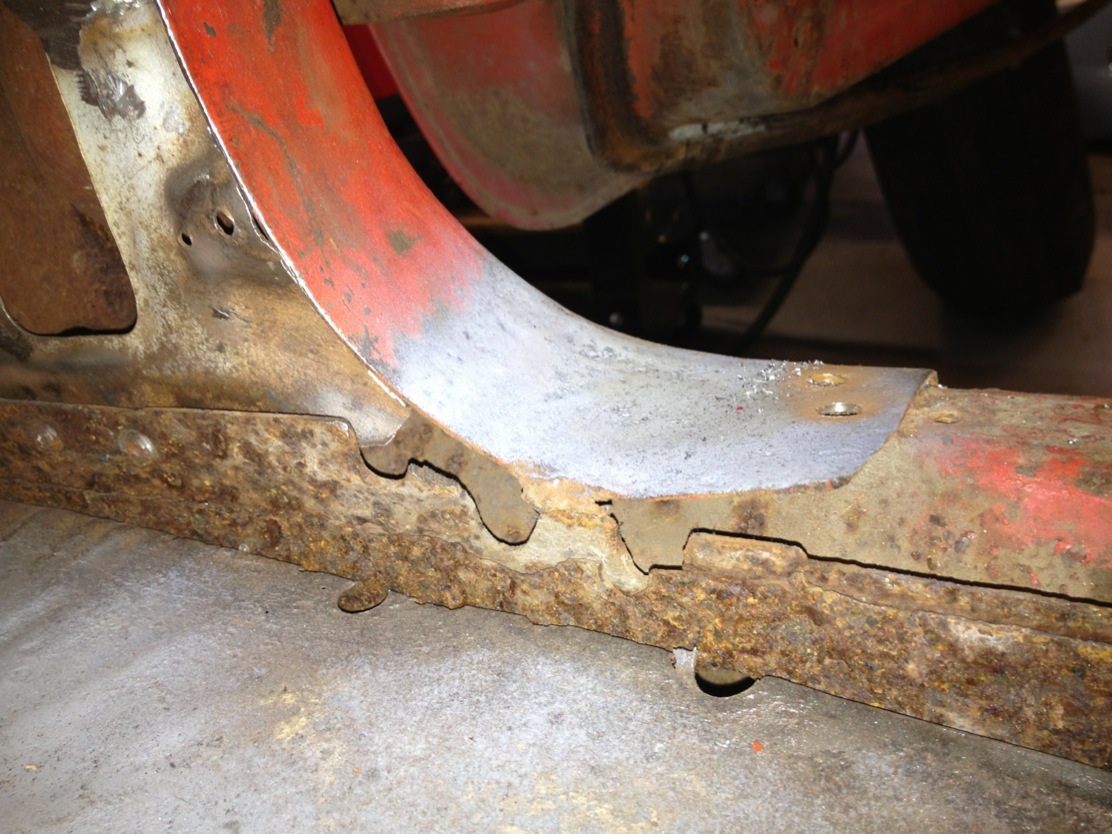
Location: Sept. 1958 | I am going to be replacing the rockers, these are bad, beyond bad. Anybody ever replaced full rockers in a 57-59 2 door? I have bought reproductions from Sweden that are 2 mm thick, not junk like eBay ones. But there are areas that doesn't come with them. I will contact a fabricator for help on this. But I want to remove entire rocker, but I don't want to cause structure damage, though I'd like to have the door on when it comes time to replace rocker. Though the door opening is braced currently. Any help/ideas?
 (image.jpg) (image.jpg)
 (image.jpg) (image.jpg)
Attachments
----------------
image.jpg (209KB - 265 downloads)
image.jpg (208KB - 271 downloads)
|
|
| |
|
Expert 5K+
Posts: 8445
Location: Perth Australia | I would make a rail to go under the floor to suport the body and also to keep the leanth right
I dont think you really do want the door on, it will get in the way
Just brace as much as you can, if you can make it so the braceing is out of the way of the door, you could fit
and remove the door as you go to check fitment.
It looks like you will be going up into the A pillar a bit as well
You need to get the under peices done first, you will see which ones as you clean it and can see how the layers go.
Just carefully remove the layers, cutting away what you have to (save these, they are paterns) and build it all back
Easy
|
|
| |
|
Expert
Posts: 2996
Location: Sept. 1958 | Thanks. That's all the way up the a-pillar I need to go. I removed it because its rotted and it overlaps the rocker. I want to remove the rocker as one piece and have certain areas fabricated using the repros as a base. I just don't want it to flex. I wanted to brace inside the car like Raffaelle and remove the door brace so I could hang door, but I don't know if it will screw up the body. |
|
| |
|
Expert
Posts: 2996
Location: Sept. 1958 | This is what the repros include.
 (image.jpg) (image.jpg)
 (image.jpg) (image.jpg)
Attachments
----------------
image.jpg (119KB - 265 downloads)
image.jpg (76KB - 269 downloads)
|
|
| |
|
Expert
Posts: 2996
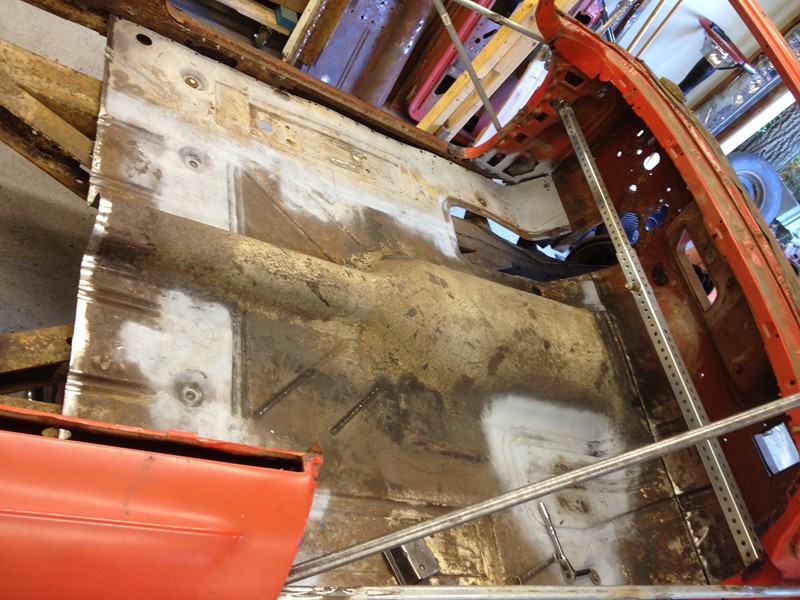
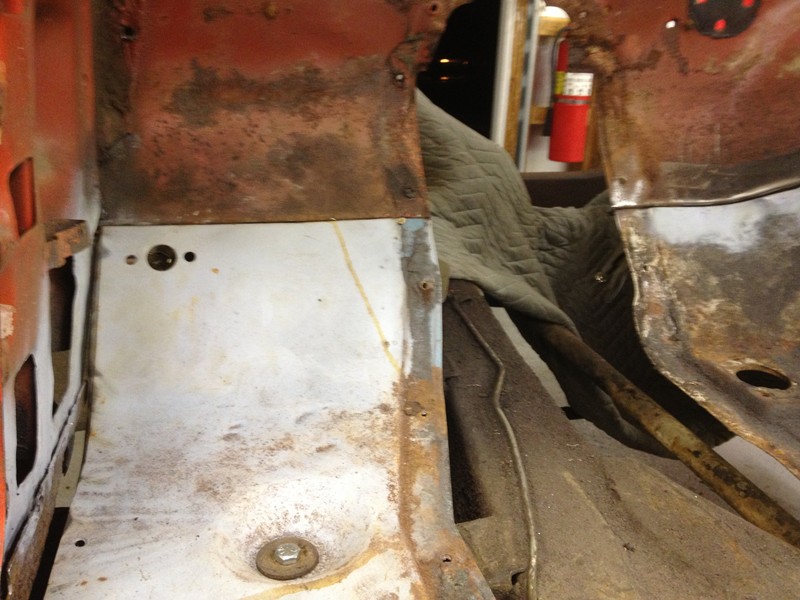
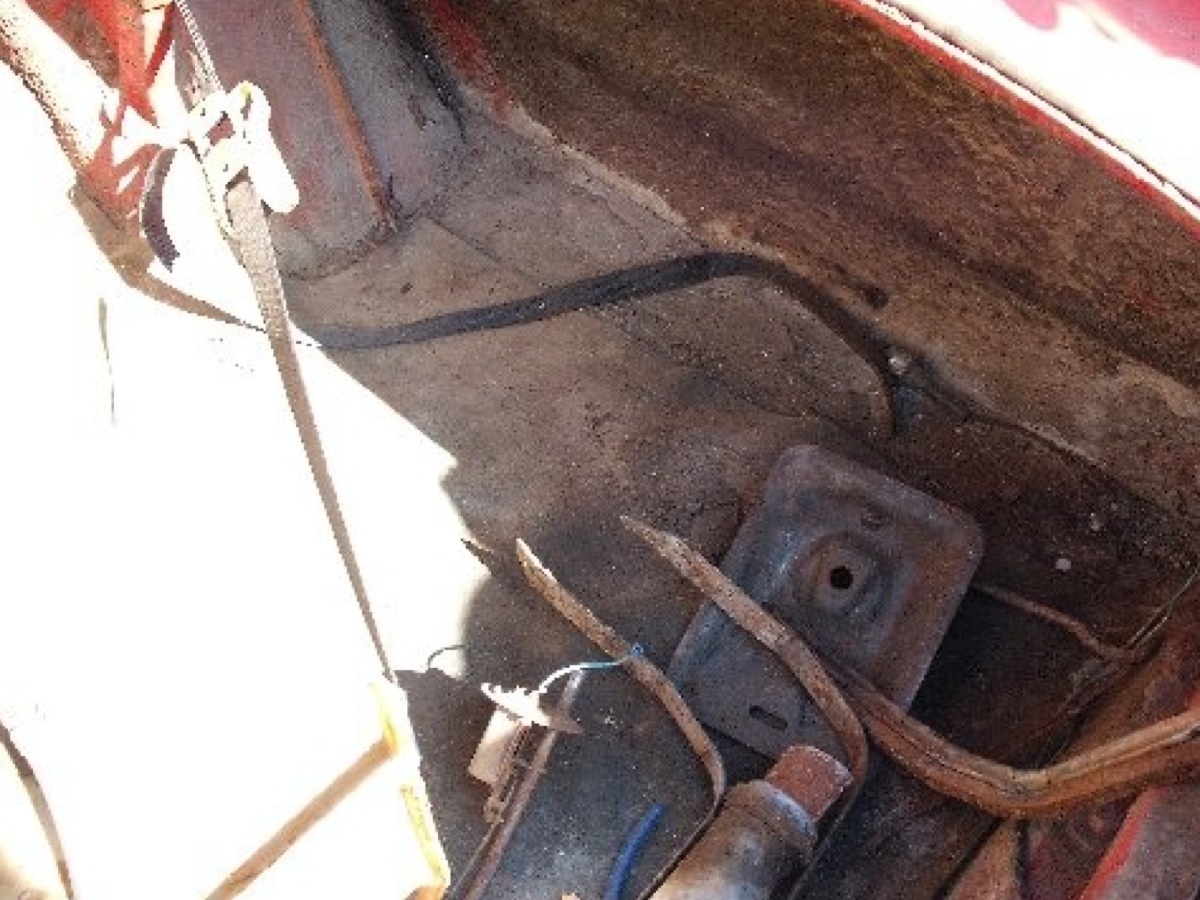
Location: Sept. 1958 | Here's the passenger compartment floor as it currently is. I have been working on the replacement trunk floor lately.
 (image.jpg) (image.jpg)
 (image.jpg) (image.jpg)
Attachments
----------------
image.jpg (161KB - 260 downloads)
image.jpg (179KB - 368 downloads)
|
|
| |
|
Expert
Posts: 2996
Location: Sept. 1958 | The trunk floors on some 58s, at least both of my cars built in May 1958 in Evansville, had a single larger rib on the right side, instead of some floors that have 2 much shorter ones.
 (image.jpg) (image.jpg)
 (image.jpg) (image.jpg)
 (image.jpg) (image.jpg)
Attachments
----------------
image.jpg (193KB - 273 downloads)
image.jpg (197KB - 251 downloads)
image.jpg (203KB - 279 downloads)
|
|
| |
|
Location: Sweden | Looks like the bodywork is coming along well, Matt. The concrete was quite innovative, wonder how many projects that started out with a jackhammer some updates also please. I think i do have found a plate for you. Best / Henric
Edited by henricthornsund 2013-11-12 4:04 PM
|
|
| |
|
Elite Veteran
Posts: 982
Location: Upper Hunter NSW Australia | wizard - 2013-04-20 6:22 AM
Wait, wait - what is this??? Shrink disc, please explain further
..........
....
I know this was way back in April but here's a pretty simple You Tube demo of how a shrink disc works.
http://www.youtube.com/watch?v=X8cruauERmI
.........
....... |
|
| |
|
Location: Sweden | Any updates on the floors, Matt? I scraped my car clean on the inside and i will probably have to replace a part as large as your rear section pictured above. I am about to buy that very piece from a donor sedan and i am a little curious if there is something particular one should have in mind before digging into it? Are you butt welding all of the joints? How do you cut the piece so that the gap becomes ok all the way around? |
|
| |
|
Expert
Posts: 2996
Location: Sept. 1958 | Henric-
I haven't worked on the passenger compartment floor in a while, it's pretty much done. I was working on the trunk floor but I f**ked up with my measuring of the patch panel and must redo it, was not happy with how the strengthen rib lines up, it was not straight front to back. I figure I'll get some panels fabricated in the next year.
The floor panel itself interchanges with all passenger car 57-58 Plymouths. I had to cut and then butt weld it together, like I said, I did this weld line so it will be right under the seat brace for structure. When I install the brace later, it will go over the weld in the middle. Around the edges I haven't welded yet. I will have inner rockers fabricated then weld to the ledge on the inner rocker. I drilled out all the spotwelds on the old floor along the sides, along where it gets spotwelded to the cowl, and along where it gets welded to the trunk floor. |
|
| |
|
Expert
Posts: 2647
Location: Minor Hill, TN | Good luck with the restoration . I hope to see more photos during and after the restoration |
|
| |
|
Expert
Posts: 2996
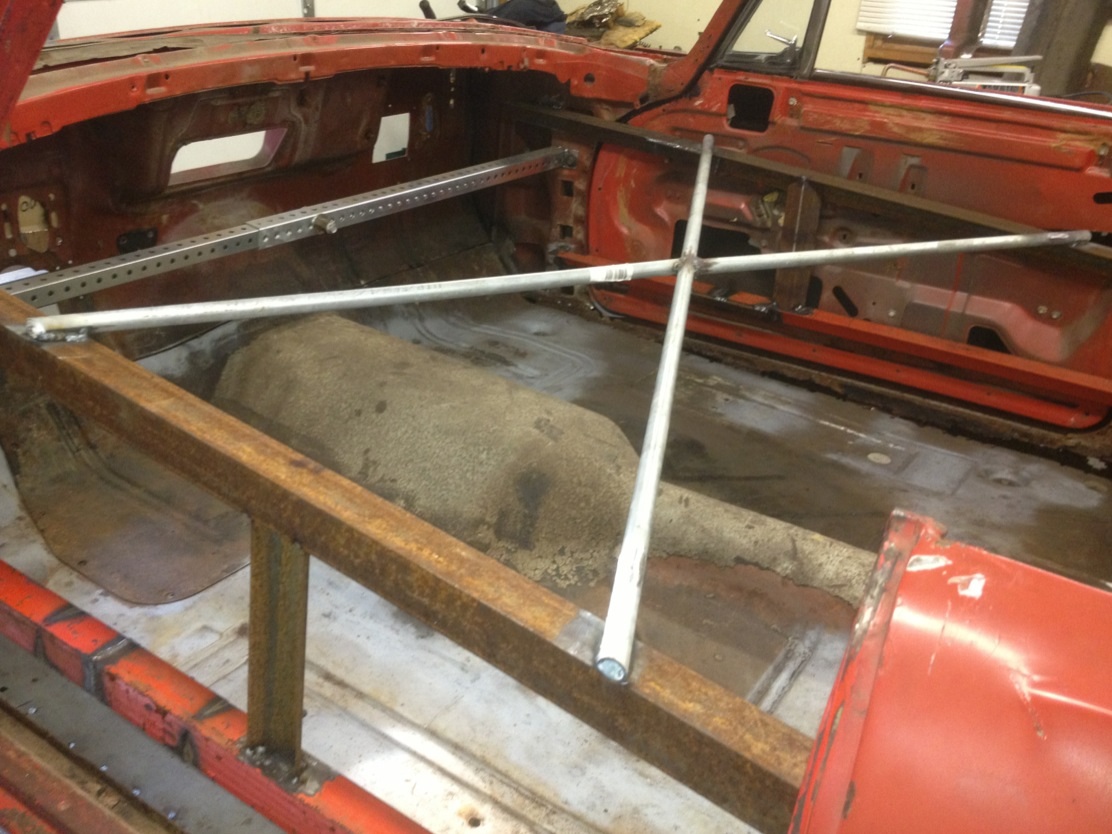
Location: Sept. 1958 | This year I've worked crazy hours at my job, especially now with GM coming out with major recalls about as frequently as I take a piss. But the other day I welded strengthening braces inside the body, copied the idea where to weld from Jan Frieburg's rebuild on the 57 Dodge, thanks!!! You are an inspiration along with Raffy and John and others. Also want to cross brace it as well before I cut out the rockers for reconstruction/replacement, that's the next surgery on the list.
 (image.jpg) (image.jpg)
 (image.jpg) (image.jpg)
Attachments
----------------
image.jpg (188KB - 273 downloads)
image.jpg (186KB - 239 downloads)
|
|
| |
|
Expert
Posts: 1906
Location: Ontario, Canada | That looks better, Matt. But, as I mentioned,weld the bracing on the insides so you can install/ remove the doors as you trial fit, tack and finish weld the rockers in place. Just a thought!
Greg |
|
| |
|
Expert
Posts: 2996
Location: Sept. 1958 | LD3 Greg - 2014-05-03 12:02 AM
That looks better, Matt. But, as I mentioned,weld the bracing on the insides so you can install/ remove the doors as you trial fit, tack and finish weld the rockers in place. Just a thought!
Greg
I did weld to the inside of the body. That's the plan Greg, as well as getting the car back on the floor when that is being done. |
|
| |
|

Expert
Posts: 1385
Location: Ocala, Florida | Nice work! Is there a thread on your Dodge? |
|
| |
|
Expert
Posts: 2996
Location: Sept. 1958 | The Chrysler Kid - 2014-05-03 12:39 PM
Nice work! Is there a thread on your Dodge?
Thanks Randy. Thread on Dodge:
http://forwardlook.net/forums/forums/thread-view.asp?tid=41913 |
|
| |
|
Expert
Posts: 2647
Location: Minor Hill, TN | Good luck with the restoratation please keep us posted |
|
| |
|
Expert
Posts: 1385
Location: Ocala, Florida | Bit more patina than expected! Good luck with the Plymouth and that Dodge! |
|
| |
|
Expert
Posts: 2996
Location: Sept. 1958 | The Chrysler Kid - 2014-05-04 10:13 AM
Bit more patina than expected! Good luck with the Plymouth and that Dodge!
Yeah, a little poetic freedom! |
|
| |
|
Expert
Posts: 2996
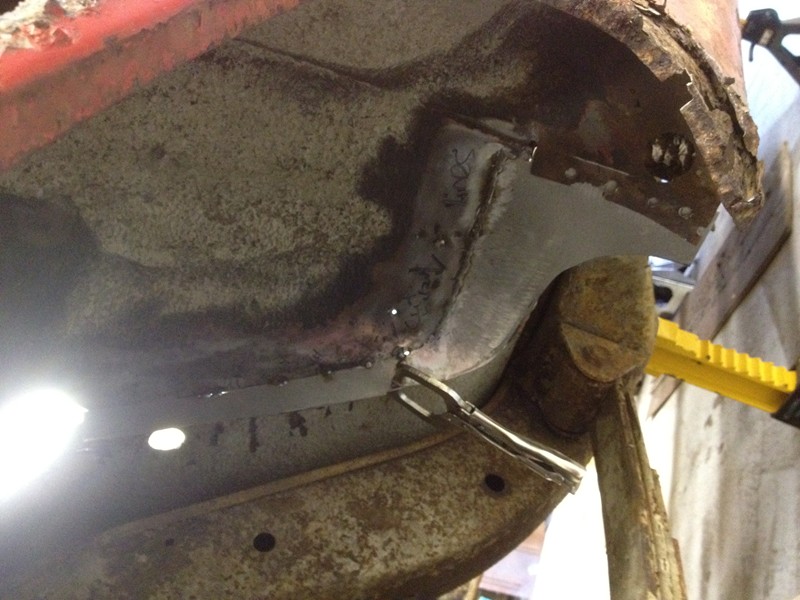
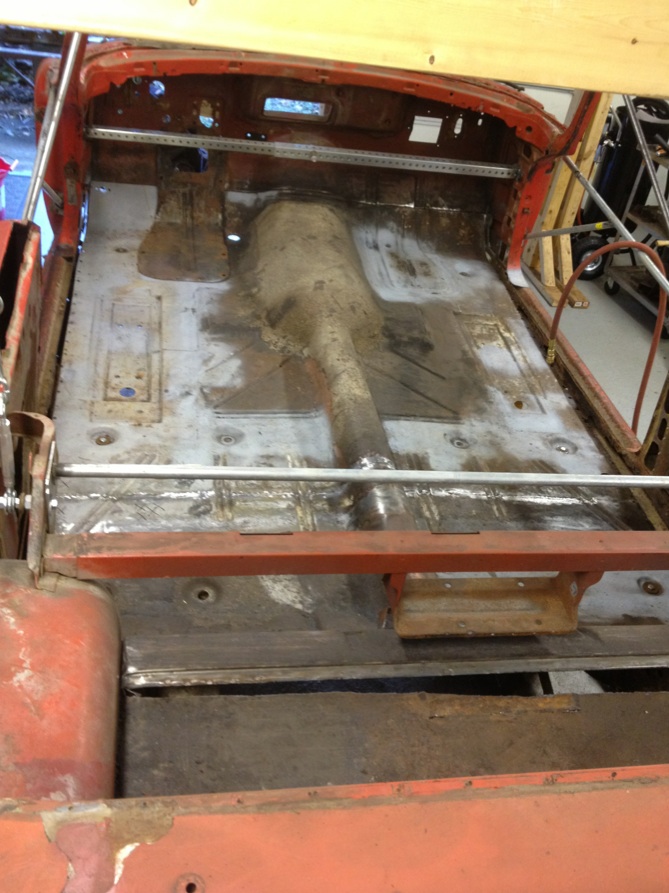
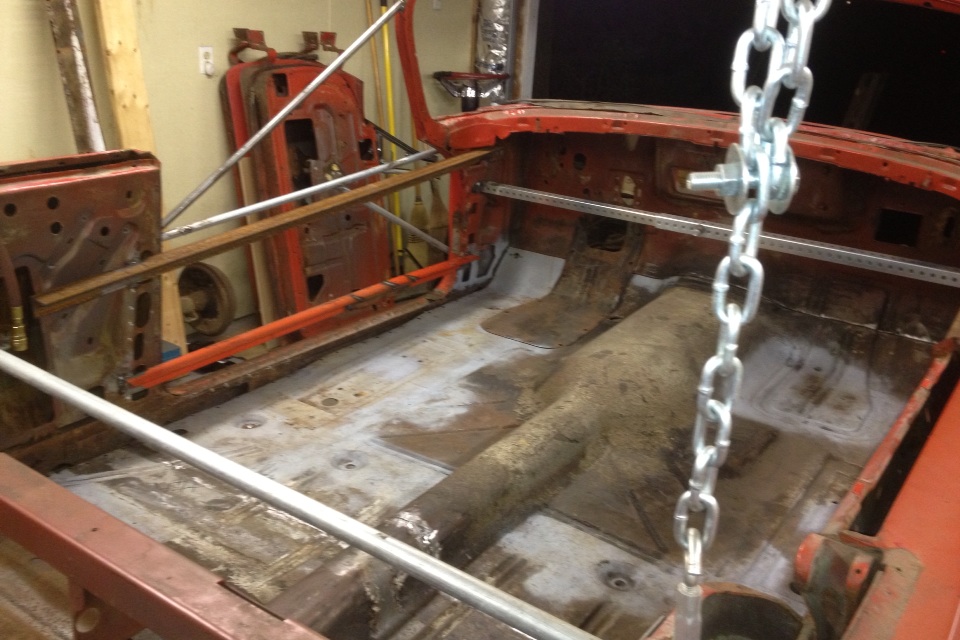
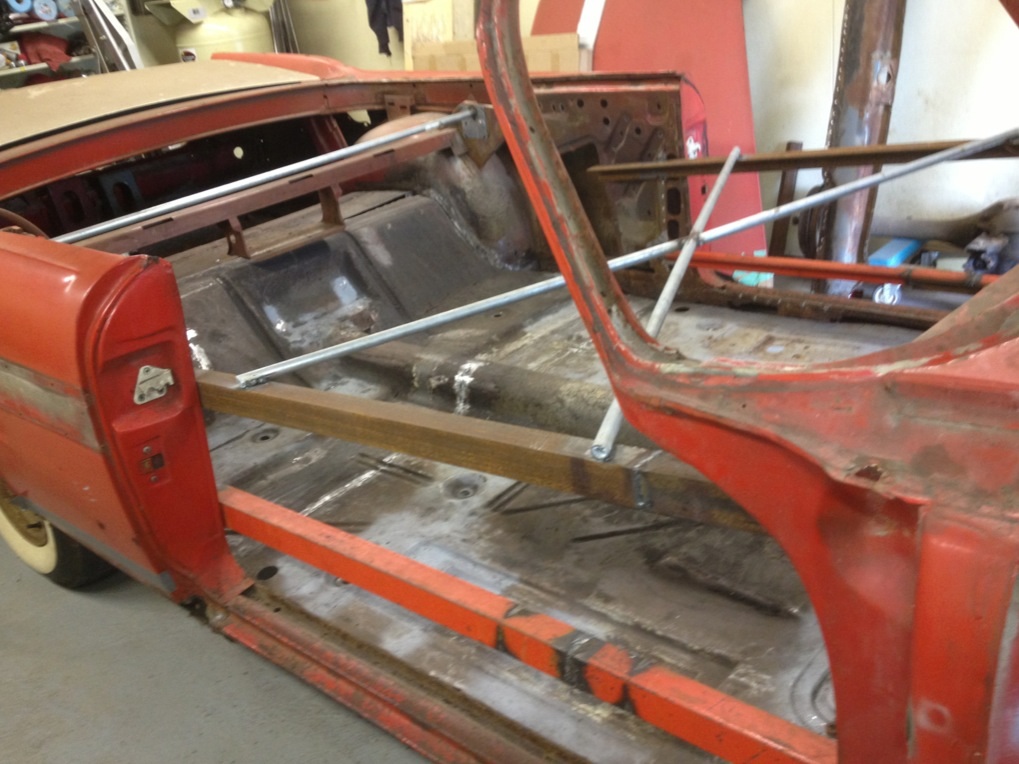
Location: Sept. 1958 | Today, I welded the rear floor section to the inner rear wheelhouses, and started to spotweld the cowl to the front floor. Made sure the floor was level. After that I removed the scaffolding holding up the rear of the body.
 (image.jpg) (image.jpg)
 (image.jpg) (image.jpg)
 (image.jpg) (image.jpg)
 (image.jpg) (image.jpg)
 (image.jpg) (image.jpg)
Attachments
----------------
image.jpg (194KB - 253 downloads)
image.jpg (214KB - 239 downloads)
image.jpg (218KB - 245 downloads)
image.jpg (215KB - 247 downloads)
image.jpg (155KB - 235 downloads)
|
|
| |
|
Expert
Posts: 2996
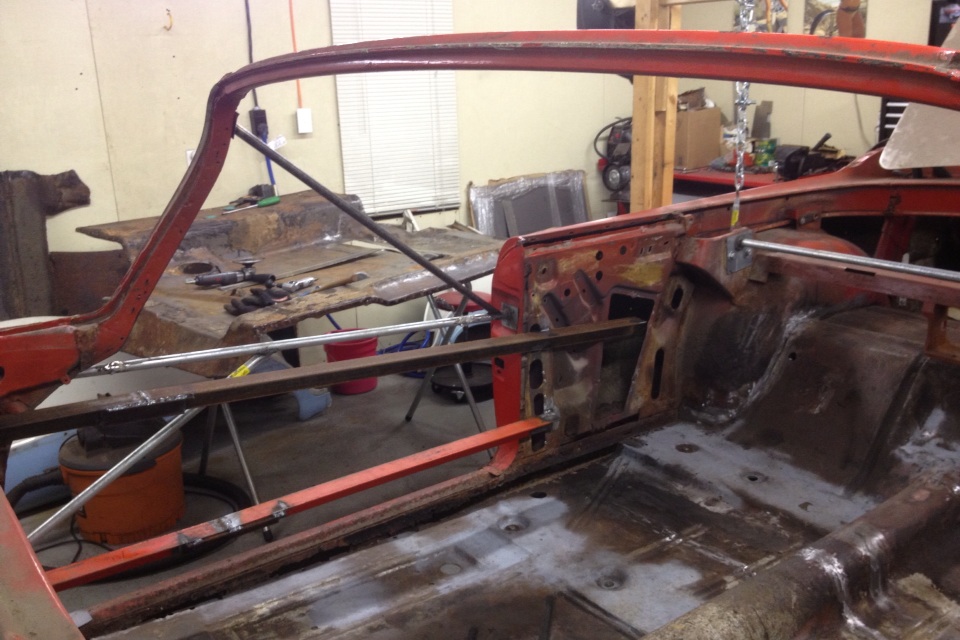
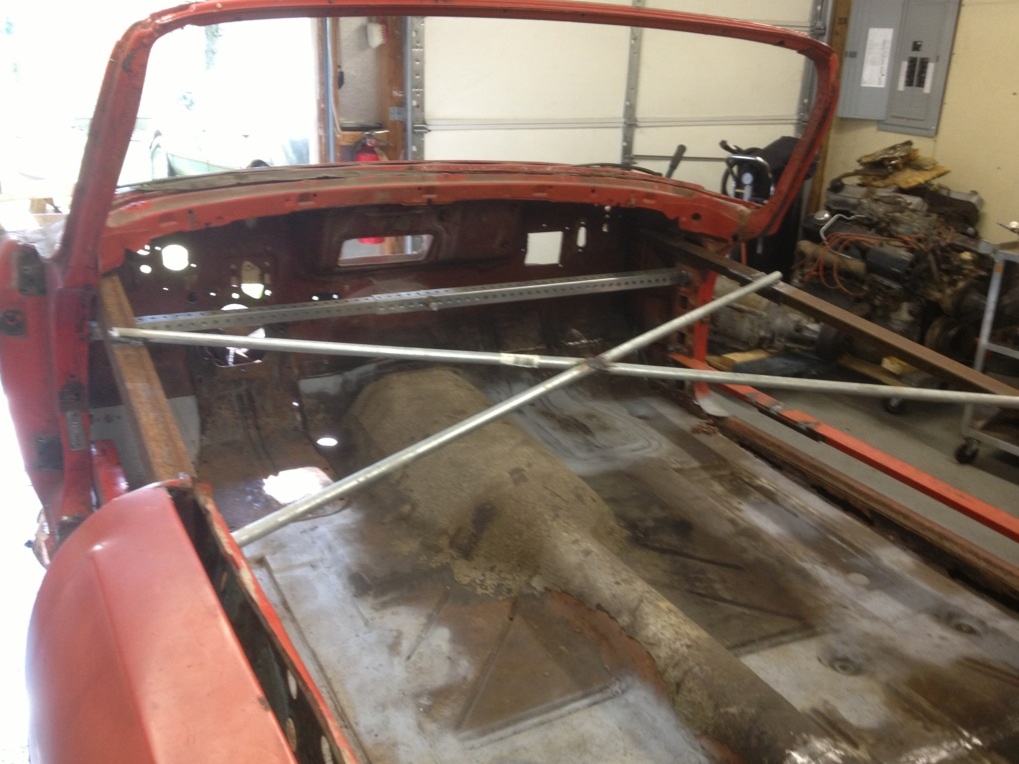
Location: Sept. 1958 | Today I finished spot welding the cowl to the floor. My spotwelder weighs about 40 pounds or so, so it was a work out. Then I put the wheels and tires on it and got it sitting back on the floor. I put a level on the center of the windshield frame and the panel between convt top opening and trunk lid and its level in both of those. Then I removed the door jamb braces. Next step will be to hang the doors, but I cannot do that alone.
 (image.jpg) (image.jpg)
 (image.jpg) (image.jpg)
 (image.jpg) (image.jpg)
 (image.jpg) (image.jpg)
 (image.jpg) (image.jpg)
 (image.jpg) (image.jpg)
Attachments
----------------
image.jpg (182KB - 246 downloads)
image.jpg (174KB - 244 downloads)
image.jpg (222KB - 253 downloads)
image.jpg (188KB - 244 downloads)
image.jpg (202KB - 248 downloads)
image.jpg (187KB - 241 downloads)
|
|
| |
|
Expert
Posts: 1906
Location: Ontario, Canada | Looks great,Matt. I imagine you will have your fingers crossed as the doors are being hung. Please keep us posted.
Greg |
|
| |
|
Expert
Posts: 2996
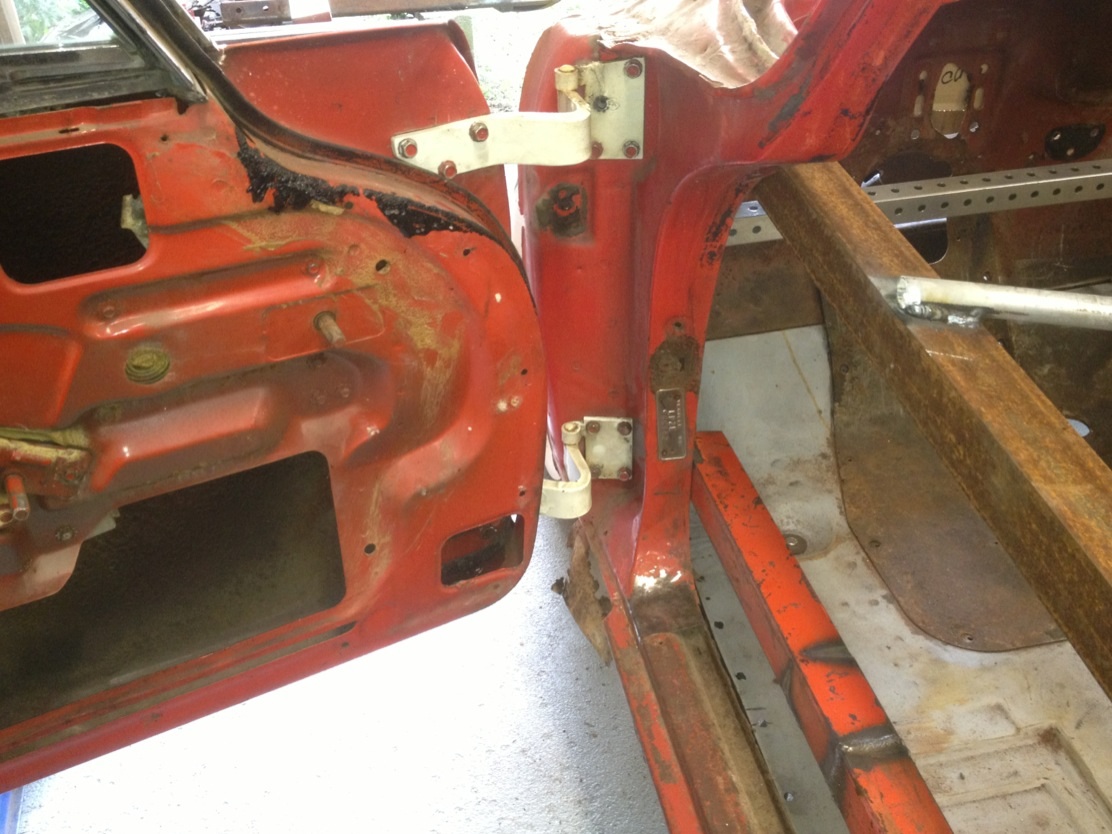
Location: Sept. 1958 | Thanks Greg. Today my dad helped me hang the doors on. It was either these or Lambo doors. On the right side the window regulator tang is hitting the strengthening brace, so I'll have to remove some metal on the lower part of it. They will still need more adjusting too, and I should hang the replacement fenders on as well to make sure. The quarters in the future will also be replaced, the drivers side is bad from a shoddy body shop repair when the car was worth very little. The passenger side is just a rusty mess along the bottom and top. Problem with the passenger side is I cannot find a rust free one.
It's nice to see the car with some parts back on it and the progress that has been achieved up to this point. For a while in the beginning I was doing so much work with very little to show.
Edited by christine-lover 2014-05-18 8:38 PM
 (image.jpg) (image.jpg)
 (image.jpg) (image.jpg)
 (image.jpg) (image.jpg)
 (image.jpg) (image.jpg)
 (image.jpg) (image.jpg)
Attachments
----------------
image.jpg (203KB - 236 downloads)
image.jpg (259KB - 243 downloads)
image.jpg (183KB - 241 downloads)
image.jpg (243KB - 243 downloads)
image.jpg (209KB - 232 downloads)
|
|
| |
|
Expert
Posts: 1385
Location: Ocala, Florida | You'll be cruising in no time looking good! |
|
| |
|
Expert
Posts: 1906
Location: Ontario, Canada | Well done Matt. It was smart to have left the vent windows in place. It gives an alignment guide for the windshield frame. Just for reassurance!
I don't think I would bother with parts of the front clip at this time. Got lots of leeway of adjustment for it later.
When the doors are fully adjusted, I would tack weld a stabilizer bar from the top of the w-shield to the rear quarter somewhere before you cut out the old rockers. I would also weld an X stabilizer in each doorway.
It is common for all doors to be"jacked out" at the rear bottom edges. It is likely because doors got slammed shut time and again with overcoats or clothing stuck down there. With the door firmly hung, press your leg against that bottom corner and pull toward you at the top rear corner. You will probably "feel" the door crunch a bit and correct itself. If the "crunch" is excessive, I have had luck pulling the door as I indicated and lightly welding a little more around the inner edges to hold it in place. See if you can adjust the doors with those bottom edges in as much as you can. When you add the weatherstrip later it will probably leave those edges back out again! Oh well!
Anyway, great progress.
Greg |
|
| |
|
Expert
Posts: 2996
Location: Sept. 1958 | Thanks guys! |
|
| |
|
Expert
Posts: 1508
Location: new york | All I can say is WOW! Matt what a job! Keep up the good work. Victor. |
|
| |
|
Veteran
Posts: 133
| Great work ,``that`s the way to do it`` ,and you saved another Forward look forever |
|
| |
|
Expert
Posts: 2647
Location: Minor Hill, TN | please keep us posted here on the restoration. With time and patience it will look as good as new |
|
| |
|
Expert
Posts: 2996
Location: Sept. 1958 | Thanks Victor, Arne, and Steph. |
|
| |
|
Expert 5K+
Posts: 7819
Location: Williams California | Nice progress, Matt!! |
|
| |
|
Expert
Posts: 2996
Location: Sept. 1958 | Thanks John! |
|
| |
|
Regular
Posts: 94
Location: New Zealand | Looks like your getting the better of it, Great workmanship, it's going to be a car to be proud of when you are finished.
Cheers Norm |
|
| |
|
Expert
Posts: 2996
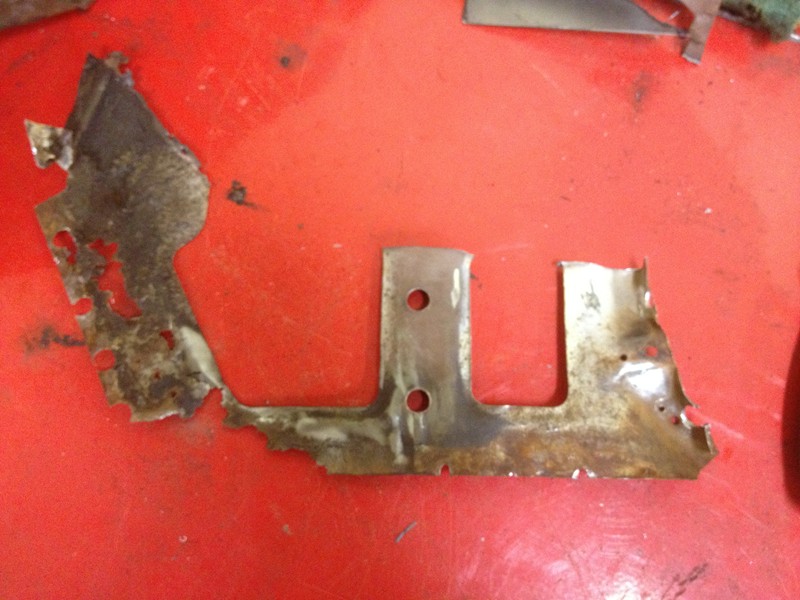
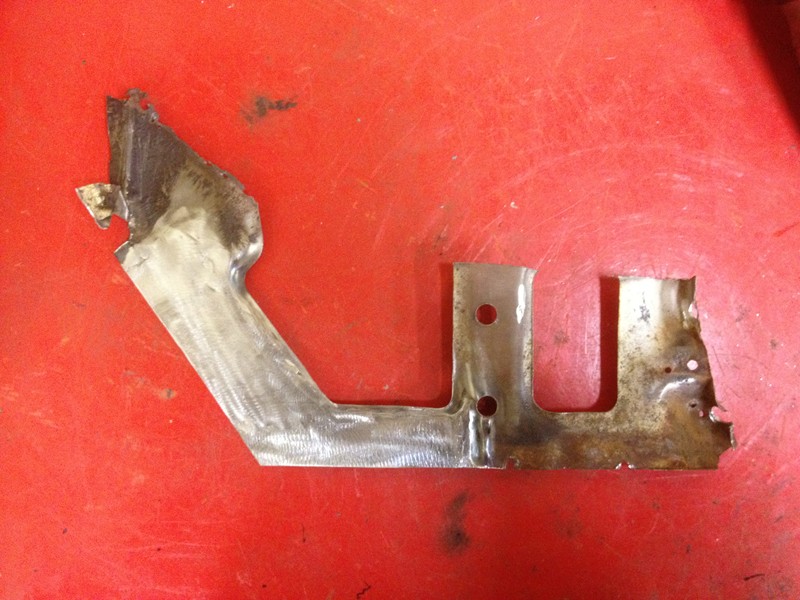
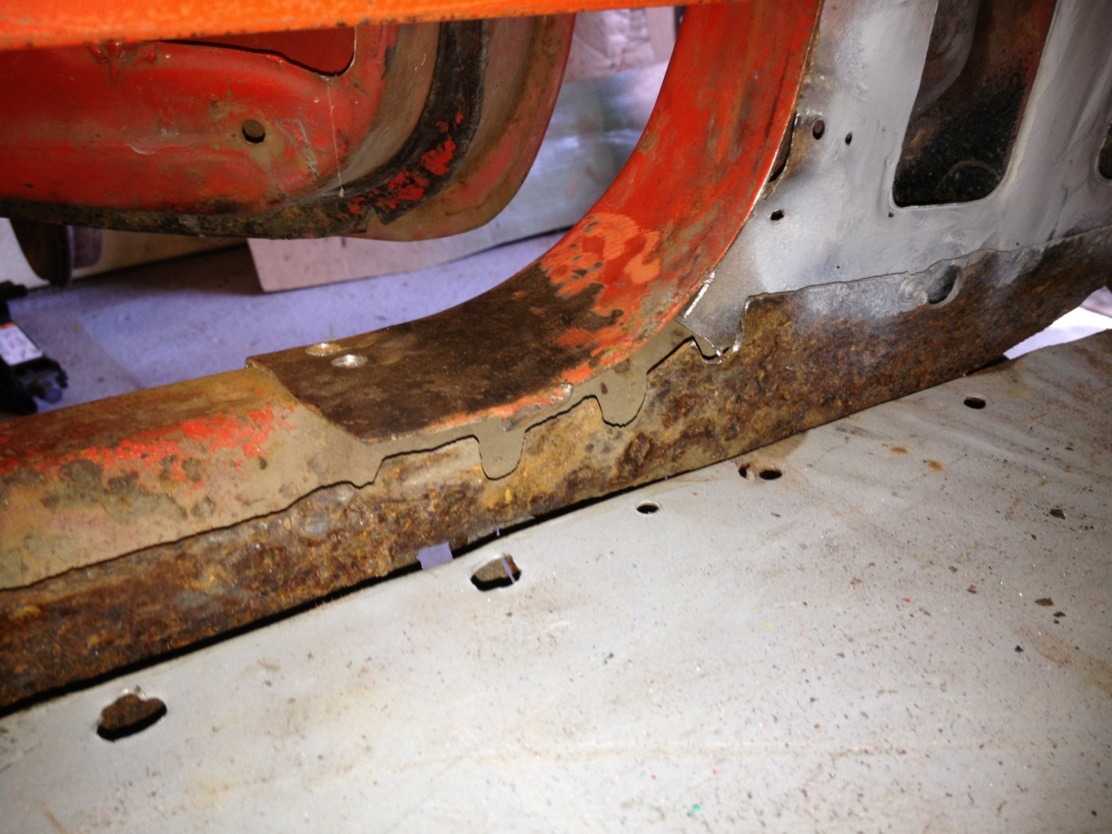
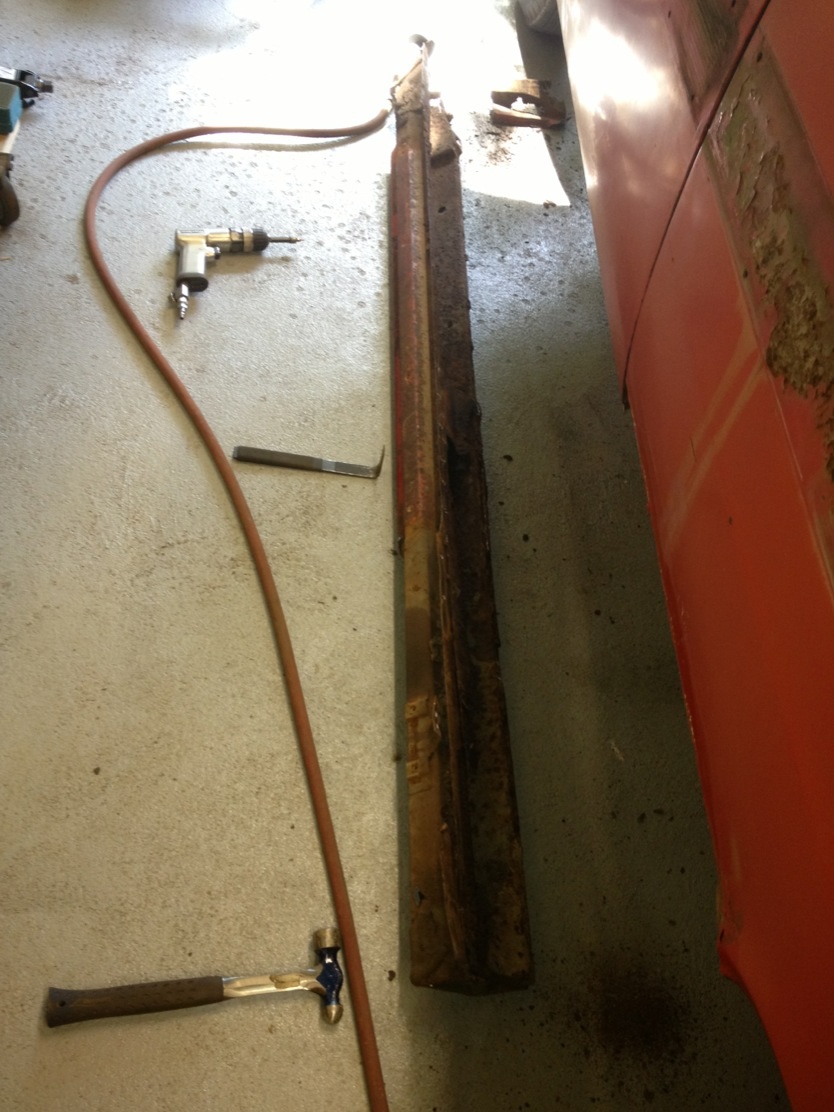
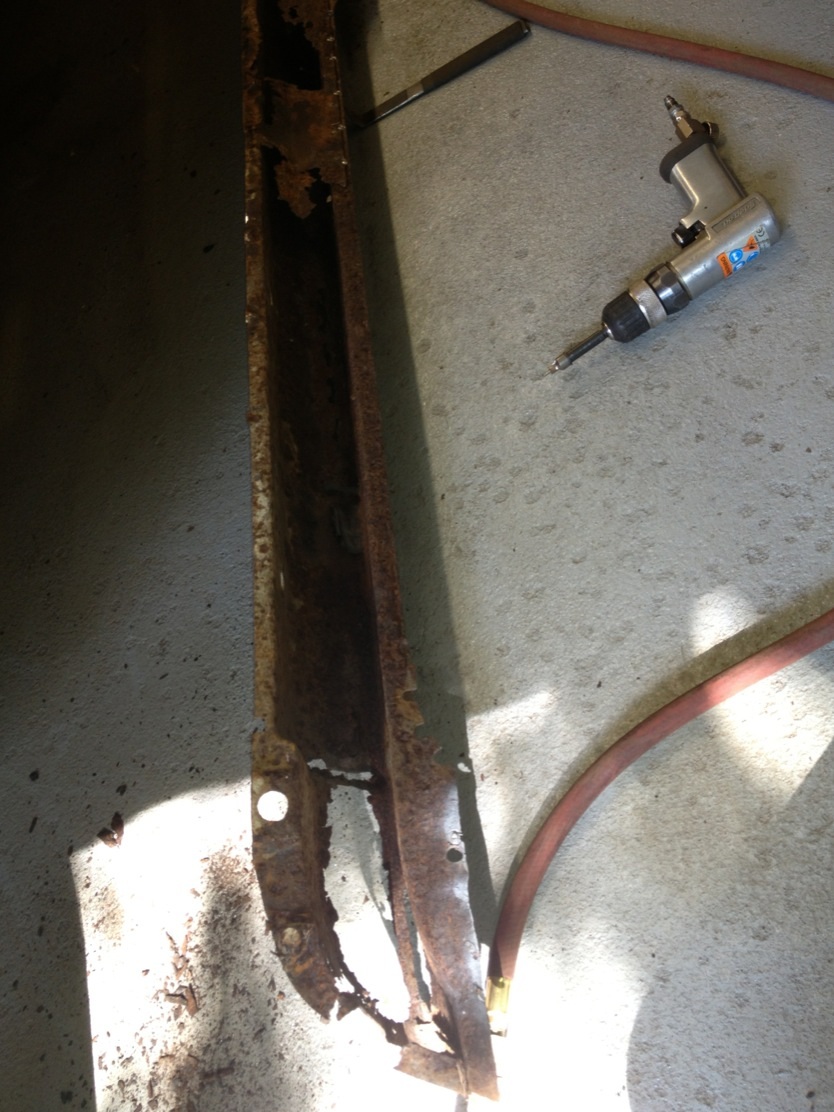
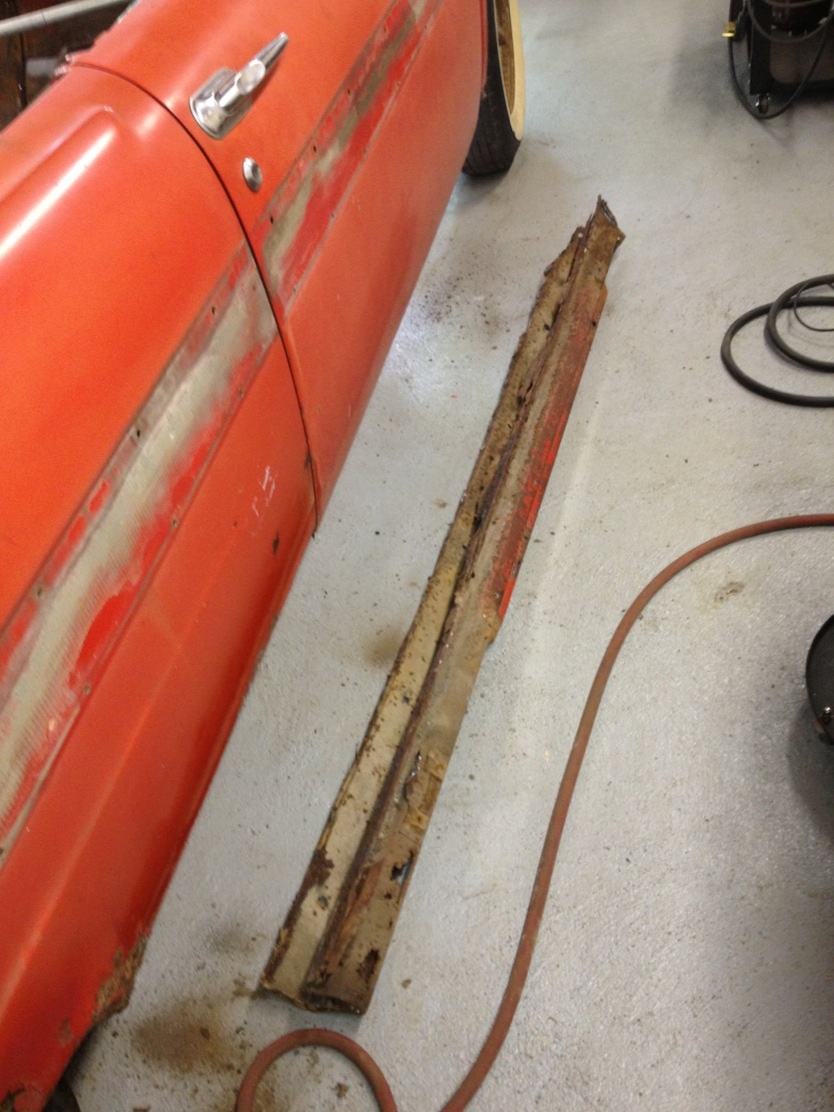
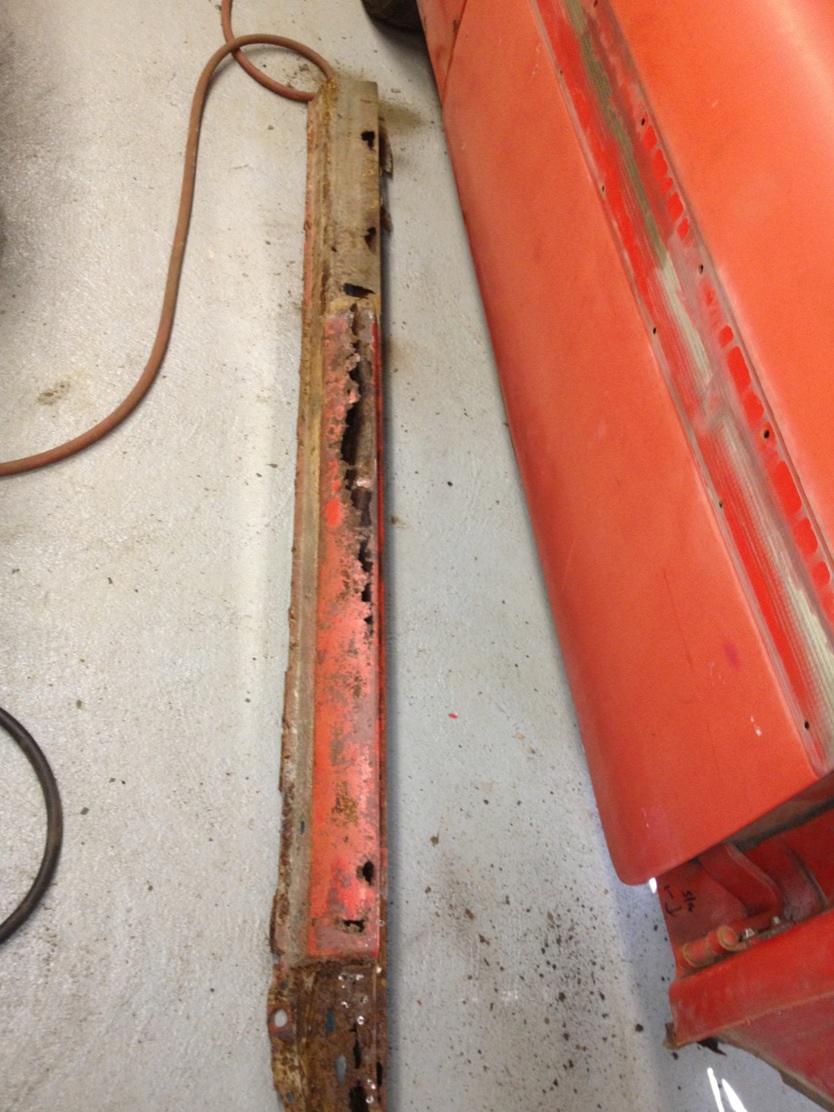
Location: Sept. 1958 | Today I removed both side rocker panels, totally wasted, but enough to build copies of I hope. The CDC wants this car gone, too much tetanus!
 (image.jpg) (image.jpg)
 (image.jpg) (image.jpg)
 (image.jpg) (image.jpg)
 (image.jpg) (image.jpg)
 (image.jpg) (image.jpg)
 (image.jpg) (image.jpg)
 (image.jpg) (image.jpg)
 (image.jpg) (image.jpg)
 (image.jpg) (image.jpg)
 (image.jpg) (image.jpg)
 (image.jpg) (image.jpg)
 (image.jpg) (image.jpg)
 (image.jpg) (image.jpg)
 (image.jpg) (image.jpg)
 (image.jpg) (image.jpg)
 (image.jpg) (image.jpg)
 (image.jpg) (image.jpg)
 (image.jpg) (image.jpg)
 (image.jpg) (image.jpg)
 (image.jpg) (image.jpg)
 (image.jpg) (image.jpg)
Attachments
----------------
image.jpg (290KB - 339 downloads)
image.jpg (316KB - 373 downloads)
image.jpg (231KB - 339 downloads)
image.jpg (242KB - 344 downloads)
image.jpg (237KB - 368 downloads)
image.jpg (316KB - 386 downloads)
image.jpg (294KB - 407 downloads)
image.jpg (272KB - 334 downloads)
image.jpg (271KB - 346 downloads)
image.jpg (251KB - 340 downloads)
image.jpg (202KB - 375 downloads)
image.jpg (230KB - 333 downloads)
image.jpg (261KB - 321 downloads)
image.jpg (286KB - 351 downloads)
image.jpg (246KB - 358 downloads)
image.jpg (229KB - 395 downloads)
image.jpg (196KB - 348 downloads)
image.jpg (248KB - 384 downloads)
image.jpg (239KB - 337 downloads)
image.jpg (214KB - 334 downloads)
image.jpg (260KB - 357 downloads)
|
|
| |
|
Expert
Posts: 2996
Location: Sept. 1958 | Last week, I braced the side braces, and replaced the worn driver's side door hinges from the parts car.
 (image.jpg) (image.jpg)
 (image.jpg) (image.jpg)
 (image.jpg) (image.jpg)
 (image.jpg) (image.jpg)
Attachments
----------------
image.jpg (247KB - 359 downloads)
image.jpg (241KB - 373 downloads)
image.jpg (164KB - 318 downloads)
image.jpg (170KB - 335 downloads)
|
|
| |
|
Expert
Posts: 1906
Location: Ontario, Canada | Well done Matt, looks good. You have been busy!!
Greg |
|
| |
|
Expert
Posts: 1728
Location: Fleetwood, Pa | Matt,
Just remember, slow and steady wins the marathon.........keep going, you're making good progress... |
|
| |
|
Expert
Posts: 2996
Location: Sept. 1958 | Thanks guys!!! |
|
| |
|
Location: Sweden | christine-lover - 2011-08-08 2:06 AM
d500neil - 2011-08-03 4:14 PM
Motor number is NOT AVAILABLE....what's up, with that (not recording the engine number on the IBM card???) ?
Thank you Neil, my guess is possibly only high performance engine numbers were listed on the IBM cards.
I had no idea what NCS stood for, but it makes sense. I though it had something to do with Chrysler Historical Society.
I looked at My build card just now and it contains the engine #. Mine is built at The Evansville plant with a 318 Super-Pak engine as well. It is also interesting how differently your accessory list is completed compared to mine. I Will upload pics of My IBM card in my Plymouth thread.
Edited by henricthornsund 2014-06-06 5:04 PM
|
|
| |
|
Exner Expert 19,174 posts. Neil passed away 18 Sep 2015. You will be missed, Neil!
Posts: 19146
Location: bishop, ca | Some years' IBM cards, from the various Assembly Plants, are very different from each other.
56 & 61 Dodges' IBM cards are very different, and after getting a Delaware Plant IBM card, for the 59 Dodges, I was finally able to 'crack'
some of the options codes which were not self explanatory, on the Detroit & L.A. IBM's.
|
|
| |
|
Expert
Posts: 2996
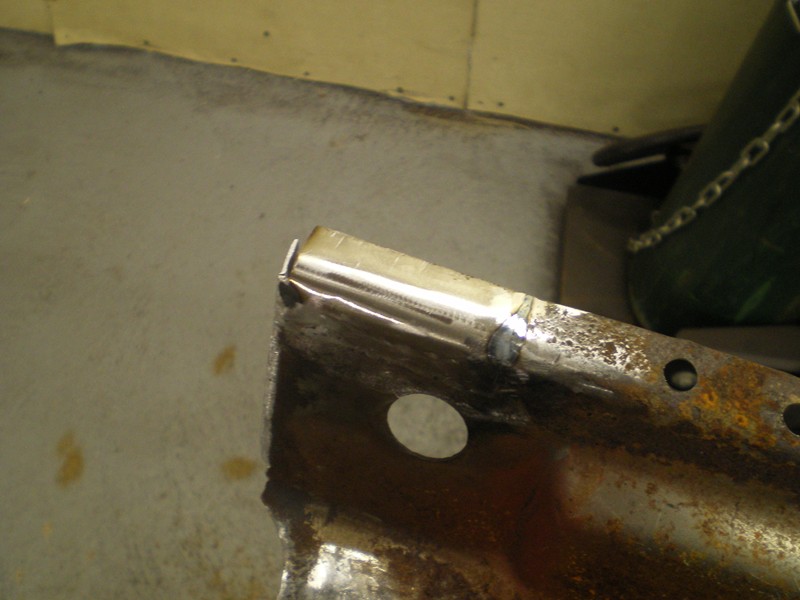
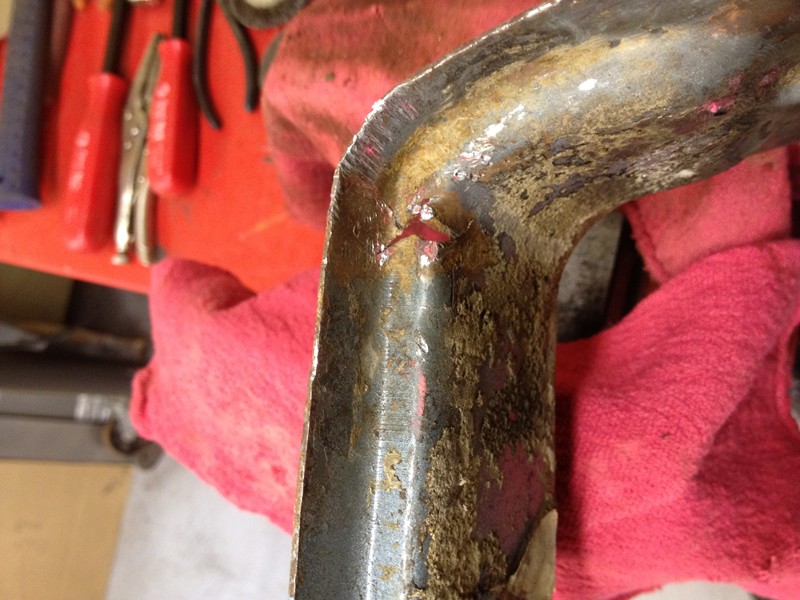
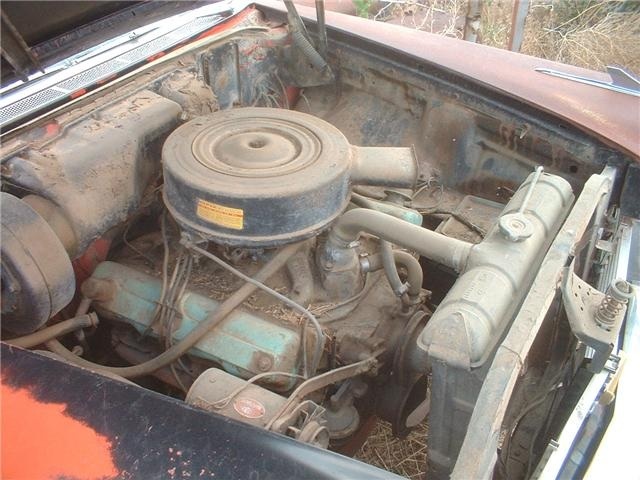
Location: Sept. 1958 | That's awesome. I'm sure the engine in my Plymouth is the original one, the engine bay was untouched, correct date coded/correct part number carburetor, distributor (which is different in 4 bbl car, but not listed in the Master Parts Catalog), radiator, etc. The fuel and water pump were replaced, which would be typical. I don't think I ever posted a photo of its engine bay, until now. Again, I plan on an it's-OE restoration on this car, so I will keep this looking this way just restored and detailed.
 (image.jpg) (image.jpg)
Attachments
----------------
image.jpg (256KB - 333 downloads)
|
|
| |
|
Exner Expert 19,174 posts. Neil passed away 18 Sep 2015. You will be missed, Neil!
Posts: 19146
Location: bishop, ca | Matt, Big M, on this website, should be able to fix you 'up' with an OEM fuel line and fuel filter.
|
|
| |
|
Expert
Posts: 2996
Location: Sept. 1958 | d500neil - 2014-06-06 7:45 PM
Matt, Big M, on this website, should be able to fix you 'up' with an OEM fuel line and fuel filter.
Thanks Neil. I have this photo of what an OEM fuel line should look like for a 4 bbl car, from a 58 convertible as well. I wish John would cut the quarters off his Fury for me! Haha
 (image.jpg) (image.jpg)
Attachments
----------------
image.jpg (107KB - 306 downloads)
|
|
| |
|
Expert
Posts: 2996
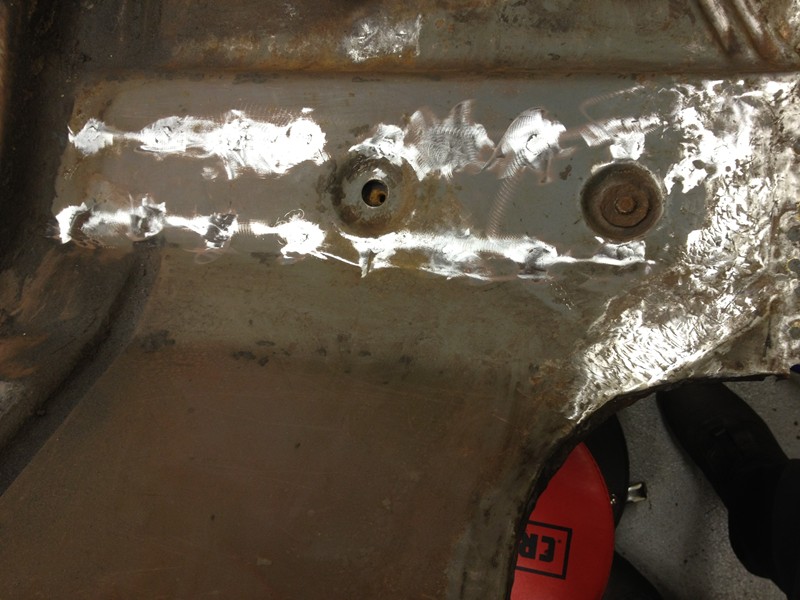
Location: Sept. 1958 | Today I drilled a lot of the brass welds on the passenger side quarter off the donor car. This car was hit and a replacement quarter was put in using brass filler metal. I plan to use some of the inner and outer lower wheel house metal from both sides as patches.
 (image.jpg) (image.jpg)
Attachments
----------------
image.jpg (246KB - 325 downloads)
|
|
| |
|
Expert
Posts: 2996
Location: Sept. 1958 | From the inside.
 (image.jpg) (image.jpg)
 (image.jpg) (image.jpg)
Attachments
----------------
image.jpg (249KB - 314 downloads)
image.jpg (298KB - 328 downloads)
|
|
| |
|
Expert
Posts: 1385
Location: Ocala, Florida | Very nice progress! You sure this is the same car at the beginning of the build? |
|
| |
|
Expert
Posts: 2996
Location: Sept. 1958 | I think so Randy, it didn't look that bad before. |
|
| |
|
Expert
Posts: 2996
Location: Sept. 1958 | Continued drilling out the spot welds today.
 (image.jpg) (image.jpg)
Attachments
----------------
image.jpg (172KB - 308 downloads)
|
|
| |
|
Expert
Posts: 2996
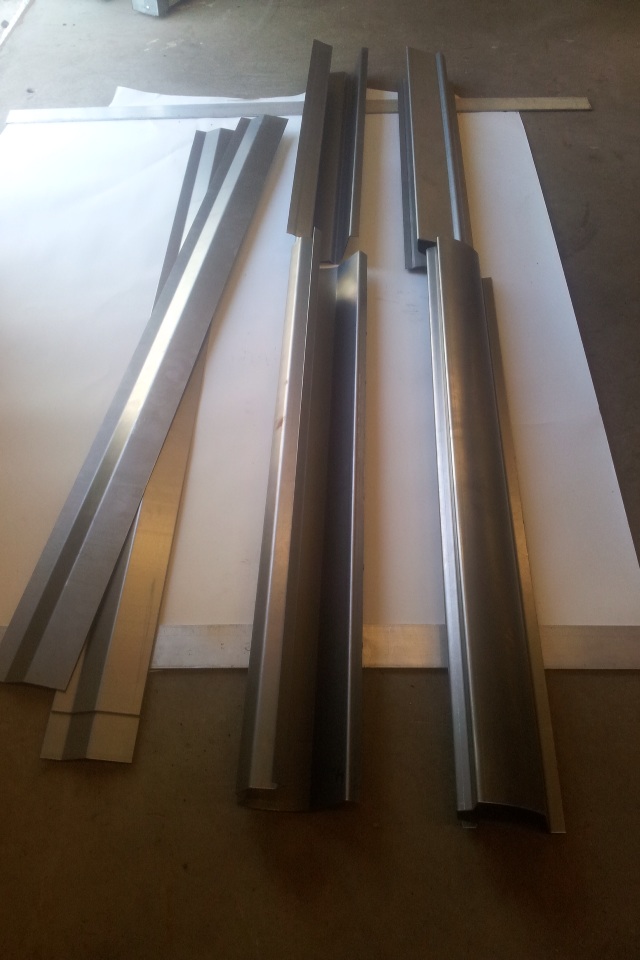
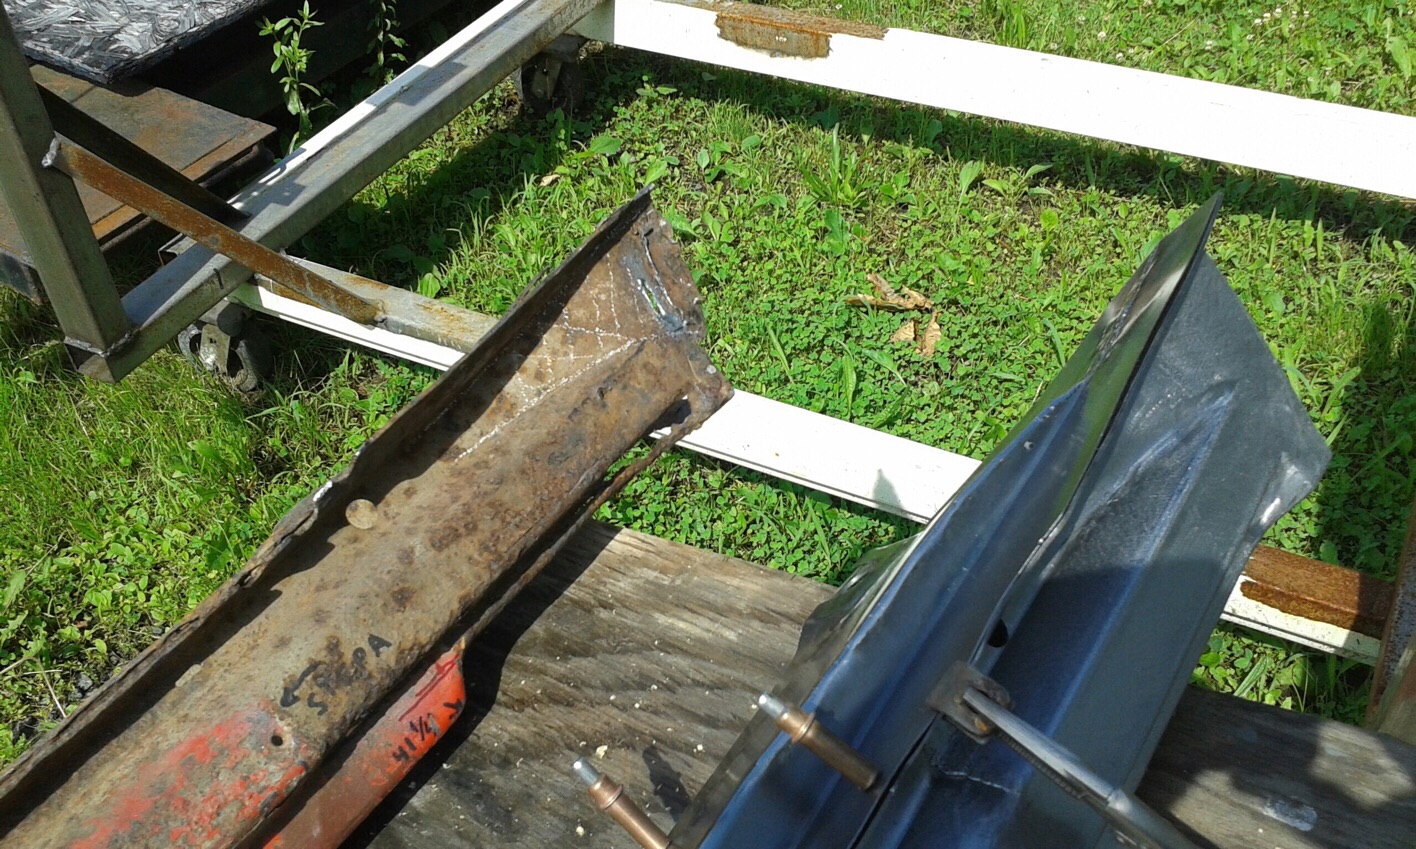
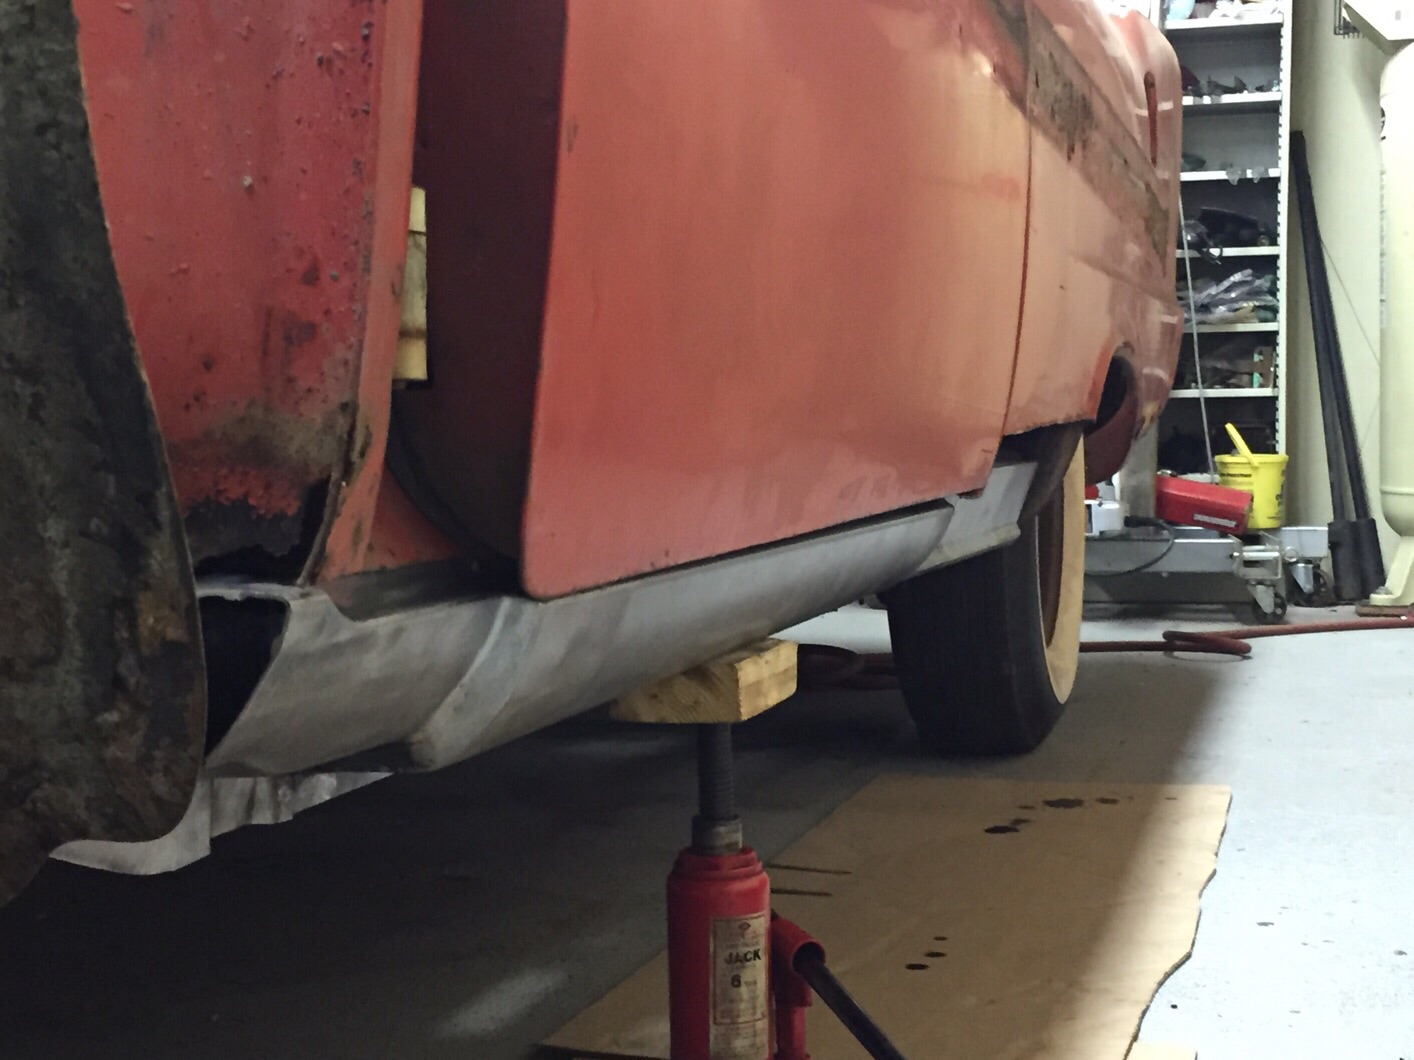
Location: Sept. 1958 | I currently have a fabricator making rocker panels for this car, using the Swedish reproductions as a base, which includes all 3 panels on each side. They are being done to resemble the OE panels even in areas that will never be seen. When they are completed I am going to install them. That's where I'm at with this car. |
|
| |
|
Expert
Posts: 2996
Location: Sept. 1958 | These are photos of how the rockers are starting to fit, not completed but I did test fit these last month.
 (image.jpg) (image.jpg)
 (image.jpg) (image.jpg)
 (image.jpg) (image.jpg)
 (image.jpg) (image.jpg)
 (image.jpg) (image.jpg)
 (image.jpg) (image.jpg)
 (image.jpg) (image.jpg)
Attachments
----------------
image.jpg (430KB - 365 downloads)
image.jpg (486KB - 332 downloads)
image.jpg (225KB - 296 downloads)
image.jpg (217KB - 298 downloads)
image.jpg (273KB - 336 downloads)
image.jpg (254KB - 313 downloads)
image.jpg (300KB - 328 downloads)
|
|
| |
|
Extreme Veteran
Posts: 481
Location: The Netherlands | Great work Matt!
Are you coming to Carlise? |
|
| |
|
Expert
Posts: 2996
Location: Sept. 1958 | Thank you Matt. Yes, I'll be in Carlisle, definitely. |
|
| |
|
Expert 5K+
Posts: 7819
Location: Williams California | Looks nice, Matt!! |
|
| |
|
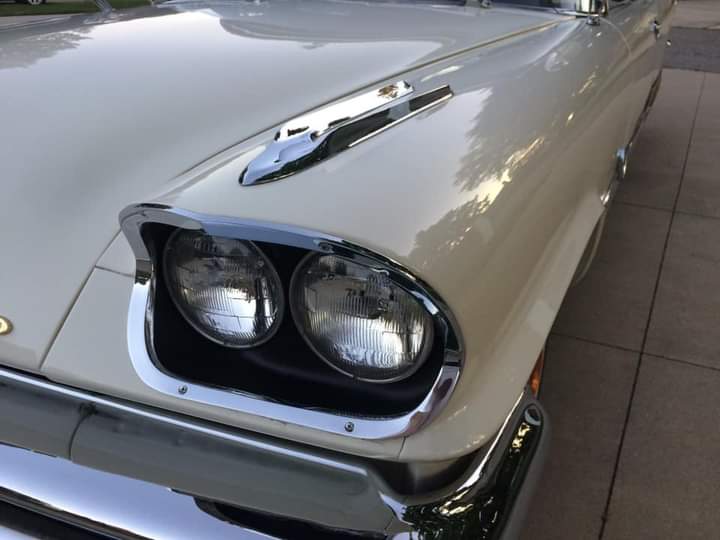
Elite Veteran
Posts: 1141
Location: Blackpool, United Kingdom. | Matt, just check you're drain holes in rockers, 57 and 58 I think are different , those holes you have look like 57 rockers, Paul. |
|
| |
|
Expert
Posts: 2996
Location: Sept. 1958 | Hi Paul, he is using my original rockers as patterns so everything is identical to what was on the car. |
|
| |
|
Expert
Posts: 2996
Location: Sept. 1958 | big m - 2015-06-22 4:42 PM
Looks nice, Matt!!
Thanks John! |
|
| |
|
Expert
Posts: 1906
Location: Ontario, Canada | Very professional, Matt. Nicely done!
Greg |
|
| |
|
Expert
Posts: 2996
Location: Sept. 1958 | Thanks Greg. This past Sunday I picked up all 6 panels from him. |
|
| |
|
Expert
Posts: 1906
Location: Ontario, Canada | christine-lover - 2015-06-30 8:11 PM
This past Sunday I picked up all 6 panels from him.
After waiting this long it probably feels great to have them home. Good luck with the assembly and keep us posted!
Greg |
|
| |
|
Expert
Posts: 2996
Location: Sept. 1958 | Yes, that will be the next adventure. And what an adventure that will be. I got to get a cleaner, since they have an oil coating on them, then POR-15 the inside areas of them and prime the other areas. |
|
| |
|
Expert
Posts: 2996
Location: Sept. 1958 | Test fitted the drivers side inner rocker, fits well.
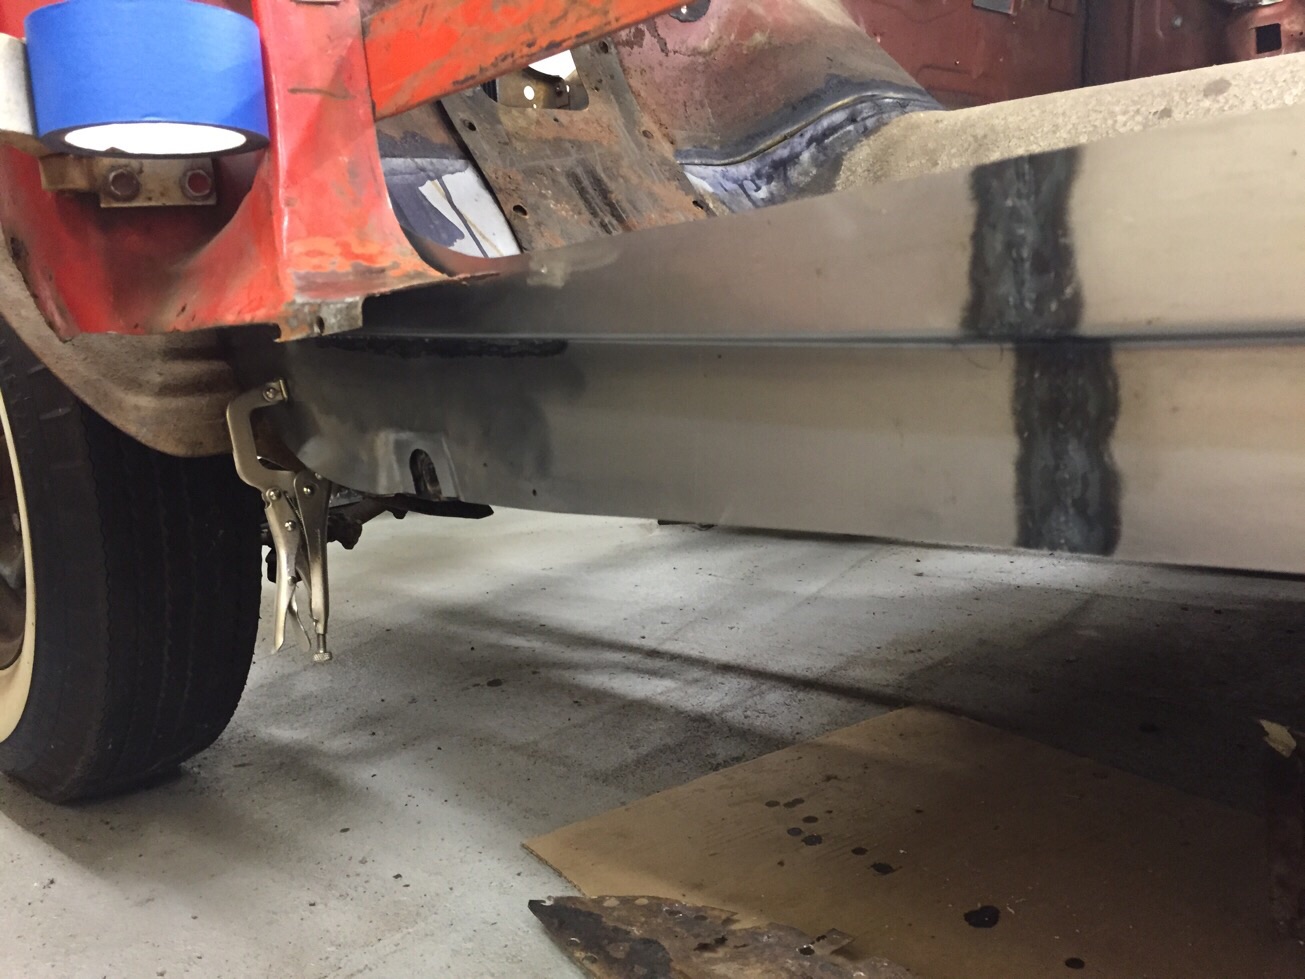 (image.jpg) (image.jpg)
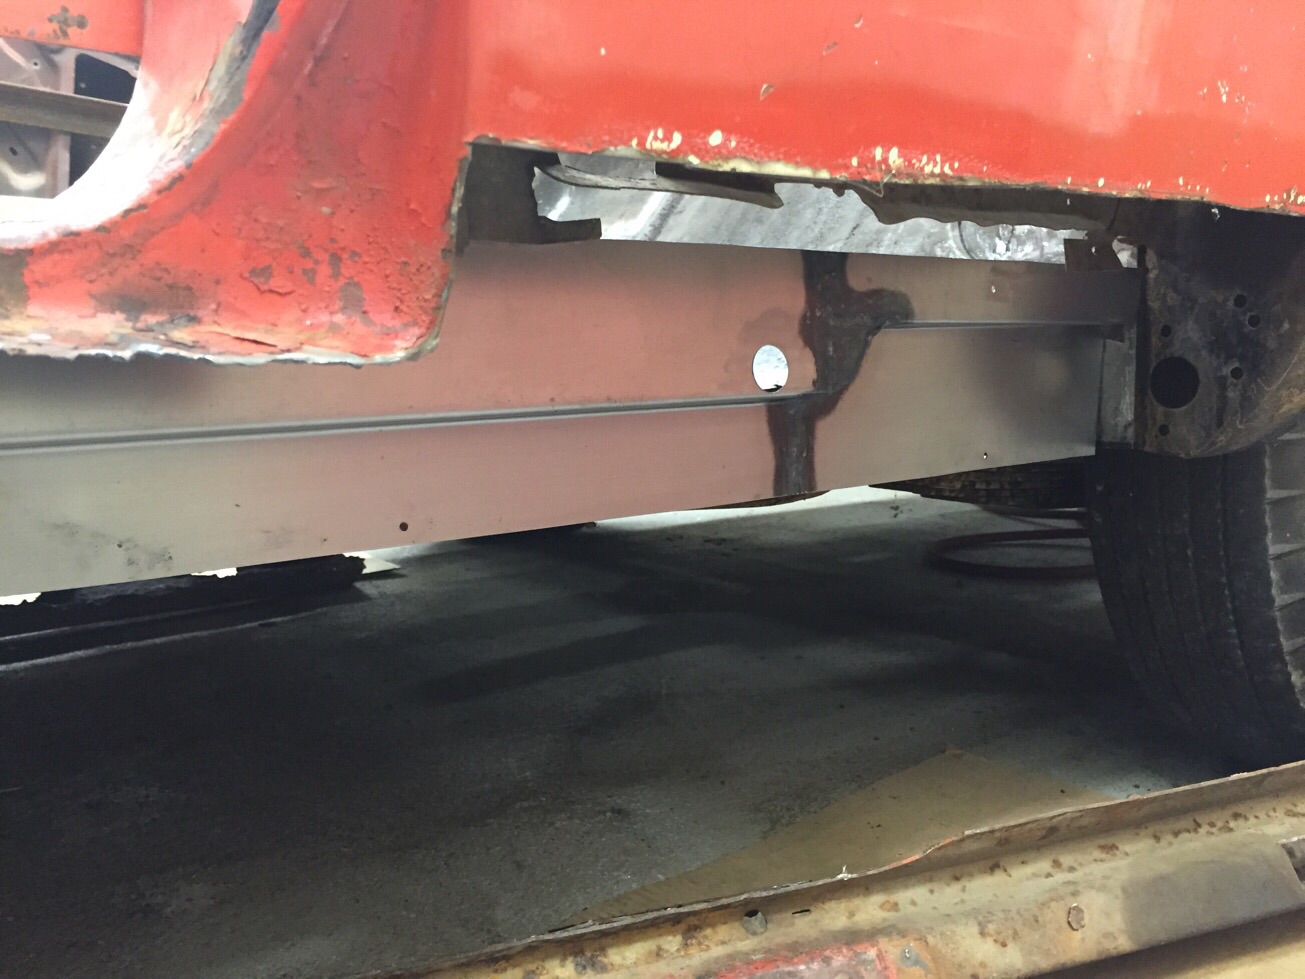 (image.jpg) (image.jpg)
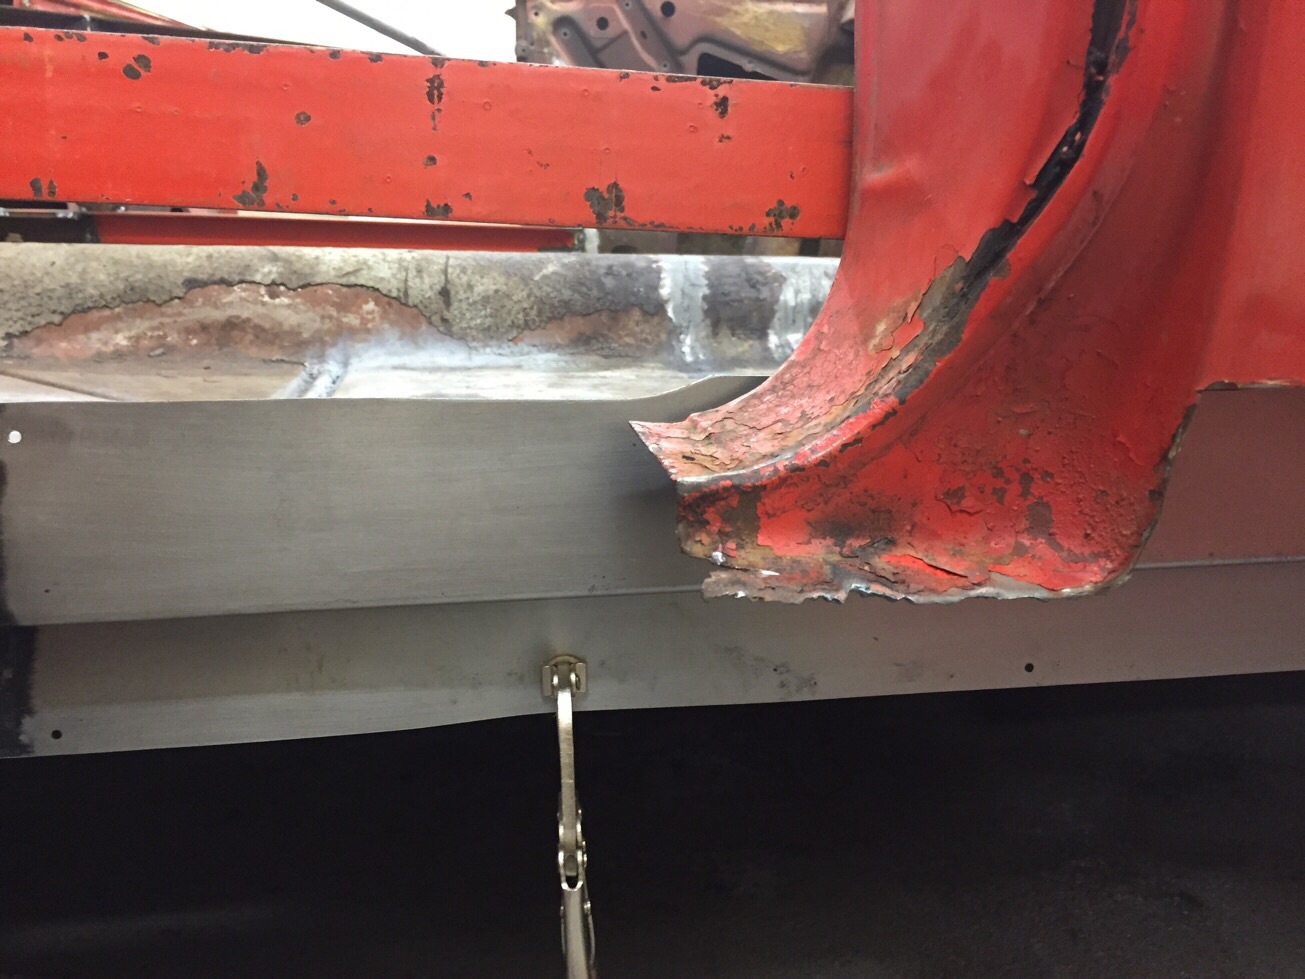 (image.jpg) (image.jpg)
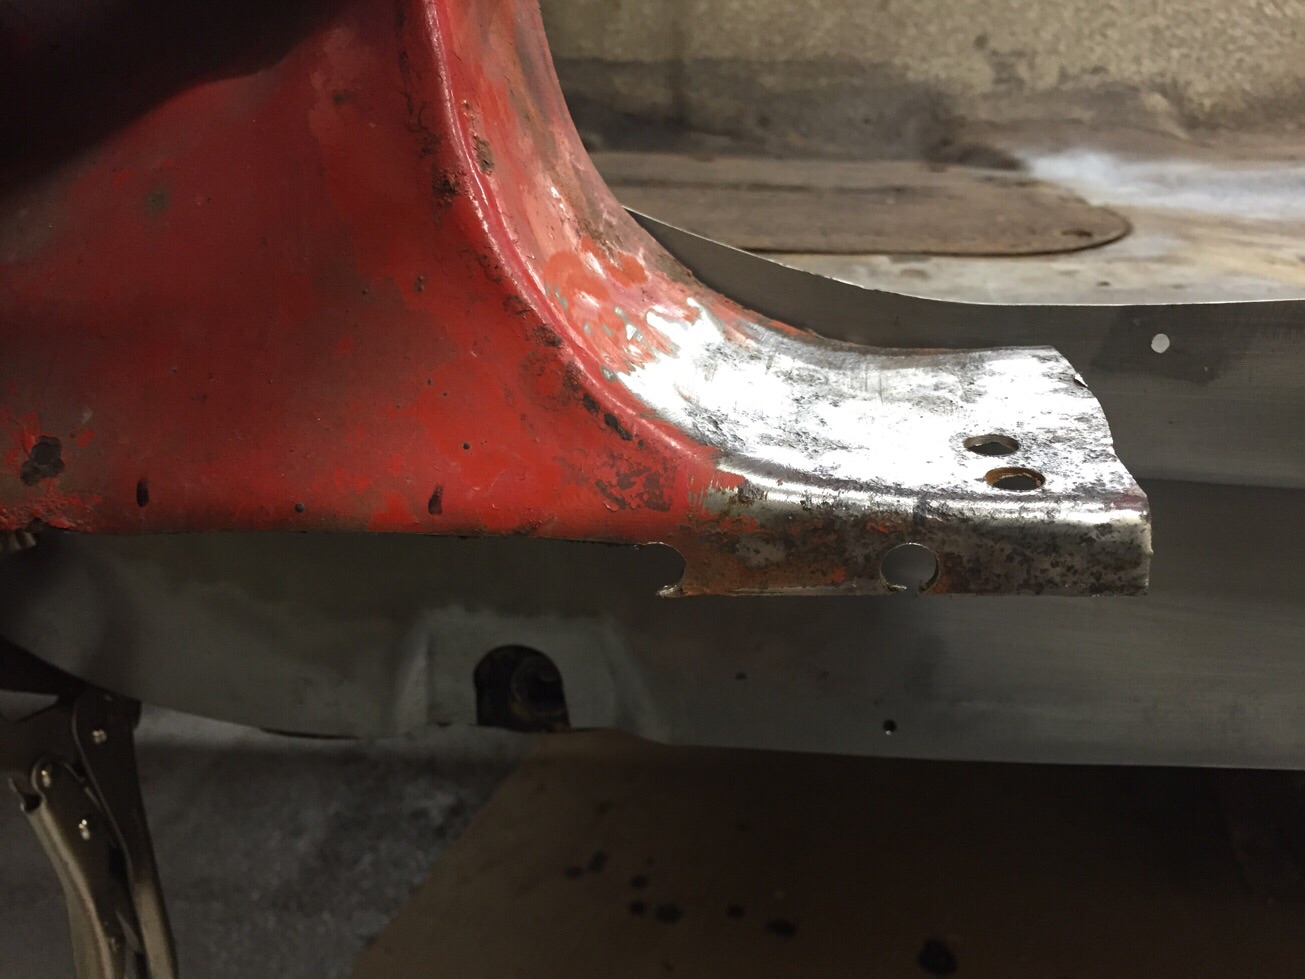 (image.jpg) (image.jpg)
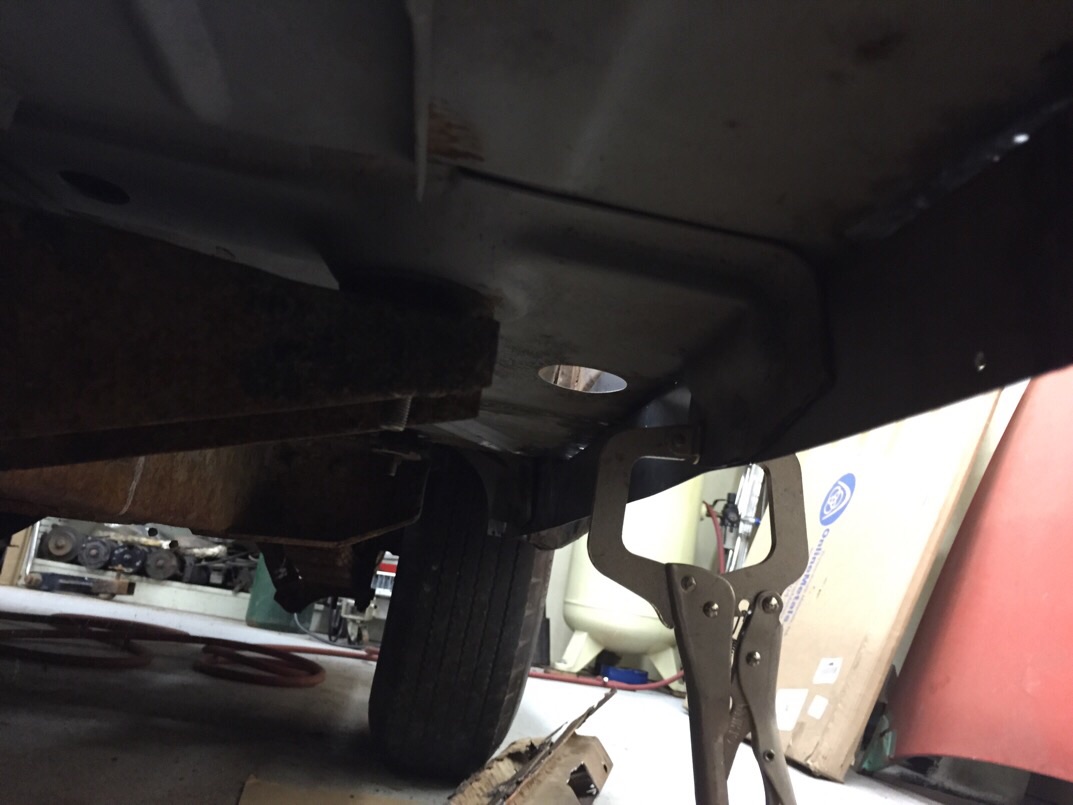 (image.jpg) (image.jpg)
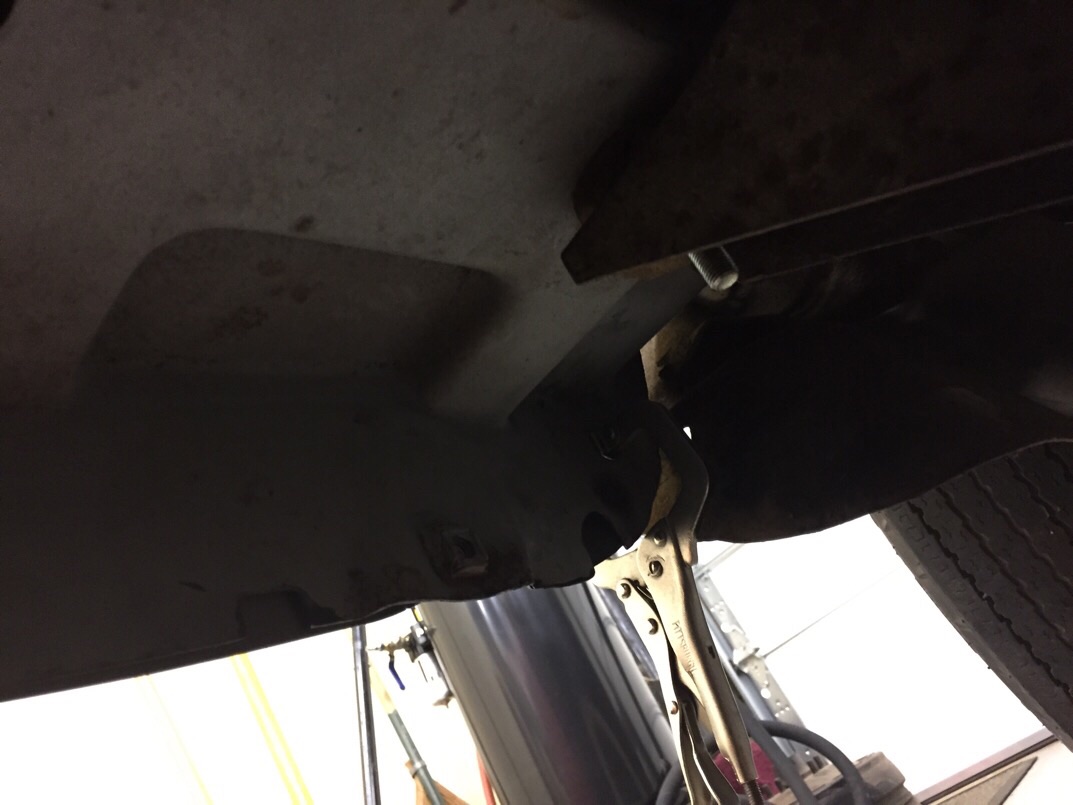 (image.jpg) (image.jpg)
Attachments
----------------
image.jpg (244KB - 306 downloads)
image.jpg (223KB - 288 downloads)
image.jpg (218KB - 300 downloads)
image.jpg (197KB - 326 downloads)
image.jpg (118KB - 324 downloads)
image.jpg (111KB - 320 downloads)
|
|
| |
|

Elite Veteran
Posts: 827
Location: tailFinland | Looking good! |
|
| |
|
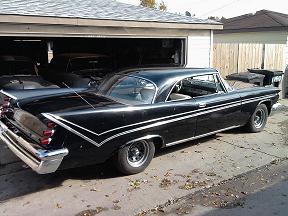
Elite Veteran
Posts: 929
Location: Finger Lakes NY | looking great matt! |
|
| |
|
Expert
Posts: 2996
Location: Sept. 1958 | Thanks! |
|
| |
|
Expert
Posts: 2996
Location: Sept. 1958 | I put together the 3 pieces of the rocker panels on the right side up into the car. I had to cut and rework the inner rocker to fit the floor better at the rear part. Before I would put each panel up into place and see how it fit and the fit well. This was the first time I put all 3 pieces into place to check fit. Well, they don't fit good at all, the inner is a half inch? away from the floor, also the outer rocker up front is way off where it would be bolted to the outrigger once fender is on.
Not really sure what to do now, I may have dug myself into a corner!!
 (image.jpg) (image.jpg)
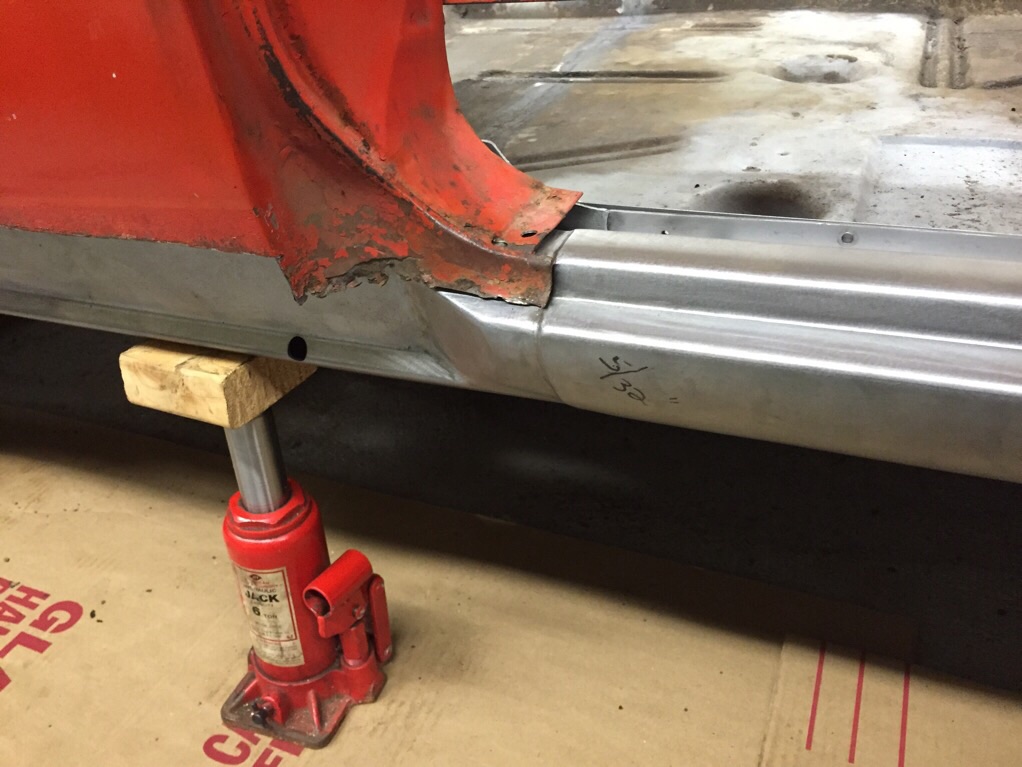 (image.jpg) (image.jpg)
 (image.jpg) (image.jpg)
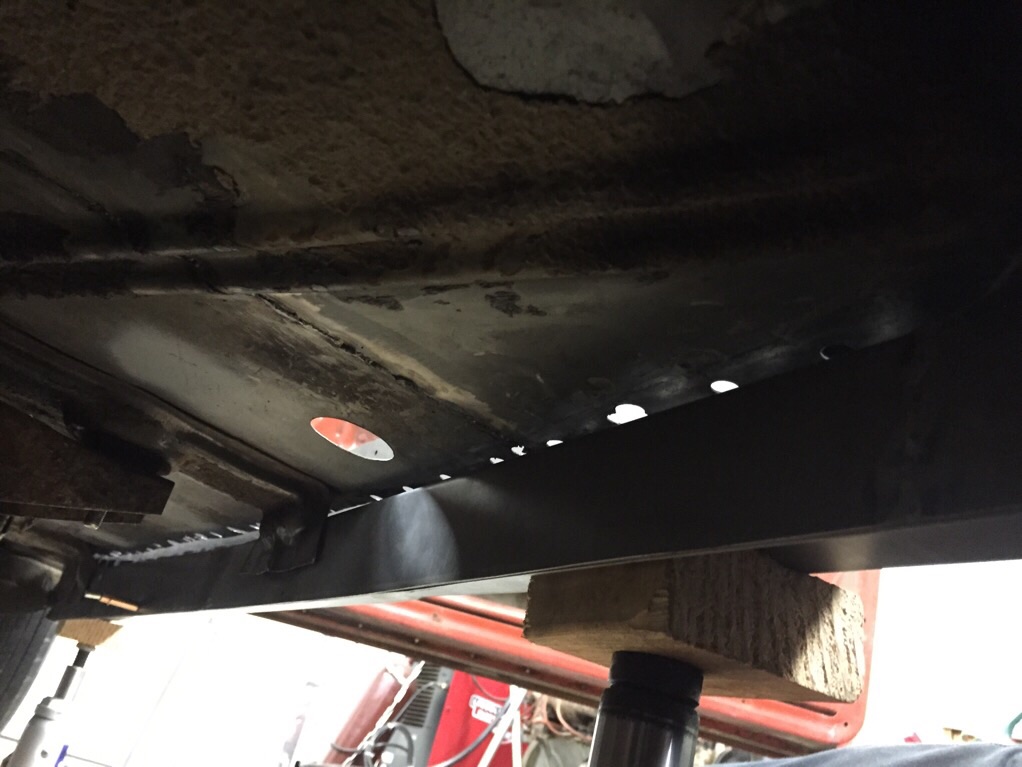 (image.jpg) (image.jpg)
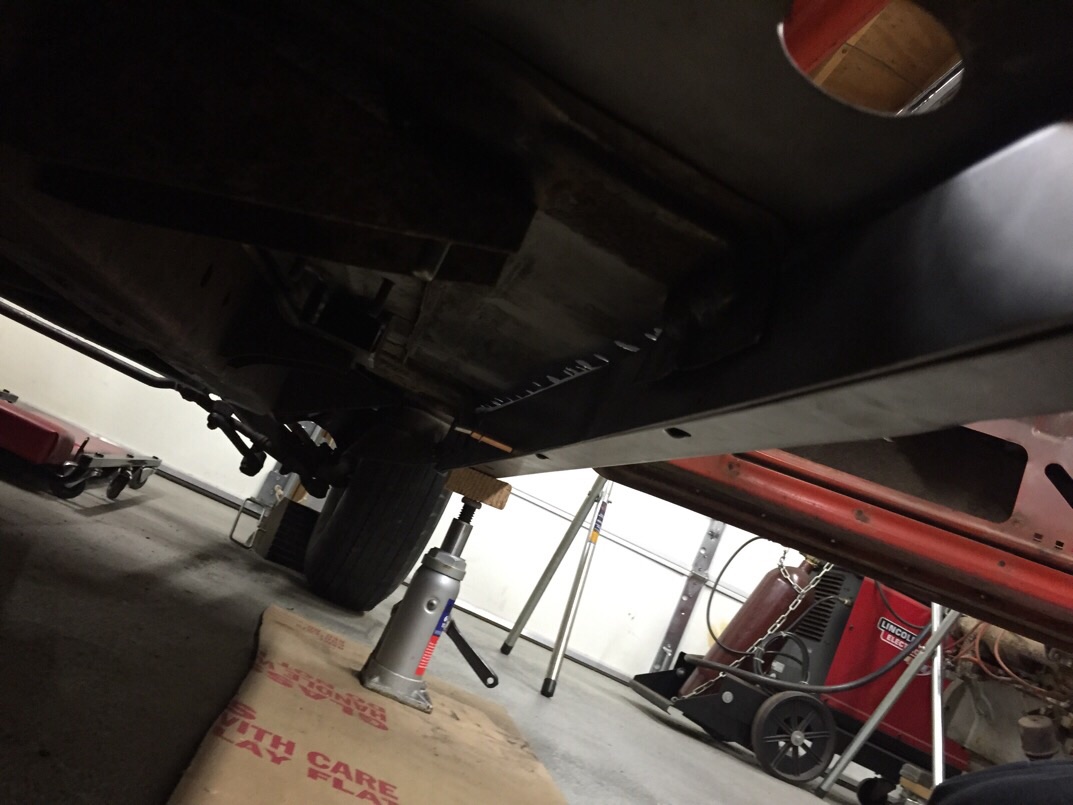 (image.jpg) (image.jpg)
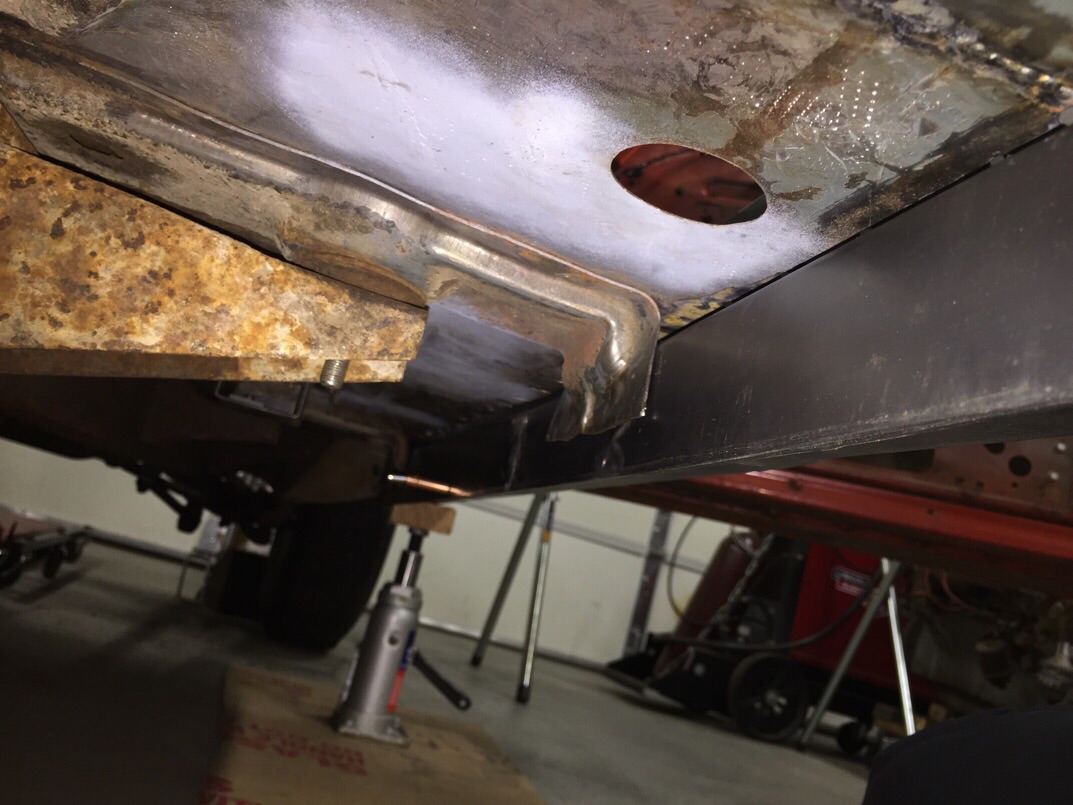 (image.jpg) (image.jpg)
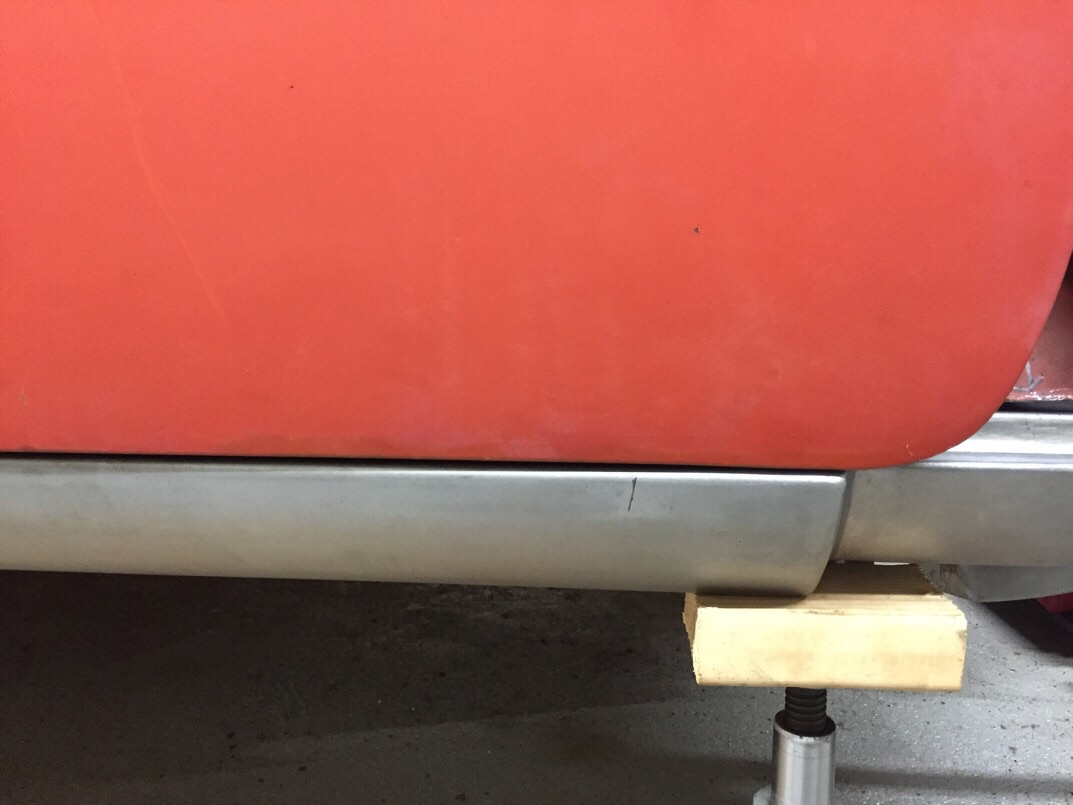 (image.jpg) (image.jpg)
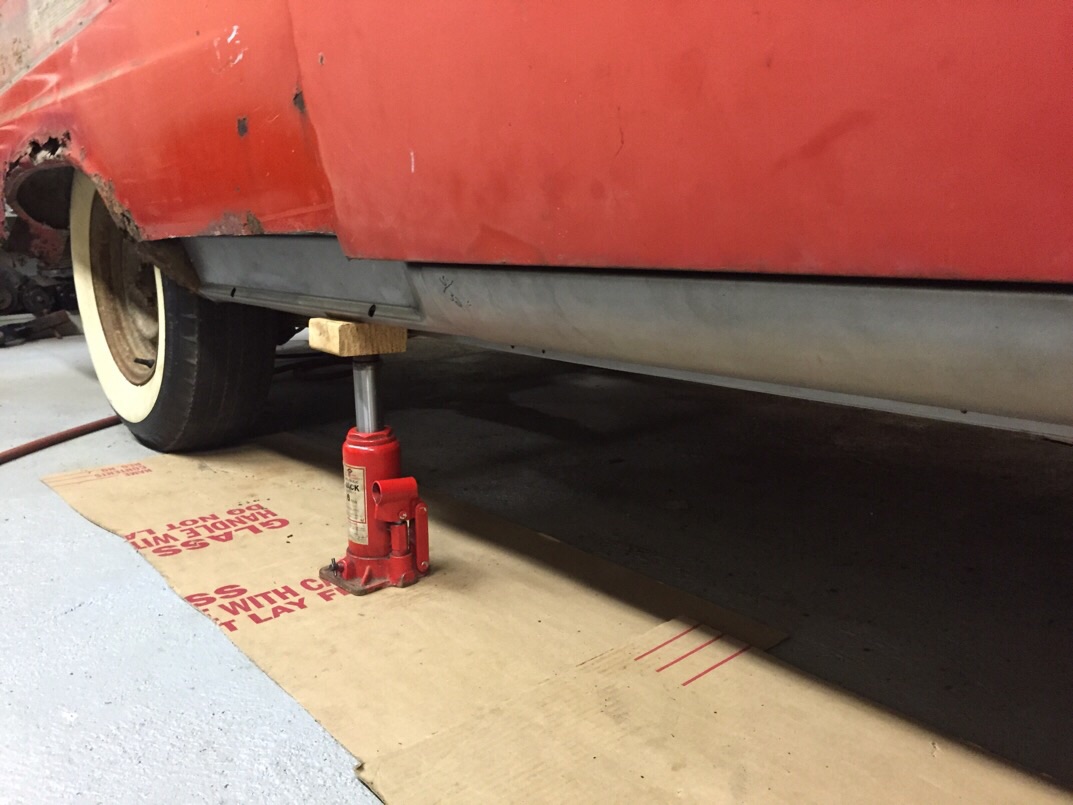 (image.jpg) (image.jpg)
 (image.jpg) (image.jpg)
Attachments
----------------
image.jpg (189KB - 291 downloads)
image.jpg (155KB - 321 downloads)
image.jpg (117KB - 303 downloads)
image.jpg (123KB - 286 downloads)
image.jpg (147KB - 286 downloads)
image.jpg (174KB - 316 downloads)
image.jpg (124KB - 286 downloads)
image.jpg (150KB - 278 downloads)
image.jpg (99KB - 297 downloads)
|
|
| |
|
Elite Veteran
Posts: 1141
Location: Blackpool, United Kingdom. | Hi Matt,
Don`t try putting all 3 pieces together at the same time, they probably won`t fit, put the inner rocker in first and work round that, the floor is not straight from one end to the other the inside of the car is wider in the middle, concentrate on getting that in first, then work the outer rocker in place to get a good gap under your door, a few vise grips are going to be needed to pull the sections together for welding, use self tapping screws to hold panels in place then you can plug weld holes up after,
Paul. |
|
| |
|
Expert
Posts: 2996
Location: Sept. 1958 | Thank you Paul. I believe I found the issue here, took me a while but it appears to be sagging, the sides of the cowl and also the overhang of the front of the quarters weigh a good bit and what needs to be done is to bring them up using a scaffold, which I started to bring it up. I'm just glad at this point I didn't try to cut the rockers in anyway to make them fit. |
|
| |
|
Board Moderator & Exner Expert 10K+
Posts: 13065
Location: Southern Sweden - Sturkö island | Very nice work, keep it up Matt and keep us posted! |
|
| |