|
|
Elite Veteran
Posts: 963
  
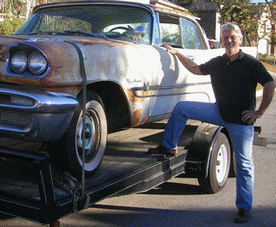
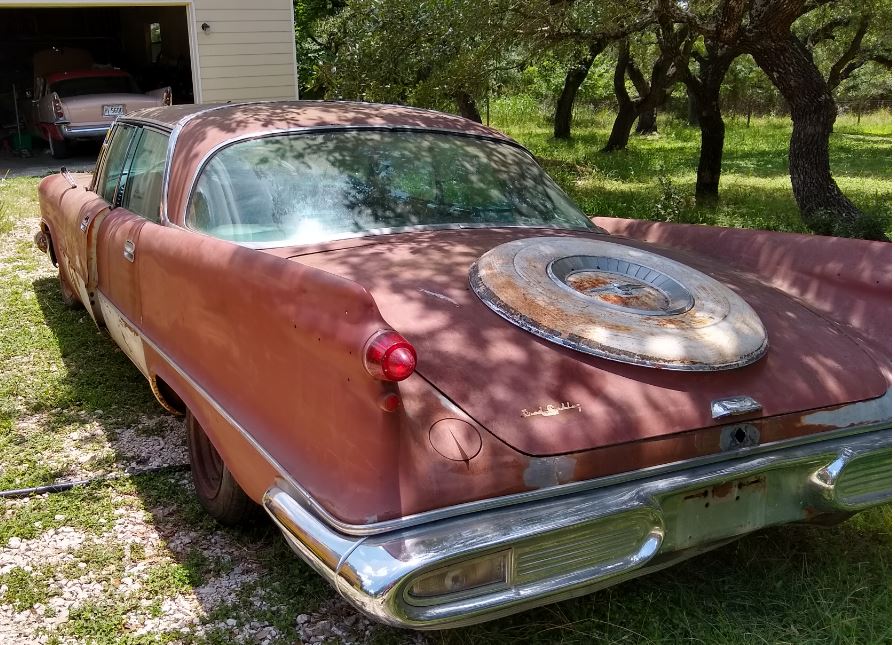
Location: San Antonio, TX | Bought a 58 Imperial. It's a base model 4 dr hdtp. However it's probably one the more highly optioned ones ever built.
Pwr seat, Pwr windows, Deluxe dual A/C, Auto-Pilot, Clock, Rear Shelf Speaker, Left remote mirror, optional hood ornament, Electro-touch radio w/pwr antenna, shaded backlight. That's all on the data tag. Also code 406... not sure what that is.
Runs and drives (yard drives, no brakes). Rough but not a lot of rust. I'll post some pictures when I get it cleaned up some. It's filthy. |
|
| |
|

Expert
Posts: 3967
 
Location: DFW, TX | Hey Dave, congrats! Sounds like a cool car. Let's see some pics! 
406 = Accessory Package A (vanity mirror + day/night dash mounted rearview mirror + license plate frame) |
|
| |
|

Elite Veteran
Posts: 967
Location: Pittsburgh, PA | [2019-03-14 Automated Thread Reset] |
|
| |
|
Elite Veteran
Posts: 963
Location: San Antonio, TX | Haven't done a whole lot since getting it. Got some brakes. Replaced the busted passenger window. Now this surprised me... a lot. Just for grins I decided to see about the A/C. So I hooked up a vacuum and evacuated for about an hour. Shut off the pump and it held solid. Added a couple of cans of 134a and it actually works. I have no idea when it last did. Blows cold from the back and front. Amazing. What will be truly amazing is if it still does tomorrow. I won't be surprised if it leaks like a sieve. |
|
| |
|
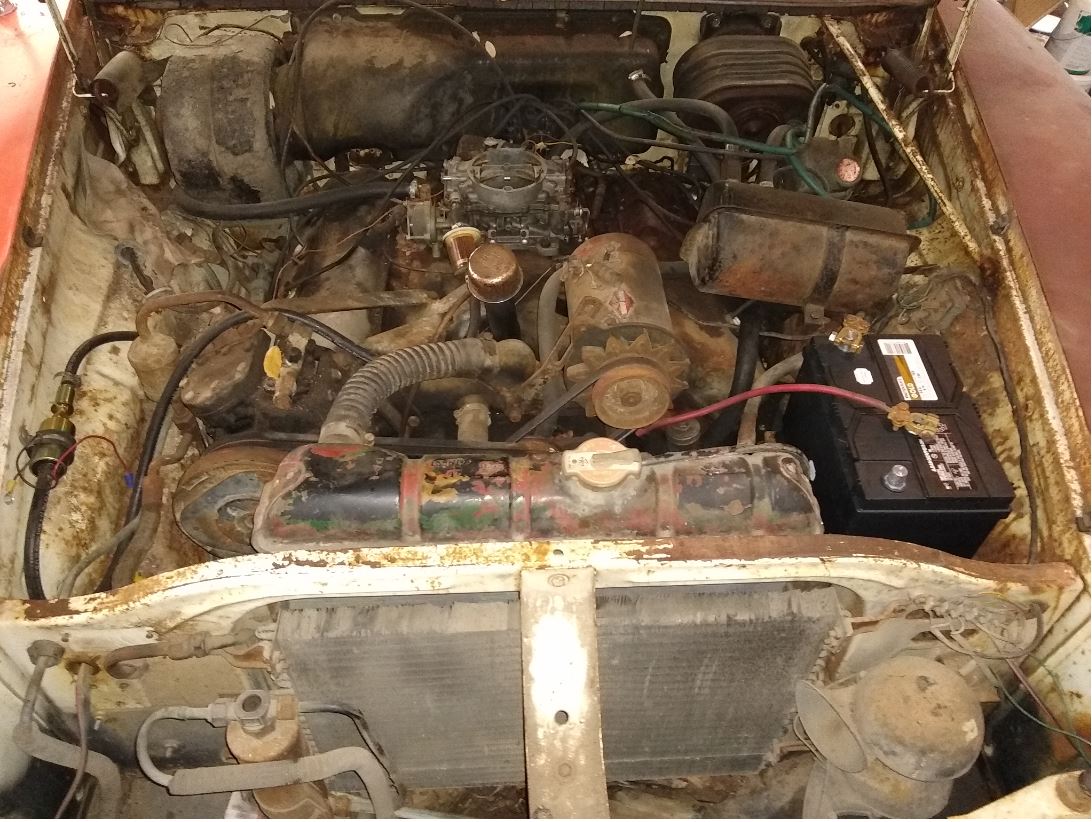
Elite Veteran
Posts: 963
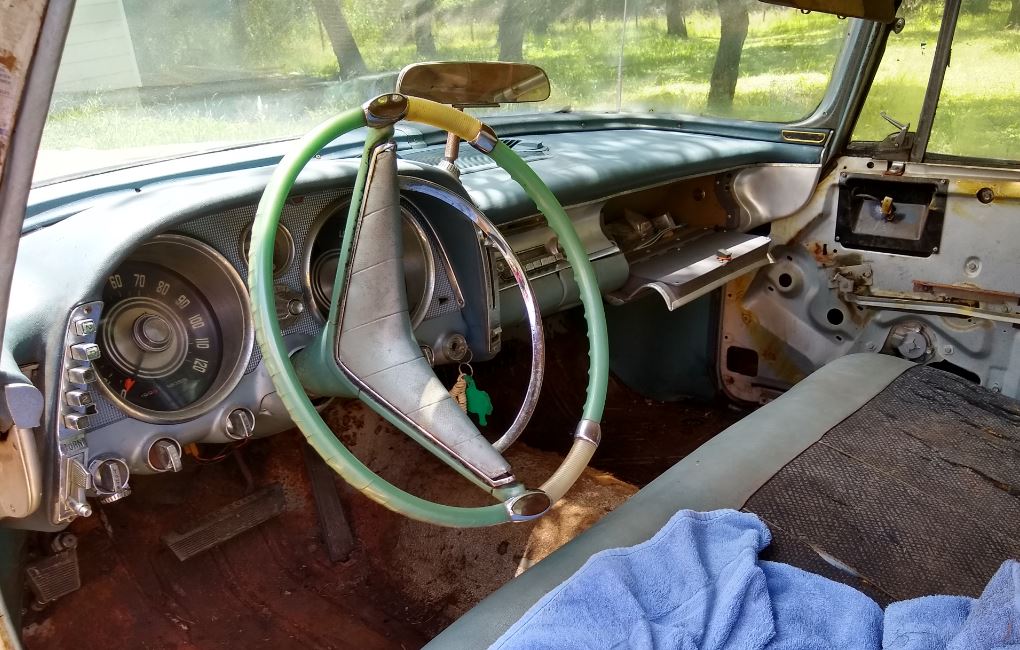
Location: San Antonio, TX | Yeah this will keep me busy for a bit. So far every thing I've tried works except the emergency brake and the dimmer switch. 392 starts right up every time and runs smooth and quiet. I need to do a compression test still. I haven't driven it on the road so I don't know if the Auto-Pilot does in fact work.
 (58imp62819.JPG) (58imp62819.JPG)
 (58imp62819a.JPG) (58imp62819a.JPG)
 (58imp62819b.JPG) (58imp62819b.JPG)
 (58imp62819c.JPG) (58imp62819c.JPG)
 (58imp62819d.JPG) (58imp62819d.JPG)
 (58imp62819e.JPG) (58imp62819e.JPG)
 (58imp62819f.JPG) (58imp62819f.JPG)
 (58imp62819g.JPG) (58imp62819g.JPG)
Attachments
----------------
 58imp62819.JPG (151KB - 457 downloads) 58imp62819.JPG (151KB - 457 downloads)
58imp62819a.JPG (107KB - 473 downloads)
58imp62819b.JPG (58KB - 451 downloads)
58imp62819c.JPG (161KB - 465 downloads)
58imp62819d.JPG (146KB - 471 downloads)
58imp62819e.JPG (140KB - 460 downloads)
58imp62819f.JPG (138KB - 468 downloads)
58imp62819g.JPG (127KB - 468 downloads)
|
|
| |
|

Expert
Posts: 2308
Location: The Bat Cave, Fairborn, OH | Looks like a really solid car from the pictures you've posted. Congrats on a decent score. I'm surprised that the A/C held a charge of R-134a refrigerant and managed to actually work (for awhile). That was definitely an R-12 set-up and has the wrong o-rings and stuff to keep a 134a charge in.Still, it is encouraging to know the A/C can be made to work. |
|
| |
|
Elite Veteran
Posts: 915
Location: Pau, S-W France | On my 57 when i restored it i put also R134 ( 15 years ago ?) but i removed the mineral oil compressor and put the correct oil (synthetic). The A/C blows cold but after one or two years a leak appeared at the sight glass and since i haven't replaced it. if I put back into operation today i 'll charge the system with Duracool, that's what i did in the '70 Ford, that works great (and with original oil). |
|
| |
|
Expert
Posts: 2490
Location: Kansas City, KS | That is a uniquely optioned Base model! Electric door locks and rear defogger are the only options I see missing.
On your dimmer switch, check your bulbs first. I've had them burned out more often than the switch.
Looks like a very solid body too, you did good getting this one. I can't wait to see more updates! |
|
| |
|
Elite Veteran
Posts: 963
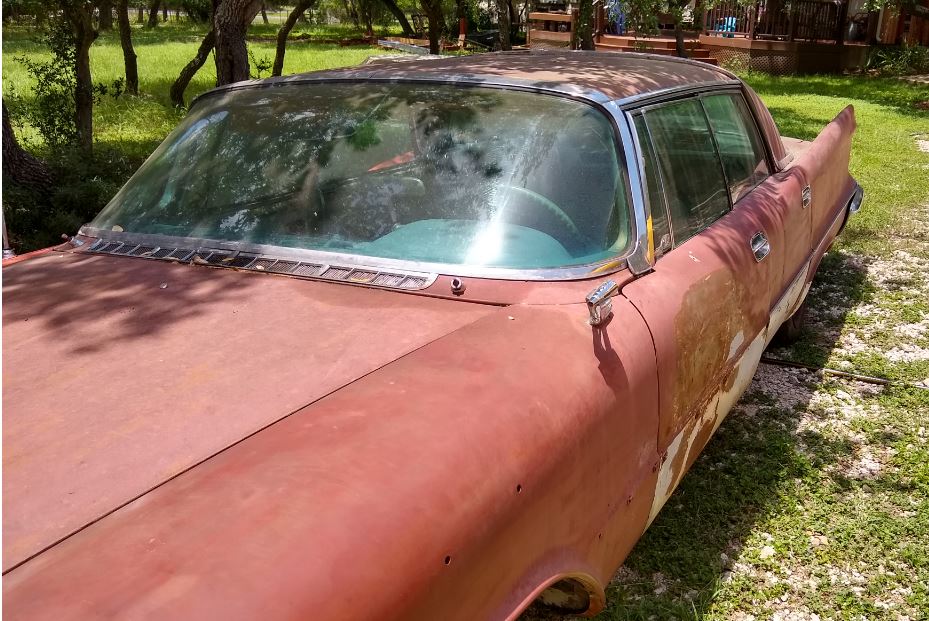
Location: San Antonio, TX | Yeah the body is very solid. There is some rust on the drivers floor not bad... 2 inch hole. Other than that really nice. I've got all the trim including the option hood ornament.
My sedan parts car has the pwr door locks... have to check and see if it has the rear defogger. Maybe I use them to give the 4dr hdtp an upgrade.
 (58imp62919.JPG) (58imp62919.JPG)
Attachments
----------------
58imp62919.JPG (185KB - 463 downloads)
|
|
| |
|
Elite Veteran
Posts: 915
Location: Pau, S-W France | If you have dual A/C you can't have the rear defoger |
|
| |
|
Elite Veteran
Posts: 963
Location: San Antonio, TX | Why is that? Compatibility issue or clearance? It looks like one could fit there. It does however look like there is no clearance for the rear speaker in the center hole. The side speaker holes are used for the A/C diffusers.
Different issue. Does anyone know of a source for the woven mat that goes on the package shelf? |
|
| |
|
Expert
Posts: 2490
Location: Kansas City, KS | Phil is right. Rear defogger would go in the same place as the large intake vent on dual A/C so it's an either or option same as the instant heat and A/C.
I got the defogger confused with rear center speaker which is possible with dual A/C
 (DSC01396.JPG) (DSC01396.JPG)
Attachments
----------------
DSC01396.JPG (69KB - 477 downloads)
|
|
| |
|
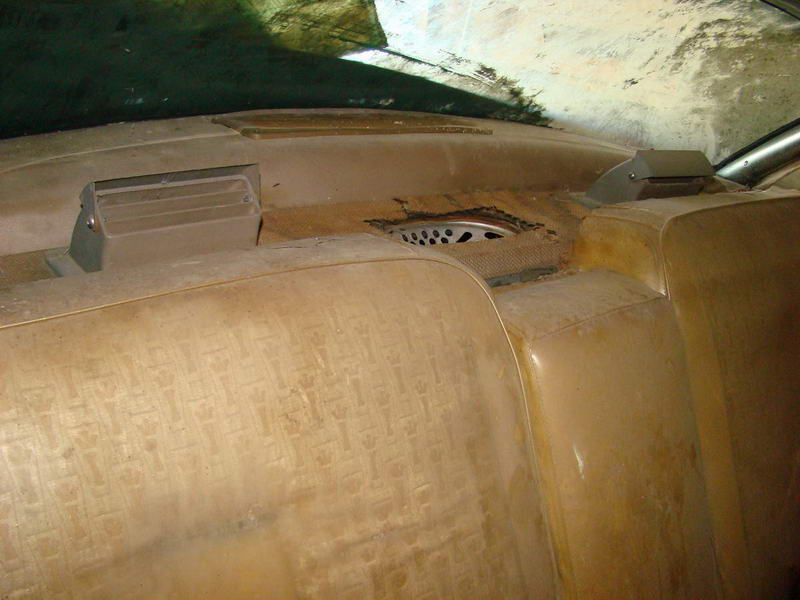
Elite Veteran
Posts: 963
Location: San Antonio, TX | Ok, I guess I'm confused or just not getting it. I always thought this was the slot for the rear defogger. I see woven part of your's is like mine... touch it and it's dust
 (58def.JPG) (58def.JPG)
Attachments
----------------
58def.JPG (52KB - 468 downloads)
|
|
| |
|
Expert
Posts: 2490
Location: Kansas City, KS | That is the slot for rear defogger. The interference would be top side trim of each. Plus, it would be counter-productive to have both as the rear a/c could defog the window if needed.
Yes, my woven mat is dust and that's on a car that's been garaged almost entirely since new. I never looked for a replacement source. |
|
| |
|

Extreme Veteran
Posts: 558
Location: Grenoble - France | And don't lose that parking brake release knob and light, that's 1 year only, and specific to the cars that came with Autopilot. |
|
| |
|
Elite Veteran
Posts: 963
Location: San Antonio, TX | Thanks. I'll definitely keep track of them during the restoration.
 (ebrake.JPG) (ebrake.JPG)
Attachments
----------------
ebrake.JPG (89KB - 499 downloads)
|
|
| |
|
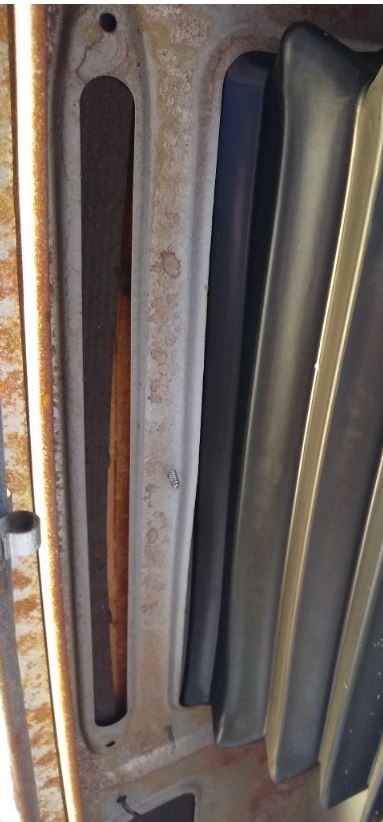
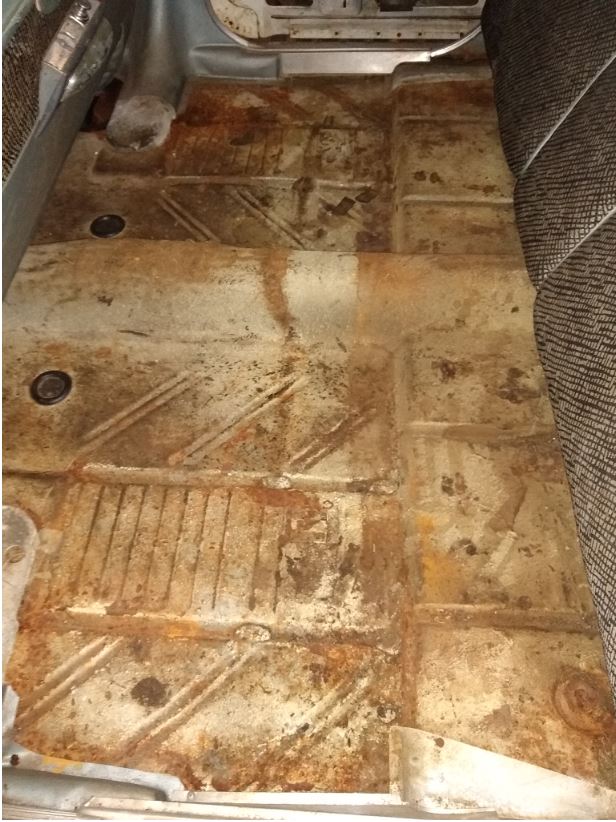
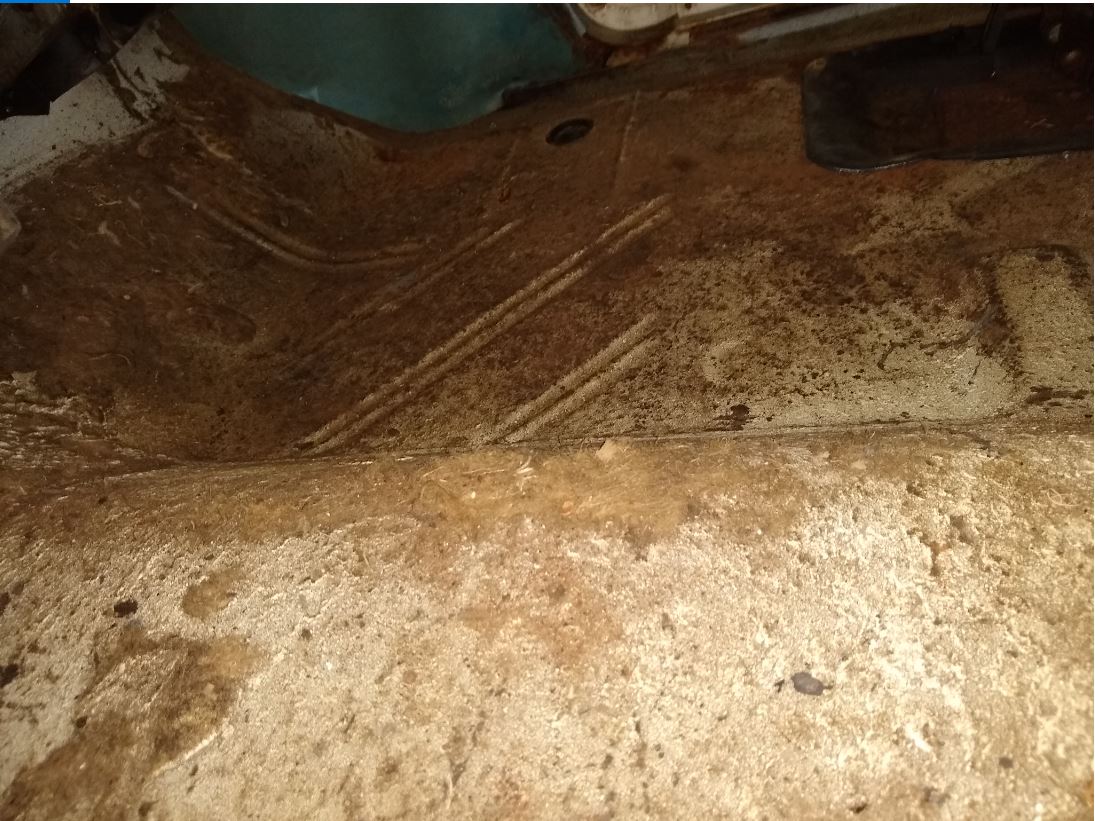
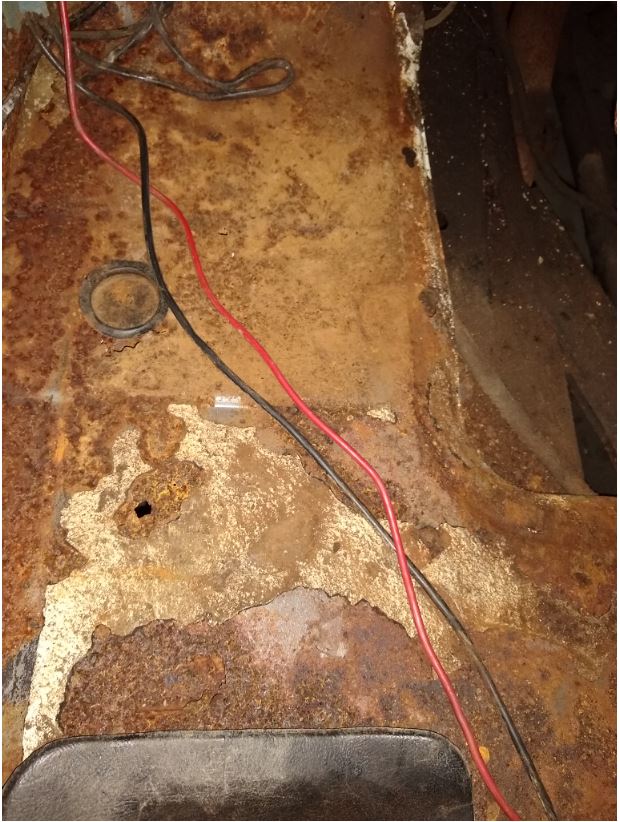
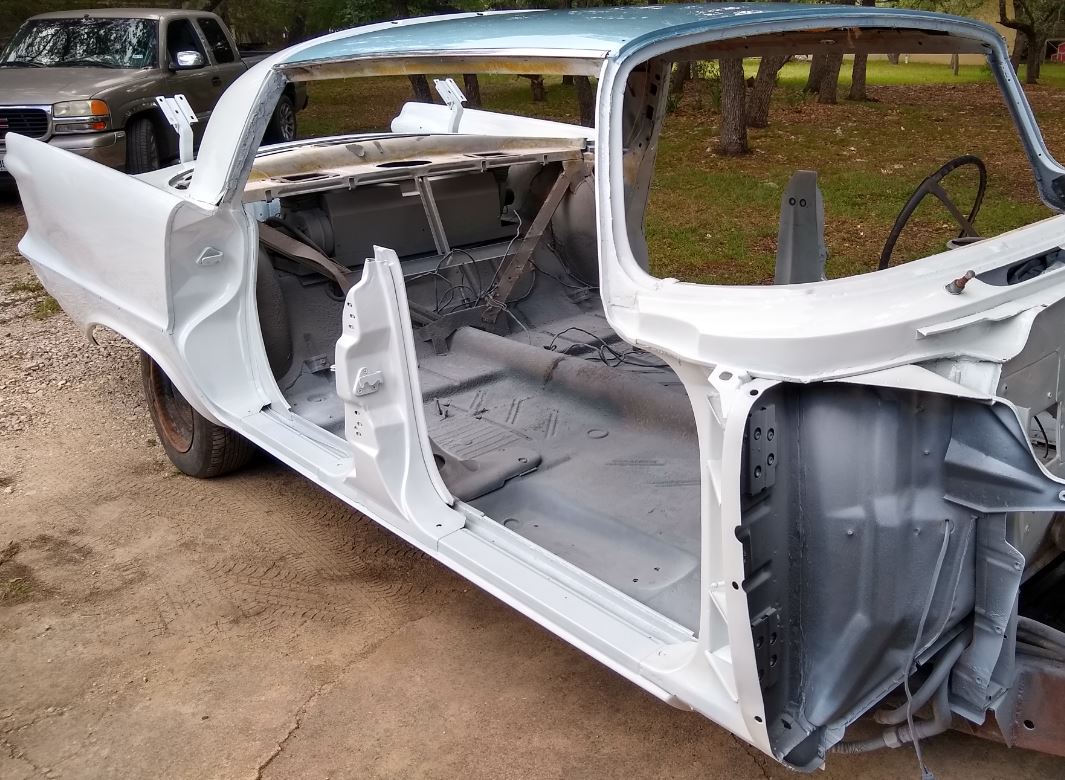
Elite Veteran
Posts: 963
Location: San Antonio, TX | Floors, rockers and trunk solid with the exception of the drivers floor. A little work to do there but minor. Whew.
 (58792019.JPG) (58792019.JPG)
 (58792019b.JPG) (58792019b.JPG)
 (58792019a.JPG) (58792019a.JPG)
 (58imp62819f.JPG) (58imp62819f.JPG)
Attachments
----------------
58792019.JPG (106KB - 448 downloads)
58792019b.JPG (181KB - 481 downloads)
58792019a.JPG (119KB - 462 downloads)
58imp62819f.JPG (138KB - 460 downloads)
|
|
| |
|
Expert
Posts: 2490
Location: Kansas City, KS | Nice metal! You still have that 1in black filler strip between the trunk extension and the quarter panel too |
|
| |
|
Elite Veteran
Posts: 963
Location: San Antonio, TX | Almost done with the toilet seat. Bit more sanding yet. Hood is next
 (ToiletSeat.JPG) (ToiletSeat.JPG)
Attachments
----------------
ToiletSeat.JPG (70KB - 410 downloads)
|
|
| |
|
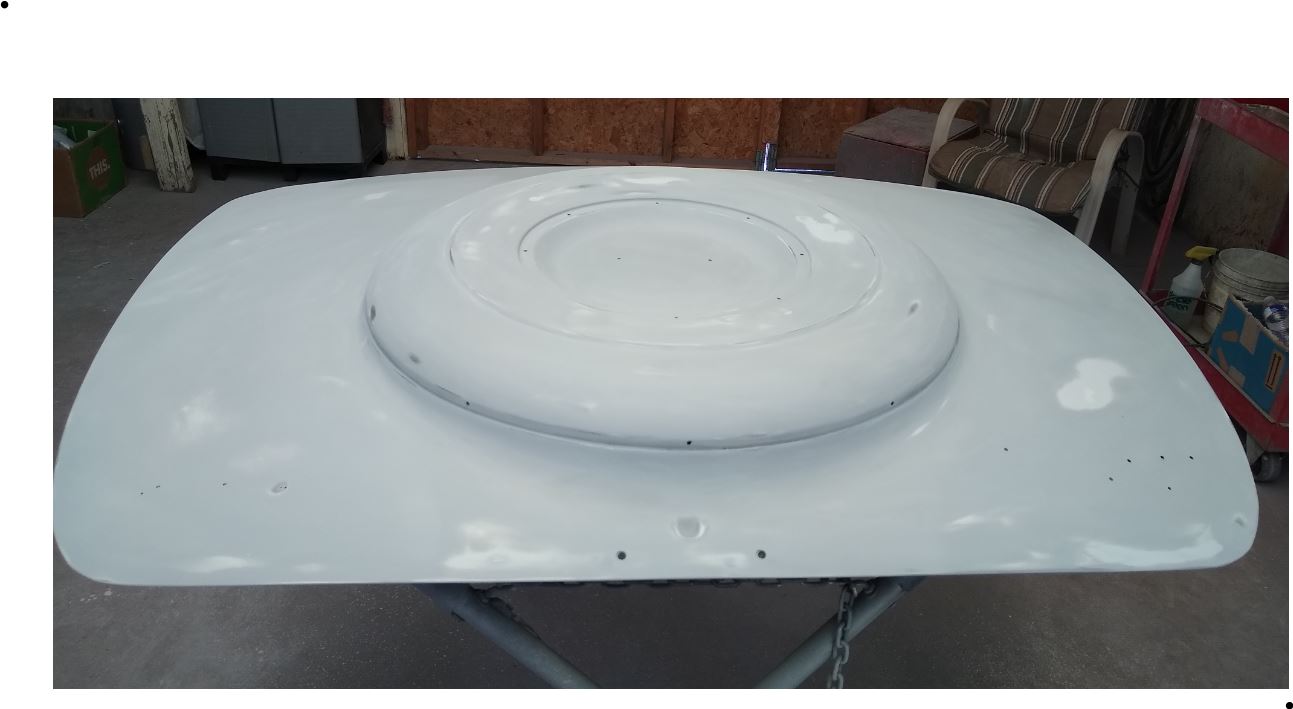
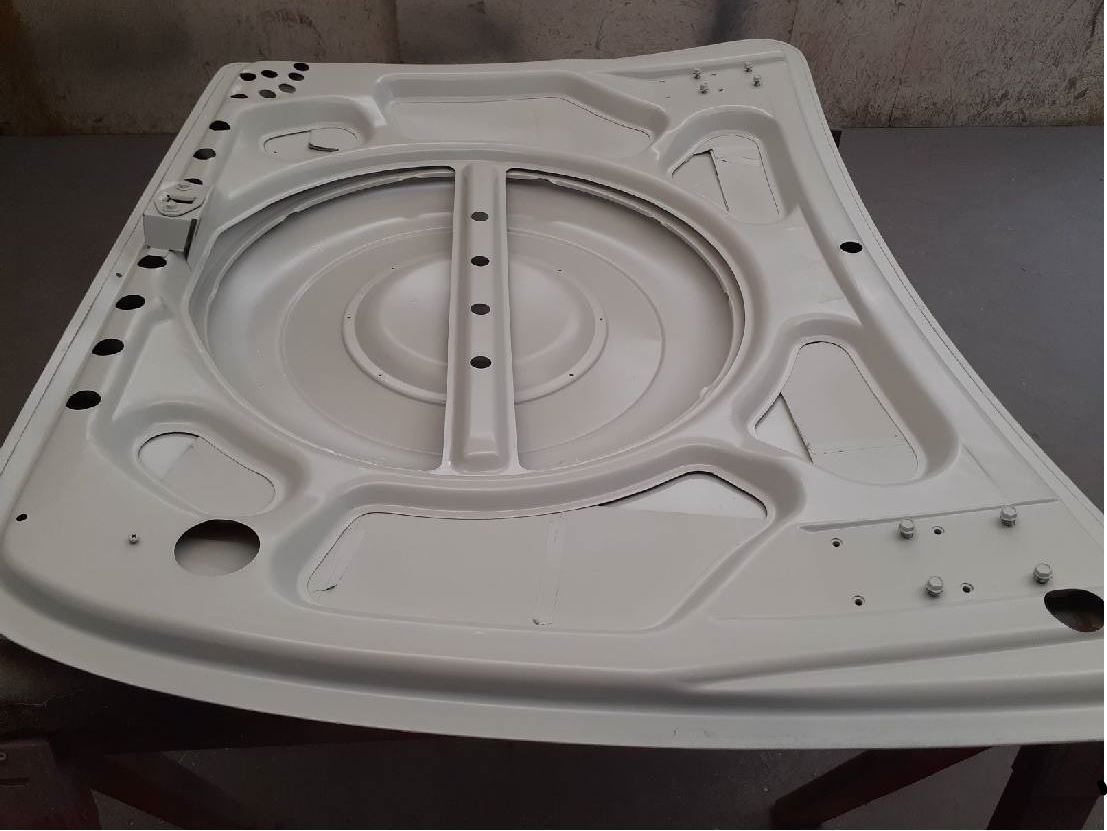
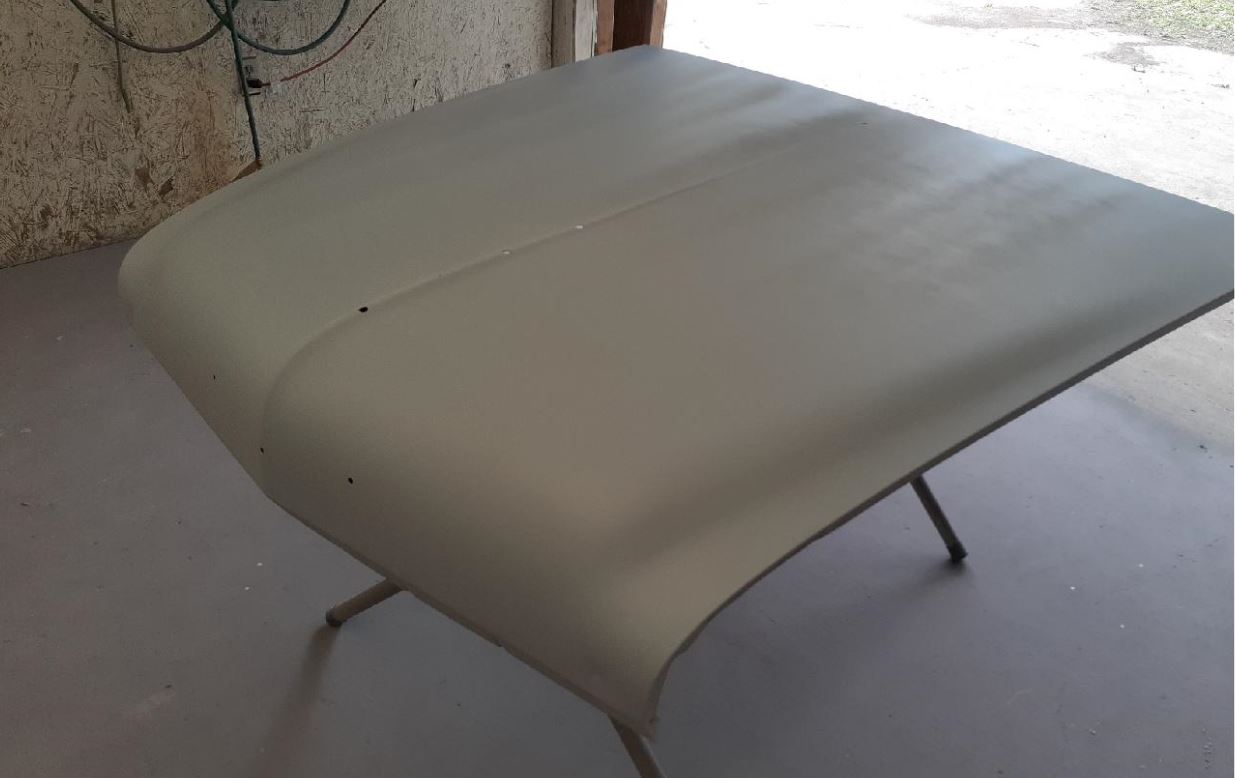
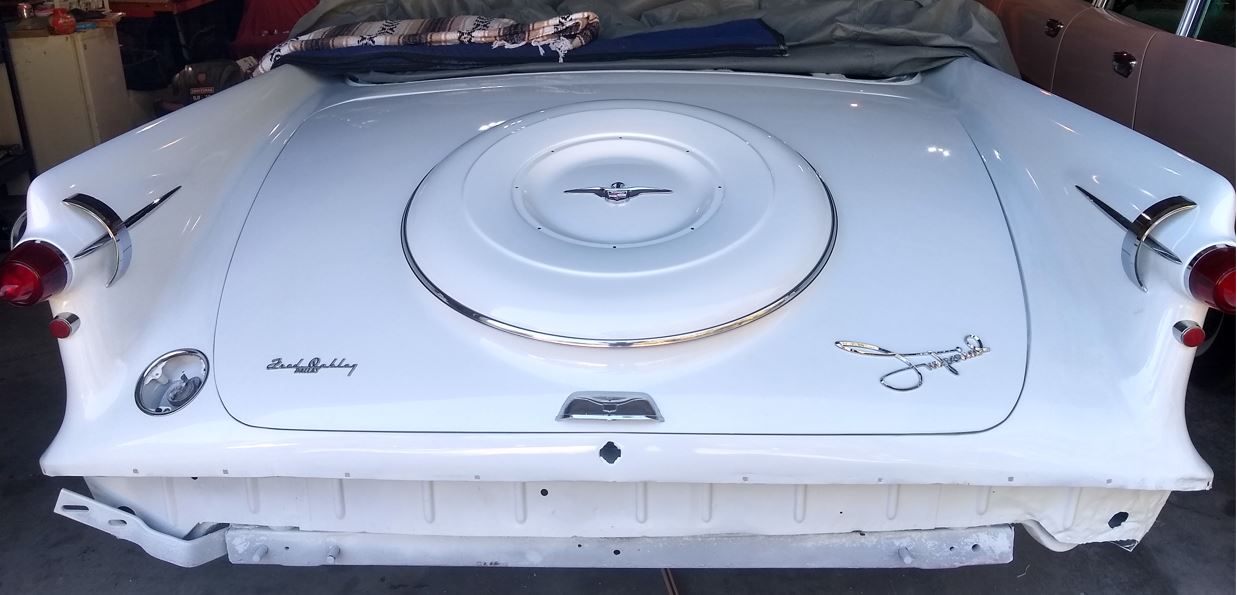
Elite Veteran
Posts: 963
Location: San Antonio, TX | Deck lid had a few dings which needed some work. Hood was essentially perfect.
 (decklid.JPG) (decklid.JPG)
 (hood.JPG) (hood.JPG)
Attachments
----------------
decklid.JPG (88KB - 410 downloads)
hood.JPG (71KB - 403 downloads)
|
|
| |
|
Expert
Posts: 1892
| .
The Flitesweep rear deck lid is optional equipment too… it should have code 365 on the data tag… |
|
| |
|
Elite Veteran
Posts: 963
Location: San Antonio, TX | Yes, you are correct.
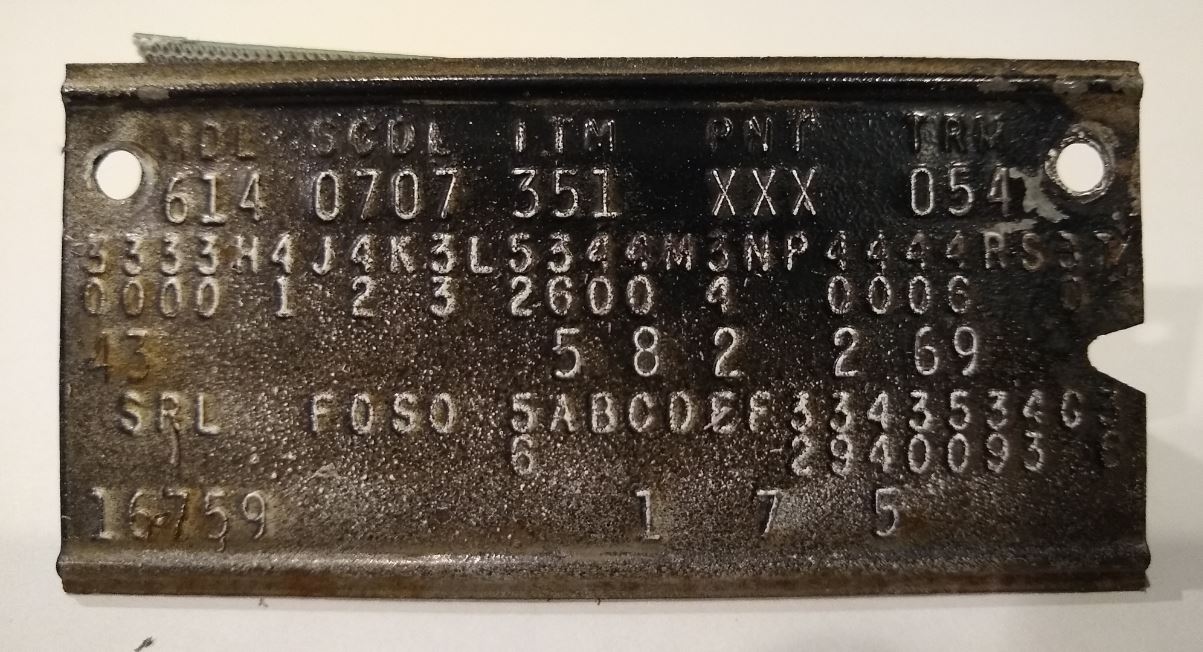 (datatag.JPG) (datatag.JPG)
Attachments
----------------
datatag.JPG (162KB - 396 downloads)
|
|
| |
|
Expert
Posts: 1892
| .
Thanks for posting the picture.
Where did you see a code 406, as you stated above?
I think originally your A/C is single unit (because code 341), and not 342 as dual unit has
I see also code 307 that mean Power Door Locks
|
|
| |
|
Expert
Posts: 1892
| .
I guess if your car would be equipped with «Mirror Package A» - the code 406 would be here…
Just on the left of ?olumn code 467 – Solex Tinted Glass with Shaded Windshield
 (1.jpg) (1.jpg)
Attachments
----------------
1.jpg (65KB - 413 downloads)
|
|
| |
|
Elite Veteran
Posts: 963
Location: San Antonio, TX | Oops. I might have posted the wrong tag. I'll check |
|
| |
|
Elite Veteran
Posts: 963
Location: San Antonio, TX | Sorry about that. I had the tag from my sedan posted. The correct one is up there now. |
|
| |
|
Expert
Posts: 1892
| .
614 = Imperial Custom Southampton 4door Hardtop
SCDL 0707 = Scheduled on July 07, 1958
ITM 351 = 51th car built that day
PNT XXX = Paint Ermine (originally White)
TRM 054 = Blue Diamond Glow Jacquard Cloth and Blue Vinyl
304 = Power Windows
303 = Power Seat 6 Way
365 = Flitesweep Rear Deck Lid
408 = Hood Ornament
342 = Heater and Air Conditioning – Dual Unit
402 = Left Outside Rear View Mirror with Remote Control (instead Conventional Mirror 401 below)
406 = Mirror Package «A» including: 401 = Left Outside Rear View Mirror, 404 = Prismatic Tilt Type Mirror, 405 = Visor Vanity Mirror
469 = Solex Tinted Glass and Large Shaded Rear Window
SRL 16759 = Serial Number LY1*16759
445 = Electro Touch Tuner Radio (including Power Antenna on Imperials)
You told that your car equipped with Rear Shelf Speaker option (code 327), but if you take a closer look it is not a code 327 – it is code F7.
Unfortunately I don’t have any info about it and about code C1 as well.
Can you post the picture of broadcast sheet? (Of course if you have it); It might be clear the situation…
|
|
| |
|
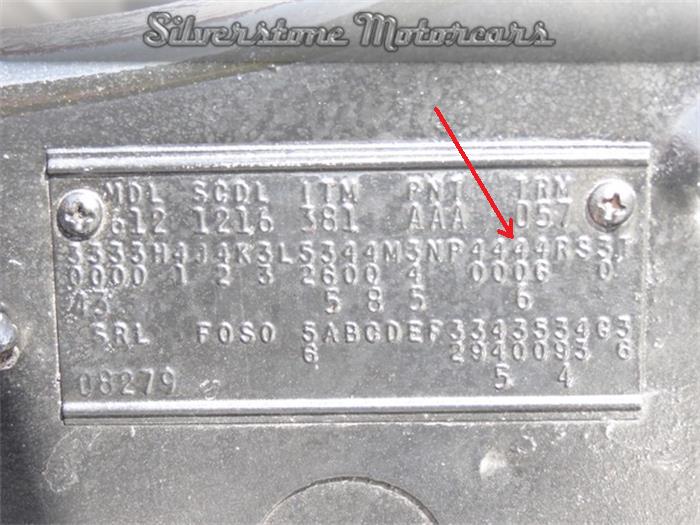
Expert
Posts: 1892
| .
This is ’58 Chrysler New Yorker 4door Hardtop (body code 554)
For confirming the code 327 actually looks like this:
 (1.jpg) (1.jpg)
Attachments
----------------
1.jpg (154KB - 408 downloads)
|
|
| |
|
Expert
Posts: 1892
| .
Forgot to say (if you interested) – this 32x column might to mean also:
321 = Convertible Top Color – Black
322 = Convertible Top Color – Ivory
323 = Convertible Top Color – Blue
324 = Convertible Top Color – Green
327 = Rear Seat Speaker (Convertibles or Wagons could not have this option)
328 = Locked Luggage Compartment for Station Wagons
|
|
| |
|
Elite Veteran
Posts: 963
Location: San Antonio, TX | No sheet unfortunately.
It does have auto-pilot. Shouldn't that be 397?
Edited by macedon 2020-06-19 3:27 PM
|
|
| |
|
Expert
Posts: 1892
| .
It makes sense. Build sheet would confirm it anyway.
Have you any thoughts about C1?
|
|
| |
|
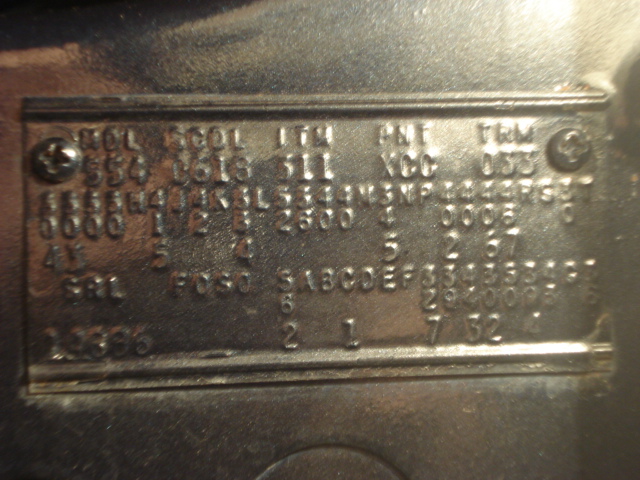
Expert
Posts: 1892
| .
Found Crown Sedan (body code 633) data tag with C2 option…
Could it be a «Market»?
611 = Domestic Market
612 = Export Market
 (C2 option.jpg) (C2 option.jpg)
Attachments
----------------
C2 option.jpg (58KB - 405 downloads)
|
|
| |
|
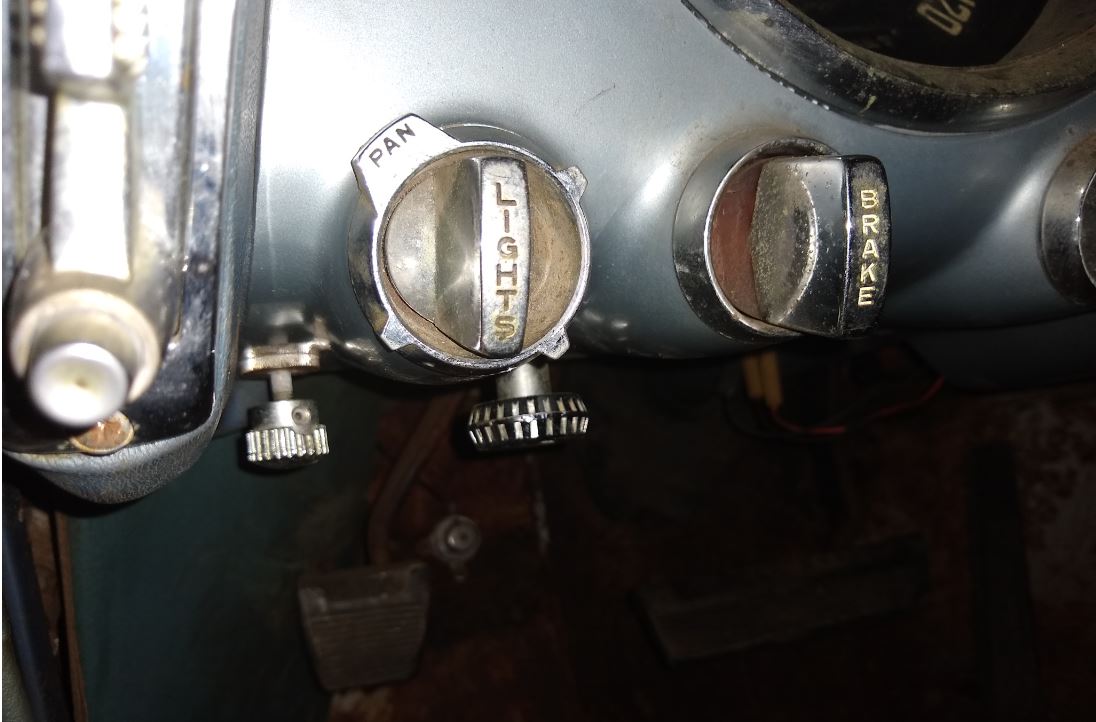
Elite Veteran
Posts: 963
Location: San Antonio, TX | Not sure what C1 stands for.
Here's a question. My dash has two blower switch knobs. The second one is left of the wheel where the antenna knob is on my sedan. I'm guessing the antenna gets activated with the radio on/off switch. I'll find out when I go through the wiring I suppose.
|
|
| |
|
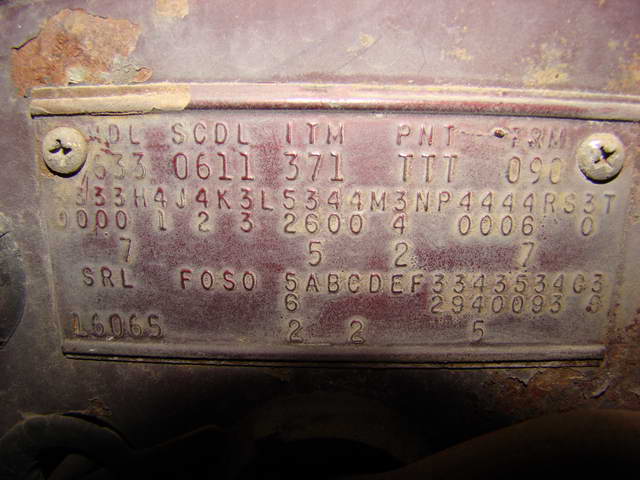
Expert
Posts: 2490
Location: Kansas City, KS | frwl - 2020-06-19 3:52 PM
.
Found Crown Sedan (body code 633) data tag with C2 option…
Could it be a «Market»?
611 = Domestic Market
612 = Export Market
That's actually the trim tag of one of my 58's
Don't know if anyone has figured out the C1/C2 code |
|
| |
|
Extreme Veteran
Posts: 558
Location: Grenoble - France | KcImperial - 2020-06-20 7:31 AM
That's actually the trim tag of one of my 58's
Don't know if anyone has figured out the C1/C2 code
I haven't. Mine was "none" despite being an export. Not all have C1 or C2 (many have nothing under the letters).
I have tags showing: A0, A9, C1, C2, F7. |
|
| |
|
Expert
Posts: 1892
| .
I guess the letter «A» means optional rear axle ratio (A0 = 550 = 3,15 to 1 and A9 = 559)
Maybe the letter «C» means optional generator or something else…
|
|
| |
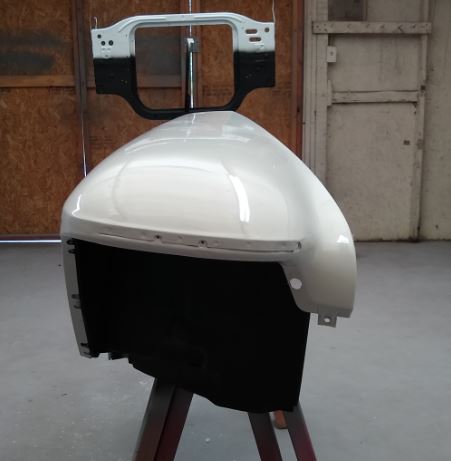
|
Elite Veteran
Posts: 963
Location: San Antonio, TX | Third and hopefully final block sanding. Should be ready to shoot the Ermine base coat later this week.
 (block.JPG) (block.JPG)
Attachments
----------------
block.JPG (71KB - 399 downloads)
|
|
| |
|
Elite Veteran
Posts: 963
Location: San Antonio, TX | Hood, decklid, fenders (inner and outer) and a few other bits done. I used the Eastwood Dead Rat Flat Black for the blackout areas. I think it's a good match and I like the name. Doors next.
 (blackout.JPG) (blackout.JPG)
Attachments
----------------
blackout.JPG (28KB - 409 downloads)
|
|
| |
|
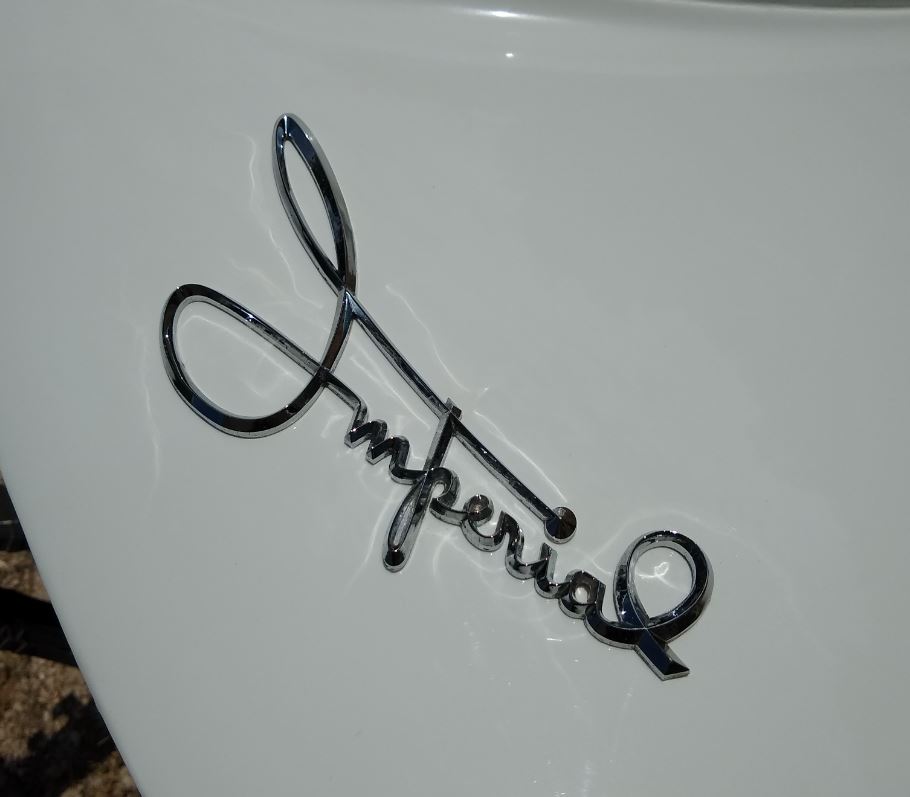
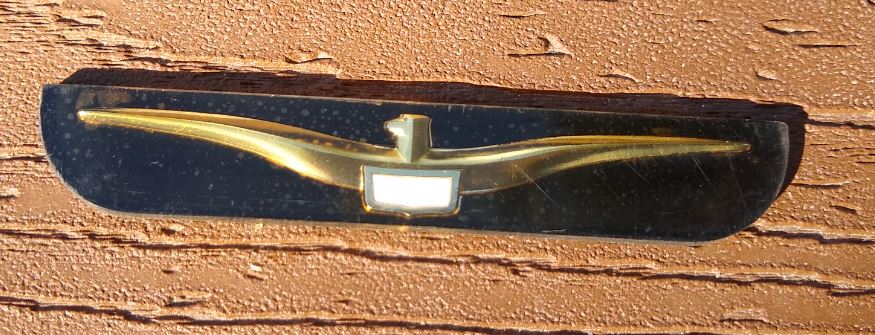
Elite Veteran
Posts: 963
Location: San Antonio, TX | Decklid Emblem
 (decklid emblem.JPG) (decklid emblem.JPG)
Attachments
----------------
decklid emblem.JPG (47KB - 385 downloads)
|
|
| |
|

Expert
Posts: 3888
Location: Northen Virginia | LOOKING GREAT! |
|
| |
|
Expert
Posts: 3967
Location: DFW, TX | Yes sir, "Finest Expression of the Forward Look" indeed! Nice job, Dave! |
|
| |
|
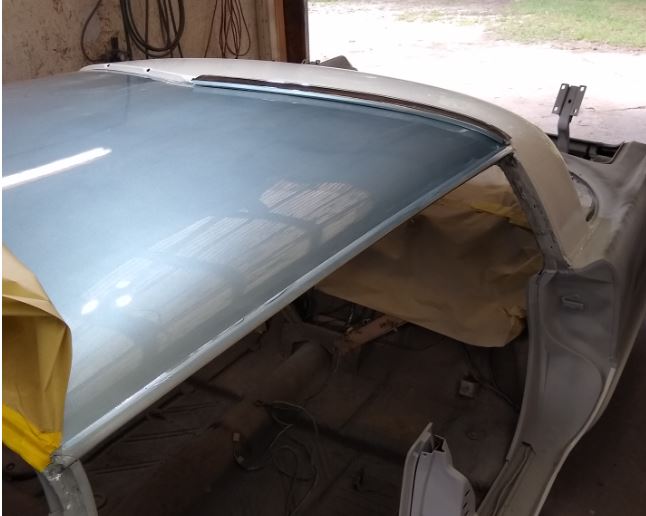
Elite Veteran
Posts: 963
Location: San Antonio, TX | This is the color for the roof. Just the forward section. The back of the roof will be white. This car came with the blue interior. I'll be restoring it to that.
 (blue.JPG) (blue.JPG)
Attachments
----------------
blue.JPG (32KB - 395 downloads)
|
|
| |
|

Expert
Posts: 1223
Location: Ramona, CA | Did you find a source for the woven rear deck mat? I've been looking for material for my 300F. The original is woven paper and even Gary Goers was not able to source a correct replacement. I've been looking at woven wallpapers and will probably use something like that and paint it black.
 (rear_deck.jpg) (rear_deck.jpg)
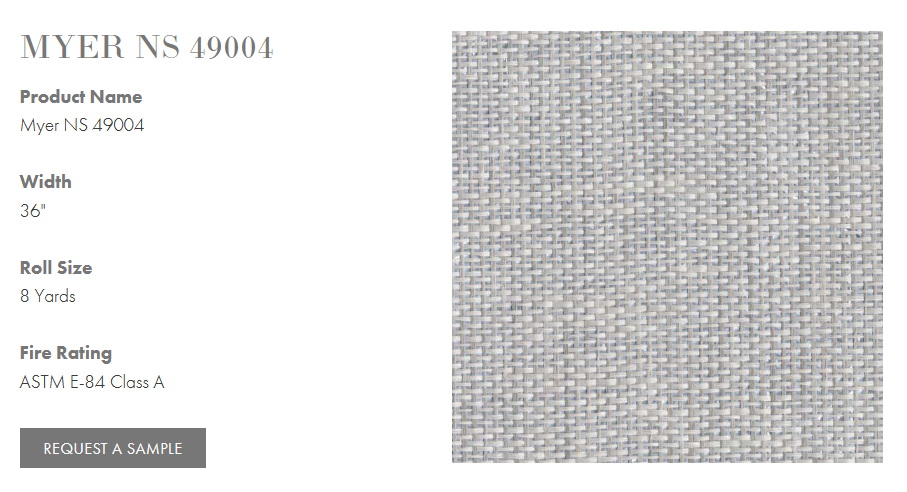 (rear_deck_myer_ns_49004.jpg) (rear_deck_myer_ns_49004.jpg)
Attachments
----------------
rear_deck.jpg (180KB - 382 downloads)
rear_deck_myer_ns_49004.jpg (133KB - 383 downloads)
|
|
| |
|
Elite Veteran
Posts: 963
Location: San Antonio, TX | This woven tablecloth is really close to the original weave. Obviously would need to be painted. I bought color-matched blue to do the interior parts.
https://tableclothsfactory.com/products/54-x-4-yards-multi-color-eco...
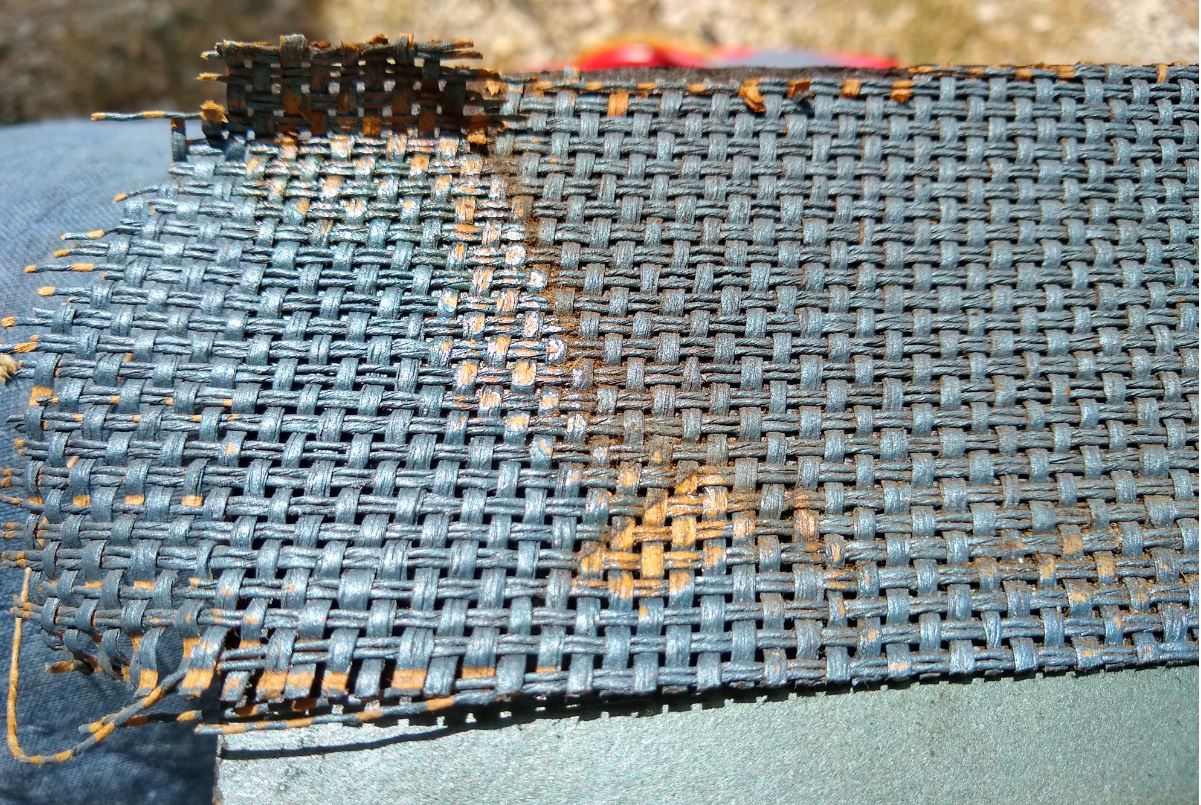 (originalweave.JPG) (originalweave.JPG)
 (tablecloth.JPG) (tablecloth.JPG)
Attachments
----------------
originalweave.JPG (323KB - 387 downloads)
tablecloth.JPG (123KB - 395 downloads)
|
|
| |
|
Elite Veteran
Posts: 963
Location: San Antonio, TX | I do have the correct color matched blue. I'm just not ready to mix some up yet. So grabbed a rattle can just to see how it takes paint. Seems fine. The weave is a little bigger than factory. I think it's in character of the original and it meets my needs.
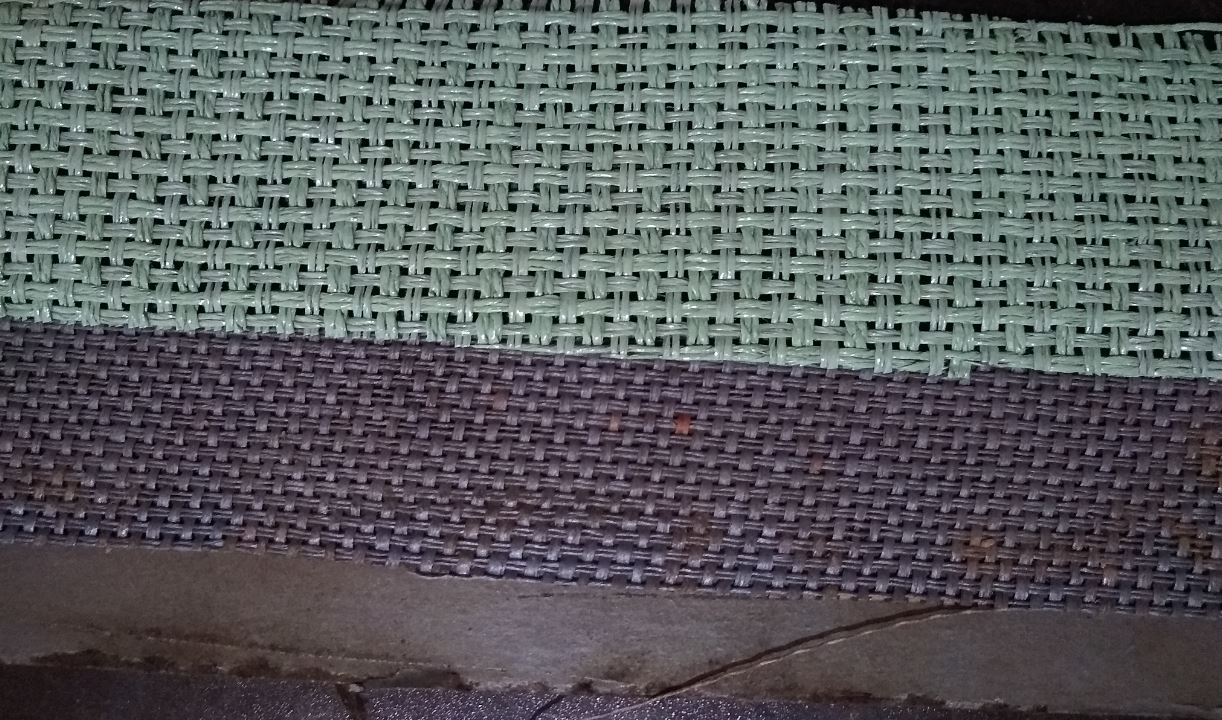 (package tray.JPG) (package tray.JPG)
Attachments
----------------
package tray.JPG (227KB - 376 downloads)
|
|
| |
|
Expert
Posts: 1223
Location: Ramona, CA | Looks like a great choice. At least it's part of the car that would be easy to update if something better comes along.
|
|
| |
|
Location: North Australia | I used a replacement vinyl with a basket weave pattern. Looks OK. Steve.
https://www.google.com/imgres?imgurl=https%3A%2F%2Fwww.nolans.com.au...
|
|
| |
|
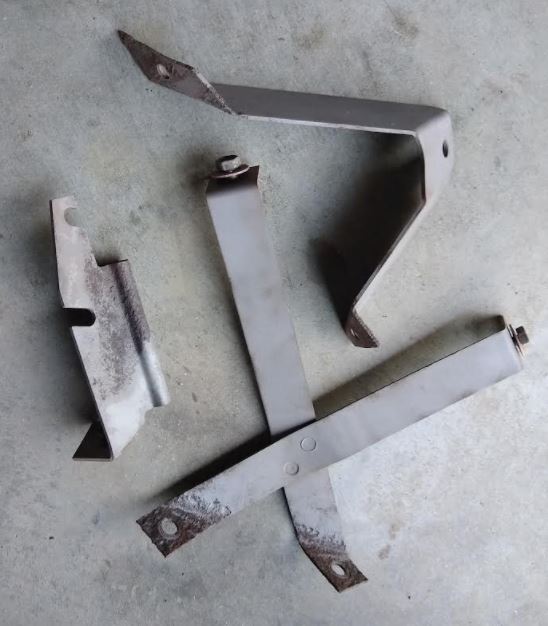
Elite Veteran
Posts: 963
Location: San Antonio, TX | These are the special brackets for the autopilot and sideways mounted Vacuum can. It doesn't look like they were painted for the original installation. Because of the corrosion I don't think I'll want to go with that. I'll need to treat fill and paint. So black like the can? Or white like the body?
 (autobracket.JPG) (autobracket.JPG)
Attachments
----------------
autobracket.JPG (51KB - 327 downloads)
|
|
| |
|
Expert
Posts: 2490
Location: Kansas City, KS | With it being an accessory item, I think it would look better/more appropriate painted black
Cool to see those brackets and the whole Auto-Pilot is such a fascinating option but...
I can't imagine how much it will suck trying to check your brake fluid or anything else on that side of the engine |
|
| |
|
Elite Veteran
Posts: 963
Location: San Antonio, TX | Haha. You are so right. I've got the brakes working and good shape. Putting the master cylinder cap on and getting that bolt on and tight is only possible if you have experience as a sideshow contortionist. |
|
| |
|
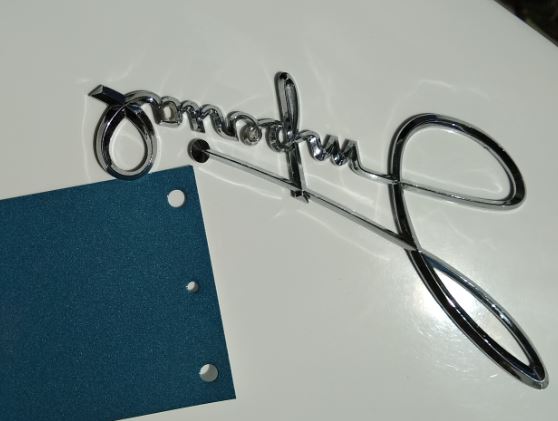
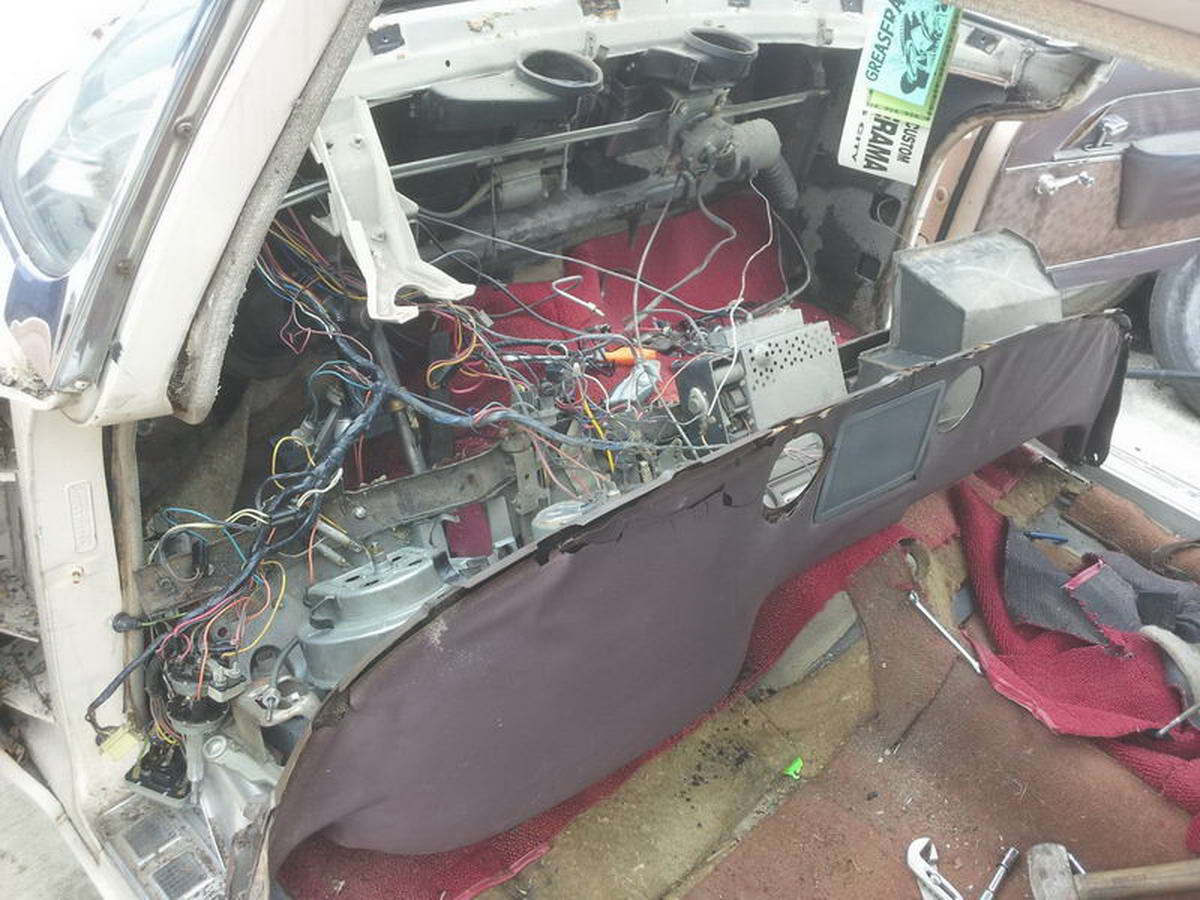
Elite Veteran
Posts: 963
Location: San Antonio, TX | Yesterday was just one of those days. I ended up having to take the dash out. I was hoping to avoid that but decided that it needed to be done. There had been some wiring issues in the past and some iffy repairs. So I just decided to bite the bullet. Not really what I would term a fun job. After I got it out I was pretty much annoyed and pissed off. Had to walk away. So today I got a nice surprise. This was inside the dash. Yep, no kidding. All I can figure is it fell off and they stuck it up on the dash and somehow it fell in? Not really sure, but happy to have it.
 (58emblem.JPG) (58emblem.JPG)
Attachments
----------------
58emblem.JPG (98KB - 370 downloads)
|
|
| |
|
Expert
Posts: 2490
Location: Kansas City, KS | pulling the dash and iffy wiring repairs?? how bad could that be? (sorry, I feel your pain)
that emblem is a huge bonus!!
while the dash is out, you might want to double check the wires and function of the neutral start and reverse light switch on the back of the push buttons. I had to solder some connections on mine.
 (dash.jpg) (dash.jpg)
Attachments
----------------
dash.jpg (159KB - 372 downloads)
|
|
| |
|
Member
Posts: 23
| A while ago, I tried to find the thread and I couldn't, you asked if anyone had the small plastic trunk crest that they could scan to make a sticker from. I checked mine at the time and it was missing. However, I have no idea how it got there (but not complaining), I found mine in the glove compartment. Do you still need this? I think it's a great idea to scan it and upload it here, but my only problem is I don't own a scanner. Do you know if places like OfficeMax let you scan things, even if a fee?
I'm glad I'm not the only one in the situation, I have to pull the dash from my Imperial, too. I've never done it before, is there any advice you can give, or what order to go? |
|
| |
|
Elite Veteran
Posts: 963
Location: San Antonio, TX | I'm sure a cellphone picture would work. They have gotten to be pretty hi-res now.
As far as pulling the dash it depends how far you want to go. Since I'm painting this car the windshield is out. I also pulled the steering wheel and dropped the column. Made life easier that way. |
|
| |
|
Elite Veteran
Posts: 963
Location: San Antonio, TX | Not perfect, but meets my needs.
 (horn ring.JPG) (horn ring.JPG)
Attachments
----------------
horn ring.JPG (280KB - 380 downloads)
|
|
| |
|
Expert
Posts: 2490
Location: Kansas City, KS | Very nice horn pad! Those are hard to find without major shrinkage at the ends or cracked down the middle of the vinyl.
Saw an Instagram post of someone starting to reproduce the horn pads in the Scandinavian region, never heard if they finalized them
Bonus fact for fun - 57-59 Imperials all had their own, year specific designs for horn pads |
|
| |
|
Elite Veteran
Posts: 963
Location: San Antonio, TX | I used flex agent in the blue paint. Seems to work. Hopefully stand up over time. |
|
| |
|
Elite Veteran
Posts: 963
Location: San Antonio, TX | Glovebox restored
 (glovebox.JPG) (glovebox.JPG)
Attachments
----------------
glovebox.JPG (138KB - 333 downloads)
|
|
| |
|
Expert
Posts: 2490
Location: Kansas City, KS | Looks great, the vinyl really pops!
Don't forget the proper OEM, half-unlatched alignment when you install the door |
|
| |
|
Elite Veteran
Posts: 963
Location: San Antonio, TX | Thanks. Mostly just cleaned and polished. Gold enamel mixed with clear coat over polished crown. Took my best pad and sprayed with base coat paint with flex agent added. Then SEM matte clear coat. Then treated with Eastwood vinyl treatment. |
|
| |
|
Elite Veteran
Posts: 963
Location: San Antonio, TX | Clean and polish. Lot's of shiny bits on an Imperial
 (shine.JPG) (shine.JPG)
Attachments
----------------
shine.JPG (135KB - 338 downloads)
|
|
| |
|
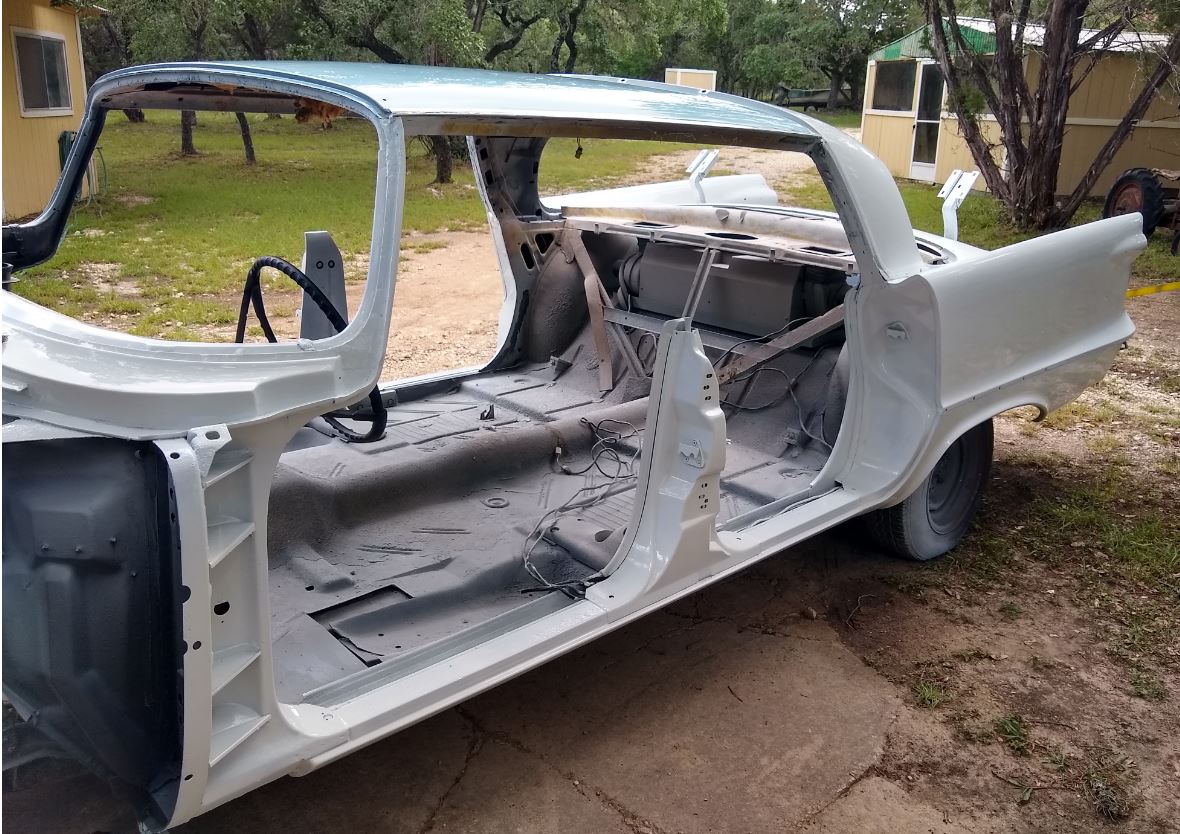
Elite Veteran
Posts: 963
Location: San Antonio, TX | Finally. After many delays I'm finally getting to sand and paint the body.
 (body.JPG) (body.JPG)
Attachments
----------------
body.JPG (77KB - 249 downloads)
|
|
| |
|
Member
Posts: 9
Location: Central Texas | Macedon, you have a rare Custom Imperial for sure. Manual windows, Auto Pilot and rear air conditioning. I have a 58 Custom Imperial. I haven't yet taken the door panels off to adjust the handle linkage in fear breaking something irreplaceable. By comparison, I've got a hangnail and you've gone Doctor Frankenstein. Good luck. |
|
| |
|
Member
Posts: 9
Location: Central Texas | My bad. I mistook your donor car with manual windows as your project car. Again, good luck with your project. |
|
| |
|
Elite Veteran
Posts: 963
Location: San Antonio, TX | Few spots of filler over some old whiskey dents. Not bad really.
 (sand1.JPG) (sand1.JPG)
 (sand2.JPG) (sand2.JPG)
 (sand3.JPG) (sand3.JPG)
 (sand4.JPG) (sand4.JPG)
Attachments
----------------
sand1.JPG (147KB - 247 downloads)
sand2.JPG (65KB - 254 downloads)
sand3.JPG (101KB - 250 downloads)
sand4.JPG (102KB - 249 downloads)
|
|
| |
|
Elite Veteran
Posts: 963
Location: San Antonio, TX | Progress.
 (prime1.JPG) (prime1.JPG)
 (prime2.JPG) (prime2.JPG)
 (prime3.JPG) (prime3.JPG)
Attachments
----------------
prime1.JPG (116KB - 236 downloads)
prime2.JPG (125KB - 243 downloads)
prime3.JPG (167KB - 236 downloads)
|
|
| |
|

Board Moderator & Exner Expert 10K+
Posts: 13050

Location: Southern Sweden - Sturkö island | It's coming along just fine Dave, keep up the good work and keep us posted. |
|
| |
|
Elite Veteran
Posts: 963
Location: San Antonio, TX | Bodywork is done. Two coats of primer and block sanding. Another coat of primer today. Hope to shoot color later next week.
 (2ndprime1.JPG) (2ndprime1.JPG)
 (2prime2.JPG) (2prime2.JPG)
Attachments
----------------
2ndprime1.JPG (72KB - 245 downloads)
2prime2.JPG (66KB - 233 downloads)
|
|
| |
|
Expert 5K+
Posts: 5006
| once the paint is on, all downhill... still alot of work but downhill  |
|
| |
|
Elite Veteran
Posts: 963
Location: San Antonio, TX | Progress
 (bluewhite.JPG) (bluewhite.JPG)
Attachments
----------------
bluewhite.JPG (43KB - 228 downloads)
|
|
| |
|
Expert
Posts: 3967
Location: DFW, TX | Awesome work, Dave! It is looking amazing. |
|
| |
|
Elite Veteran
Posts: 963
Location: San Antonio, TX | Progress
 (color1.JPG) (color1.JPG)
 (color2.JPG) (color2.JPG)
 (color3.JPG) (color3.JPG)
Attachments
----------------
color1.JPG (65KB - 214 downloads)
color2.JPG (60KB - 234 downloads)
color3.JPG (81KB - 232 downloads)
|
|
| |
|
Elite Veteran
Posts: 963
Location: San Antonio, TX | Now all I have to do is put it back together. Hah, yeah... that's all.
 (blueroof.JPG) (blueroof.JPG)
 (blueroof2.JPG) (blueroof2.JPG)
 (blueroof3.JPG) (blueroof3.JPG)
 (backhome.JPG) (backhome.JPG)
Attachments
----------------
blueroof.JPG (170KB - 231 downloads)
blueroof2.JPG (212KB - 224 downloads)
blueroof3.JPG (176KB - 222 downloads)
backhome.JPG (49KB - 225 downloads)
|
|
| |
|
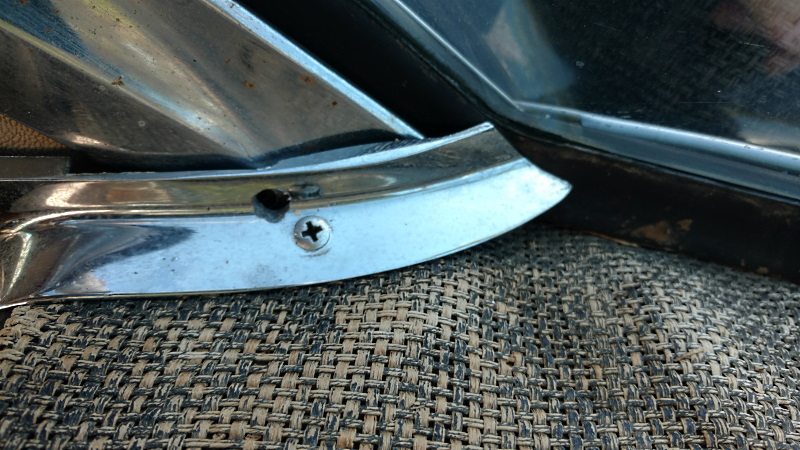
Elite Veteran
Posts: 963
Location: San Antonio, TX | Been a while... put these on today.
 (tailcrop.JPG) (tailcrop.JPG)
Attachments
----------------
tailcrop.JPG (66KB - 163 downloads)
|
|
| |
|
Elite Veteran
Posts: 963
Location: San Antonio, TX | A few more
 (ring.JPG) (ring.JPG)
Attachments
----------------
ring.JPG (86KB - 172 downloads)
|
|
| |
|
Elite Veteran
Posts: 963
Location: San Antonio, TX | The trim ring for the Imperial Flitesweep decklid didn't hold up well since water collected at the bottom. Most of them are pretty ate up with corrosion and pitting. So until I find a nice one this will have to do. I had a broken one and the one that came with this car. Stitched them together. I think it looks presentable.
 (stitch.JPG) (stitch.JPG)
 (ends.JPG) (ends.JPG)
 (jbweld.JPG) (jbweld.JPG)
Attachments
----------------
stitch.JPG (43KB - 151 downloads)
ends.JPG (43KB - 165 downloads)
jbweld.JPG (81KB - 166 downloads)
|
|
| |
|
Elite Veteran
Posts: 915
Location: Pau, S-W France | Do you have the small clear plastic hose which is connected to a tiny hole at the bottom of the hollow under the ring ? This hose (maybe 30 cm long ?) runs on the underside of the deck lid and emerges under the trunk handle ! I saw that on a '58 Crown and I was very amazed
Edited by Phil_the_frenchie 2021-11-27 4:01 PM
|
|
| |
|
Elite Veteran
Posts: 963
Location: San Antonio, TX | Been a while
 (impr.JPG) (impr.JPG)
Attachments
----------------
impr.JPG (82KB - 127 downloads)
|
|
| |
|
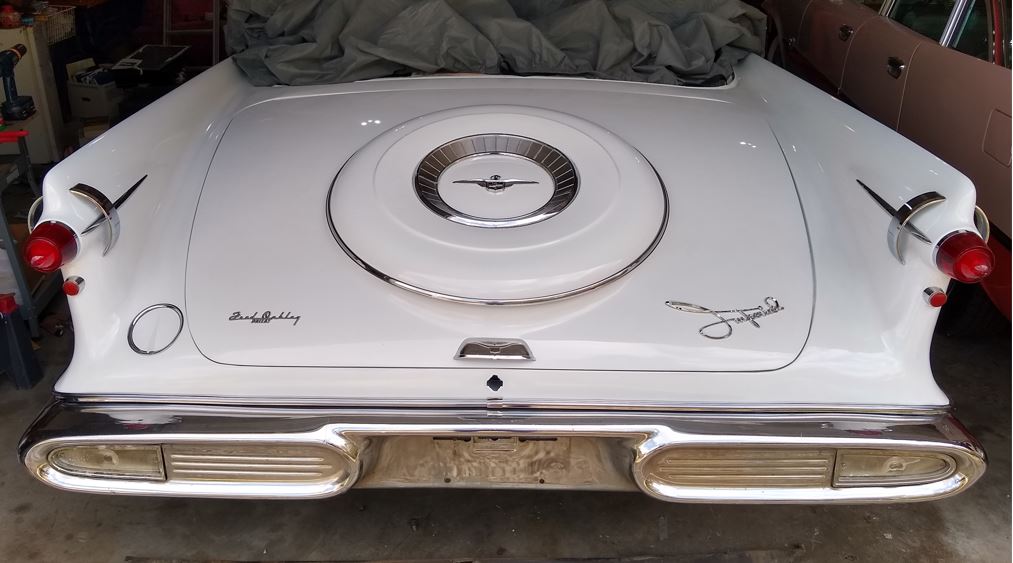
Elite Veteran
Posts: 963
Location: San Antonio, TX | Doors. Yay!
 (doorsbackon.JPG) (doorsbackon.JPG)
Attachments
----------------
doorsbackon.JPG (66KB - 117 downloads)
|
|
| |
|
Expert
Posts: 3967
Location: DFW, TX | This car is a work of art. Great job, Dave!
(the idea to butt two half-good Flitesweep sections together was pure genius, btw)

 (impr.JPG) (impr.JPG)
Attachments
----------------
impr.JPG (82KB - 123 downloads)
|
|
| |
|

Expert 5K+
Posts: 8947
Location: WHEELING,WV.>>>HOME OF WWVA | beautiful work ----------------------------------later |
|
| |
|
Elite Veteran
Posts: 963
Location: San Antonio, TX | Mudflap restore. I'm sure the correct name is a more elegant Imperial worthy name, but I always just called it the mudflap.
 (mudflap1.JPG) (mudflap1.JPG)
 (mudflap2.JPG) (mudflap2.JPG)
Attachments
----------------
mudflap1.JPG (182KB - 59 downloads)
mudflap2.JPG (59KB - 64 downloads)
|
|
| |
|
Elite Veteran
Posts: 963
Location: San Antonio, TX | Installed
 (flap2.JPG) (flap2.JPG)
Attachments
----------------
flap2.JPG (74KB - 63 downloads)
|
|
| |