|
|
Regular
Posts: 60

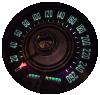
Location: Northeast | Just joined. Owned almost 30 A-Bodies, a couple B-Bodies, and a few C-Bodies. This is my first Forward Look vehicle. My wife & I owned a '65 Imperial a couple years ago. We found it looking for a '59 Imperial Crown Sedan. Now the '65 is gone, but we found our '59. I have no idea how to post pics of the car. |
|
| |
|
Extreme Veteran
Posts: 558

Location: Grenoble - France | To post pictures, you reply to the previous message (using the top right Reply button that is between Quote and Alert of the message you are replying to), then you check the box "Attach a file after posting" (just below the text box where you type the reply message). It brings you to the next page where you can upload files by clicking the button. Once all pictures have been uploaded, simply click on the link "return to the thread". |
|
| |
|
Regular
Posts: 60
Location: Northeast | Following Imp58Alpes' instructions. |
|
| |
|
Regular
Posts: 60
Location: Northeast | Don't know. Is there a minimum post restriction on uploads? Anyways, bought it Saturday, May 23. Pick up the body this coming Saturday June 6. It's a Crown Sedan. |
|
| |
|
Expert 5K+
Posts: 8443
   
Location: Perth Australia | Nope, no restrictions on posts, but the pictures need to be jpegs (thats what I save them as)
I open them in paint and reduce them there (cant be more than 250kb)
I dont have any of the other picture programs, so I dont know how to do it with anything else
I cant remember how I did this, but I was able to get the link for attaching a file at the bottom of the text box without having to do the edit thing
 (untitled.JPG) (untitled.JPG)
Attachments
----------------
 untitled.JPG (146KB - 328 downloads) untitled.JPG (146KB - 328 downloads)
|
|
| |
|
Exner Expert 19,174 posts. Neil passed away 18 Sep 2015. You will be missed, Neil!
Posts: 19146
Location: bishop, ca | In the past, I've 'walked' people thru the learning process, by telephone.
As long as the pics are not too big, to be accepted for posting pics (jay-peg, only ;no PDF files are accepted, here.
|
|
| |
|
Expert
Posts: 2312
Location: Arizona | <p>It's not that you can't upload and attach PDFs. You can upload and attach anything you want as long as it's under the 250K limit. But only jpgs will be displayed so you can "see" them. Others will just show up an attachment and file name. I uploaded and attached a small pdf to this to verify it can be done. PDFs don't have near the compression of jpgs so a lot more "info" can be put in a 250k jpg than in a 250 k PDF.</p>
Edited by jimntempe 2015-06-02 3:50 PM
Attachments
----------------
This is a pdf.pdf (79KB - 252 downloads)
|
|
| |
|
Regular
Posts: 60
Location: Northeast | Reduced size on one to test. |
|
| |
|
Regular
Posts: 60
Location: Northeast | Test
 (Side1_Web.png) (Side1_Web.png)
Attachments
----------------
Side1_Web.png (49KB - 305 downloads)
|
|
| |
|
Regular
Posts: 60
Location: Northeast | I'll be darned! Lookie there! Lemme try that again.
 (Dash1_Web.png) (Dash1_Web.png)
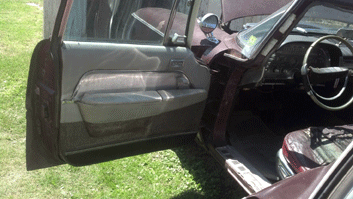 (Door1_Web.png) (Door1_Web.png)
Attachments
----------------
Dash1_Web.png (46KB - 297 downloads)
Door1_Web.png (52KB - 333 downloads)
|
|
| |
|
Regular
Posts: 60
Location: Northeast | Someone stop me before I start posting pics of the Daytonas, DeLorean, and Rampage!
 (Front1_Web.png) (Front1_Web.png)
 (Side2_Web.png) (Side2_Web.png)
Attachments
----------------
Front1_Web.png (55KB - 272 downloads)
Side2_Web.png (47KB - 272 downloads)
|
|
| |
|
Expert
Posts: 2312
Location: Arizona | I see a corvette fender... |
|
| |
|

Expert
Posts: 2596
Location: Upplands Väsby, Sweden | Nice IMPERIAL 59, I like the body 4dr/sedan and the color. Nice car. |
|
| |
|
Regular
Posts: 60
Location: Northeast | Thanks all. |
|
| |
|
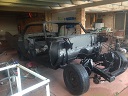
Regular
Posts: 60
Location: Northeast | Picked up the body today. |
|
| |
|
Regular
Posts: 60
Location: Northeast | Here it is up on the trailer.
 (PickItUp1.jpg) (PickItUp1.jpg)
Attachments
----------------
PickItUp1.jpg (101KB - 270 downloads)
|
|
| |
|
Exner Expert 19,174 posts. Neil passed away 18 Sep 2015. You will be missed, Neil!
Posts: 19146
Location: bishop, ca | STILL can't upload/attach a PDF file to a thread on this website...Buehler; ....anyone?
|
|
| |
|
Expert
Posts: 2788
Location: USA - KY | 
Welcome, Mike - great Imperial!
Congratulations on coming over to the FL Side! 
Looking forward to seeing more photos of your Imperial, now that your are a photo-posting enthusiast. 
 |
|
| |
|
Regular
Posts: 60
Location: Northeast | As a side note, there are only 14 calenders. From the birth of Christ to many years into the future, there are only 14 calenders. Indecently, 2015 and 1059 share the same calendar. |
|
| |
|
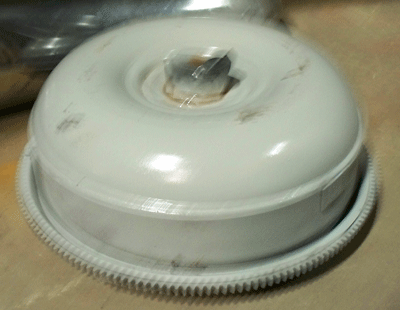
Regular
Posts: 60
Location: Northeast | I spend a lot of time out of state and overseas, plus our Imp isn't located at our home. I finally got some time to do some work. Painted the fresh engine & transmissions, along with the bare metal torque converter. I got the tranny cross member sand blasted & painted. Hey, it's progress!
 (PaintedEngine1.png) (PaintedEngine1.png)
 (PaintedTranny1.png) (PaintedTranny1.png)
 (PaintedTQ1.png) (PaintedTQ1.png)
 (PaintedTrannyCrossMember1.png) (PaintedTrannyCrossMember1.png)
Attachments
----------------
PaintedEngine1.png (81KB - 287 downloads)
PaintedTranny1.png (78KB - 260 downloads)
PaintedTQ1.png (82KB - 267 downloads)
PaintedTrannyCrossMember1.png (26KB - 279 downloads)
|
|
| |
|
Extreme Veteran
Posts: 360
| nice another Imperial! Congrats on a great set of wheels! |
|
| |
|

Expert
Posts: 3888
Location: Northen Virginia | Nice Imperial!! Virgil Exner favorite body style!!
Edited by hemidenis 2015-10-07 11:42 PM
|
|
| |
|
Regular
Posts: 60
Location: Northeast | Brought a trunk-load of parts home, blasted & coated them. Went into the shop, installed a few, and brought another trunk-load home. I stopped by Tractor Supply & bought a bag of nuts, bolts, and washers I need (plus spares). I installed some of the reconditioned parts. I then got online & ordered belts, WC & MC kits, Rad cap & T-stat, water and fuel pumps, U-joints, Gen & starter brushes, air & fuel filters, carb kit and wiper blades. This ought to keep me busy for awhile!
 (Ebrake1.png) (Ebrake1.png)
 (Ebrake2.png) (Ebrake2.png)
 (Bolts1.png) (Bolts1.png)
 (Engine1.png) (Engine1.png)
 (Engine2.png) (Engine2.png)
 (Parts1.png) (Parts1.png)
 (Parts2.png) (Parts2.png)
 (VacuumTank1.png) (VacuumTank1.png)
Attachments
----------------
Ebrake1.png (78KB - 275 downloads)
Ebrake2.png (79KB - 261 downloads)
Bolts1.png (75KB - 247 downloads)
Engine1.png (84KB - 275 downloads)
Engine2.png (81KB - 271 downloads)
Parts1.png (65KB - 244 downloads)
Parts2.png (72KB - 284 downloads)
VacuumTank1.png (66KB - 257 downloads)
|
|
| |
|
Veteran
Posts: 295
Location: Tallapoosa, GA |
SWEET!! She's lookin' good, man!! |
|
| |
|
Regular
Posts: 60
Location: Northeast | Got a few more pieces processed. Repaired the battery tray and reconditioned the fan.
 (BatteryTrayBefore1.png) (BatteryTrayBefore1.png)
 (BatteryTrayBefore2.png) (BatteryTrayBefore2.png)
 (BatteryTrayBefore3.png) (BatteryTrayBefore3.png)
 (BatteryTrayAfter1.png) (BatteryTrayAfter1.png)
 (FanAfter1.png) (FanAfter1.png)
 (FanAfter2.png) (FanAfter2.png)
Attachments
----------------
BatteryTrayBefore1.png (79KB - 272 downloads)
BatteryTrayBefore2.png (88KB - 262 downloads)
BatteryTrayBefore3.png (82KB - 288 downloads)
BatteryTrayAfter1.png (75KB - 257 downloads)
FanAfter1.png (87KB - 273 downloads)
FanAfter2.png (67KB - 262 downloads)
|
|
| |
|
Regular
Posts: 60
Location: Northeast | Still have to powder coat the battery tray. It's bare sand blasted metal in the above pic. |
|
| |
|
Regular
Posts: 60
Location: Northeast | After I replace a few worn parts on my sand blaster, I'll be back at it again. The dried hose kept blowing through, and it just ate through a brass ball valve I replaced 2 days previously. Have a shopping list of parts coming to recondition the starter, generator, rebuild the carburetor, plus fuel pump, water pump, filters, and some other goodies. |
|
| |
|
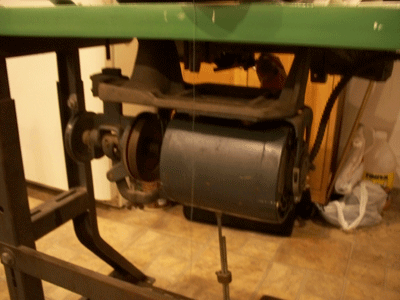
Regular
Posts: 60
Location: Northeast | So you purchase a workable Forward Look vehicle. It obviously needs a new interior. You could pay someone $2500 or more (perhaps way more), or...
Buy an industrial sewing machine. Acquired a WWI era (1940 we believe) military issue sewing machine made to sew parachutes, canvass duffel bags, and perhaps even saddles. We will be stitching our own interior! |
|
| |
|
Regular
Posts: 60
Location: Northeast | It has an oil pan, oil pump, and goes like 40 mph! (SCARY FAST!!) I've seen them at 2X the price many times, so I guess we got it at 1/2 off. This will contribute to our winter interior project. The motor was updated somewhere along the line. The temp rating is 40 degrees Celsius, so I know it isn't 1940.
Edited by mpgmike 2015-11-02 9:14 PM
 (Singer1_Web.png) (Singer1_Web.png)
 (Singer2_Web.png) (Singer2_Web.png)
 (Singer3_Web.png) (Singer3_Web.png)
Attachments
----------------
Singer1_Web.png (74KB - 242 downloads)
Singer2_Web.png (83KB - 251 downloads)
Singer3_Web.png (69KB - 258 downloads)
|
|
| |
|
Regular
Posts: 60
Location: Northeast | Got more done. Will have to post pics later. |
|
| |
|
Regular
Posts: 60
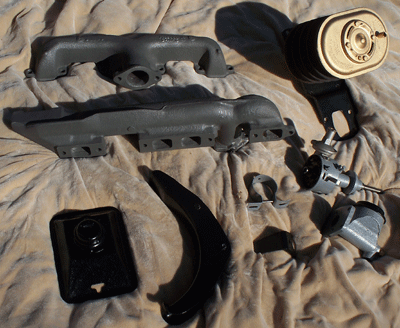
Location: Northeast | Got a bunch of parts blasted and coated. Here are a few pics. There is more, and I will post pics as I can.
 (Booster1.png) (Booster1.png)
 (MotorMounts1.png) (MotorMounts1.png)
 (ExMan1.png) (ExMan1.png)
Attachments
----------------
Booster1.png (56KB - 265 downloads)
MotorMounts1.png (68KB - 253 downloads)
ExMan1.png (114KB - 244 downloads)
|
|
| |
|
Regular
Posts: 60
Location: Northeast | More parts processed. The first picture is the bell housing blasted & painted, with the air cleaner blasted & powder coated.
Edited by mpgmike 2015-11-04 5:51 PM
 (BH_AC1.png) (BH_AC1.png)
 (ExMan4.png) (ExMan4.png)
 (Generator1.png) (Generator1.png)
 (MC1.png) (MC1.png)
 (Parts3.png) (Parts3.png)
Attachments
----------------
BH_AC1.png (99KB - 226 downloads)
ExMan4.png (60KB - 262 downloads)
Generator1.png (74KB - 251 downloads)
MC1.png (92KB - 262 downloads)
Parts3.png (105KB - 227 downloads)
|
|
| |
|
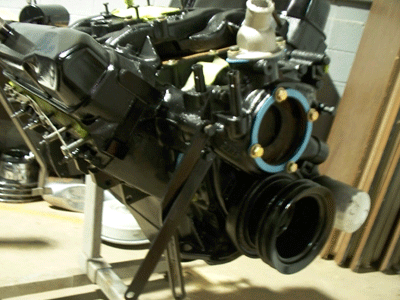
Regular
Posts: 60
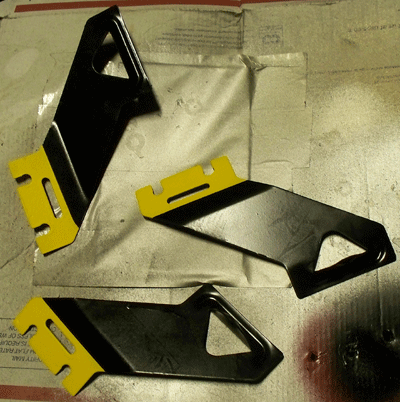
Location: Northeast | The second picture is the exhaust manifolds; one simply sand blasted and the other with the 2000 degree base coating. Third picture is the reconditioned generator (with new brushes). It also got sand blasted one disassembled piece at a time) before paint went on. Fourth picture is the rebuilt & powder coated master cylinder. Last picture is the exhaust manifolds with the final coating, jack pieces blasted & powder coated, power brake booster ready to install, distributor (still needing service items), coil bracket, and distributor hold down bracket (blasted & powder coated). |
|
| |
|
Regular
Posts: 60
Location: Northeast | Got to the Imp today & bolted on some new & reconditioned parts. Water & fuel pumps, thermostat, exhaust manifolds, motor mounts, dip stick tube, and mounted the coil bracket.
 (Engine3.png) (Engine3.png)
 (Engine4.png) (Engine4.png)
 (Engine5.png) (Engine5.png)
Attachments
----------------
Engine3.png (65KB - 229 downloads)
Engine4.png (76KB - 260 downloads)
Engine5.png (80KB - 229 downloads)
|
|
| |
|
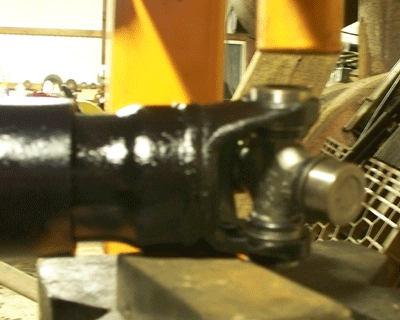
Regular
Posts: 60
Location: Northeast | Got the drive-shaft disassembled, blasted, painted, & reassembled with new U-Joints. Blasted & painted a few small brackets; of note are the ignition wire separators. They were painted black with a plasti-dip type coating on the ends. I used yellow.
 (DS1.png) (DS1.png)
 (DS2.png) (DS2.png)
 (IgnWirSep1.png) (IgnWirSep1.png)
Attachments
----------------
DS1.png (75KB - 228 downloads)
DS2.png (76KB - 259 downloads)
IgnWirSep1.png (118KB - 233 downloads)
|
|
| |
|
Regular
Posts: 60
Location: Northeast | Spent a couple hours with the Imp today. Bolted on a few reconditioned items. Removed everything from the trunk; parts, carpet, & trim panels. The floor has a few bad spots, but is better than many of the pictures I see posted on these era cars. Removed the rear seat and removed the aftermarket seat cover. Of course, one would hope the cover was installed over a mint seat. This was not the case. It has a 2-tone cloth interior (604 code). I'll have to do some research. It is supposed to be a Crown, has all the markings of a Crown, but I've never seen a Crown without at least leather borders. Maybe it's a base Imperial? The floor under the rear seat needs a few minor patches, but looking good otherwise.
Although I hate painting over rust, I bought 2 cans of Eastwood's Rust Encapsulator and shot the frame & seams under the hood and body. Found a mouse that was like Egyptian mummy half way into a hole in the frame. It amazes me how many hours go into "very little to show" (and I've done this sort of work before!).
 (Engine6.png) (Engine6.png)
 (BackSeatAfterMarketCover1.png) (BackSeatAfterMarketCover1.png)
 (BackSeatBottomStock1.png) (BackSeatBottomStock1.png)
 (BackSeatBackStock1.png) (BackSeatBackStock1.png)
 (Frame1.png) (Frame1.png)
 (Frame2.png) (Frame2.png)
 (Mouse1.png) (Mouse1.png)
 (TrunkFloor1.png) (TrunkFloor1.png)
 (TrunkFloor2.png) (TrunkFloor2.png)
Attachments
----------------
Engine6.png (75KB - 266 downloads)
BackSeatAfterMarketCover1.png (64KB - 237 downloads)
BackSeatBottomStock1.png (85KB - 251 downloads)
BackSeatBackStock1.png (65KB - 253 downloads)
Frame1.png (89KB - 232 downloads)
Frame2.png (88KB - 245 downloads)
Mouse1.png (79KB - 234 downloads)
TrunkFloor1.png (97KB - 225 downloads)
TrunkFloor2.png (99KB - 268 downloads)
|
|
| |
|
Regular
Posts: 60
Location: Northeast | Oh yea, had to look at the seats because the 1940 Singer is in its new home.
 (Singer4.png) (Singer4.png)
Attachments
----------------
Singer4.png (74KB - 222 downloads)
|
|
| |
|
Location: North Australia | Good going Mike, keep up the good work and posting here, I am enjoying the pics and your comments.
Steve. |
|
| |
|
Regular
Posts: 60
Location: Northeast | Polished the chrome & painted the black on the headlight buckets.
 (HdltBucketsFinal1.png) (HdltBucketsFinal1.png)
Attachments
----------------
HdltBucketsFinal1.png (107KB - 228 downloads)
|
|
| |
|
Regular
Posts: 60
Location: Northeast | Did some research because of the interior. All of the Crowns I've seen had either full leather, or at least leather trimmed interior. Ours is 2-tone cloth seats with what looks like a vinyl door trim. Decoding the VIN definitely proves it a Crown, and the 604 interior is Paris inspired 'LeHavre' Jacquard cloth in Dark Grey. Looks legit. I don't think we will be reproducing the stock interior. New enigma to solve! |
|
| |
|
Expert
Posts: 1231
Location: York County, PA | Must be nice to have lots of money.

Edited by ruchaven 2015-11-21 9:27 PM
|
|
| |
|
Regular
Posts: 60
Location: Northeast | ruchaven - 2015-11-21 9:26 PM
Must be nice to have lots of money.
:jealous:
I agree! One of these days I just may have lots. So far I've spent just over $200 in parts for the Imp. Most of the improvements are just hard work; sand blasting (I've owned the blaster for well over 10 years now), powder coating (cheap Eastwood version), and spray painting (most at $5 per can, with the REALLY expensive stuff costing $20 per can). I opted for rebuild kits as opposed to buying rebuilt parts (like $15 instead of $215). However, I will take that as a sincere compliment. It suggests I make "on the cheap" look expensive.
While the family spent the day with my Father-in-Law, I spent the day working on Imperial parts. Need the rubber boots for the starter bendix, but other than that it is blasted, painted, repaired, and assembled. Had to replace an electrical eyelet going to one of the brushes.
Disassembled the headlight assemblies. Blasted & painted the buckets and brackets. Originally I was going to blast & powder coat the chrome surround, but after I washed them, it looked like there was hope for them. The difference between a fairy tale and a Texas Tall Tale is a fairy tale starts, "Once upon a time..." and a Texas Tall Tale starts, "Y'all ain't gonna believe this sh!t..." Either version would be equally remarkable pertaining to just how well the chrome surrounds came out. Took quite a bit of time with the bench buffer, but I wouldn't believe it if I hadn't seen it myself. Not show quality, but quite adequate for a driver.
 (StarterBrushes1.png) (StarterBrushes1.png)
 (Starter1.png) (Starter1.png)
 (Headlight_Disassembled1.png) (Headlight_Disassembled1.png)
 (Headlight_Buckets1.png) (Headlight_Buckets1.png)
 (Headlight_Brackets1.png) (Headlight_Brackets1.png)
Attachments
----------------
StarterBrushes1.png (90KB - 242 downloads)
Starter1.png (60KB - 260 downloads)
Headlight_Disassembled1.png (79KB - 222 downloads)
Headlight_Buckets1.png (108KB - 244 downloads)
Headlight_Brackets1.png (74KB - 230 downloads)
|
|
| |
|
Regular
Posts: 60
Location: Northeast | Got the adjuster springs blasted & painted, so I was able to reassemble one of the headlight assemblies.
 (Headlight_Assembled1.png) (Headlight_Assembled1.png)
 (Headlight_Assembled2.png) (Headlight_Assembled2.png)
Attachments
----------------
Headlight_Assembled1.png (80KB - 244 downloads)
Headlight_Assembled2.png (81KB - 227 downloads)
|
|
| |
|
Expert
Posts: 2905
Location: little rock, AR | I have 3 '59 Imperial Imp. parts cars. I wish I could find a good '59 to start with. Good Looking work.
|
|
| |
|
Regular
Posts: 60
Location: Northeast | Finished up the other headlight assembly. No pics, as it's just a virtual mirror image of what I already posted. |
|
| |
|
Regular
Posts: 60
Location: Northeast | 'Tis a proud moment for any enthusiast when a fresh engine & tranny make their way between the frame rails. Got the engine & trans bolted together. I know mathematically there are only 8 possible ways to clock the torque converter, & I tried all 9 of them. First auto trans with no flex plate I ever worked with. It's now bolted in; nothing actually hooked up other than the mounts. Did the entire job myself, no helper. I'm sore now; not sure if I hurt more from laying on my back fighting the cross member, or patting myself on the back. Also, I had powder coated the air cleaner gold. It came out a flat finish. I sprayed it with a clear enamel. NICE difference.
 (EngTrans1.png) (EngTrans1.png)
 (EngineIn1.png) (EngineIn1.png)
Attachments
----------------
EngTrans1.png (58KB - 234 downloads)
EngineIn1.png (123KB - 247 downloads)
|
|
| |
|
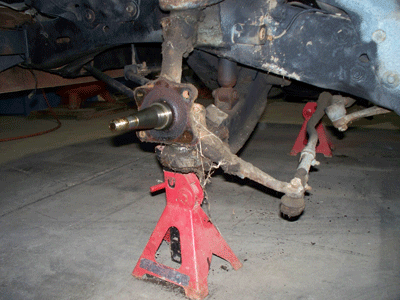
Regular
Posts: 60
Location: Northeast | Removed the entire brake assemblies from the front. Will be blasting, coating, rebuild the wheel cylinders, greasing, and reassembling.
 (SteerKnuckle1.png) (SteerKnuckle1.png)
Attachments
----------------
SteerKnuckle1.png (82KB - 241 downloads)
|
|
| |
|
Regular
Posts: 60
Location: Northeast | Got the backing plates blasted & painted along with all the little springs & cups for the brakes. I blasted & painted the metal parts of the brake shoes, along with the (I don't know what it's called) retainer piece.
 (BackPlates1.png) (BackPlates1.png)
 (BackPlates2.png) (BackPlates2.png)
 (BackPlates3.png) (BackPlates3.png)
 (BrakeHardware1.png) (BrakeHardware1.png)
 (BrakeShoes1.png) (BrakeShoes1.png)
Attachments
----------------
BackPlates1.png (53KB - 232 downloads)
BackPlates2.png (83KB - 249 downloads)
BackPlates3.png (93KB - 236 downloads)
BrakeHardware1.png (122KB - 218 downloads)
BrakeShoes1.png (74KB - 239 downloads)
|
|
| |
|
Regular
Posts: 60
Location: Northeast | There are 3 screws on the back of the hub caps. I would assume they can be disassembled. I removed the screws, soaked the hub area with PB Blaster, yet I can't seem to get anything to budge. I don't want to destroy original hub caps trying to recondition them. Anybody ever worked with the '59 Imperial hub caps and can let me know the "secret"?
 (HubCap1.png) (HubCap1.png)
Attachments
----------------
HubCap1.png (98KB - 257 downloads)
|
|
| |
|

Board Moderator & Exner Expert 10K+
Posts: 13053
Location: Southern Sweden - Sturkö island | Very nice work with good Pictures! Keep it up and keep us posted |
|
| |
|
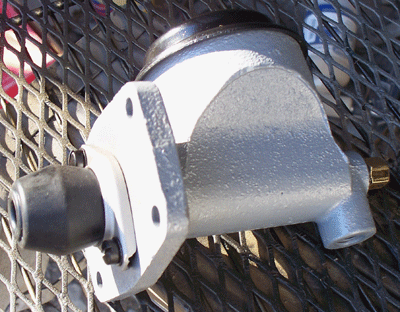
Regular
Posts: 60
Location: Northeast | Got all the parts for the backing plate reconditioned; the last being the wheel cylinders. I was able to save them. I soaked them in PB Blaster for several days, put them on the hydraulic press to compress the piston, used sand paper to clean away the "ridge" above the piston, then with compressed air I was able to pop them out. The wheel cylinders were powder coated, the rest painted.
 (BackPlateB1.png) (BackPlateB1.png)
 (BackPlateF1.png) (BackPlateF1.png)
Attachments
----------------
BackPlateB1.png (123KB - 240 downloads)
BackPlateF1.png (110KB - 234 downloads)
|
|
| |
|
Regular
Posts: 60
Location: Northeast | I have been sharing select pictures on several sites. Somewhere someone said, "It must be nice to be rich!" I wanted to share some of the equipment I'm using. I have been acquiring tools for about 30 years now. I used to earn my living porting heads, turbo mods, and custom manifolds. I have a tank blaster, cabinet blaster, adequate compressor, cheapo Eastwood powder coater, and a used residential electric oven. If I had to try to start from scratch, it would probably cost a small fortune. But since I'm using tools I acquired over many years, the immediate costs are negligible. If anybody happens to be looking for a flow bench, I have a top-of-the-line for sale.
 (CabinetBlaster1.png) (CabinetBlaster1.png)
 (Sand1.png) (Sand1.png)
 (TankBlaster1.png) (TankBlaster1.png)
 (FlowBench3.jpg) (FlowBench3.jpg)
Attachments
----------------
CabinetBlaster1.png (97KB - 219 downloads)
Sand1.png (102KB - 224 downloads)
TankBlaster1.png (99KB - 226 downloads)
FlowBench3.jpg (189KB - 213 downloads)
|
|
| |
|
Expert
Posts: 1231
Location: York County, PA | Some people don't seem to understand that collecting tools and equipment over a period of years is all part of the fun and hobby.
Every once in a while you have to make a major investment that you saved and skimped to get.
A little at a time gets it done and a good woman to help and support you.
Good luck on your project.
 
Edited by ruchaven 2015-12-06 10:39 PM
|
|
| |
|
Regular
Posts: 60
Location: Northeast | Was able to recondition ONE of the front brake drums. The valve that regulates the flow of sand on the tank blaster blew through. I need to get that fixed before I can blast the other drum. Ordered new brake hoses, bearing seals, and dust cover for the front brakes today; along with a new brake light switch.
 (Drum1.png) (Drum1.png)
Attachments
----------------
Drum1.png (94KB - 216 downloads)
|
|
| |
|
Regular
Posts: 60
Location: Northeast | ruchaven - 2015-12-06 10:37 PM
Some people don't seem to understand that collecting tools and equipment over a period of years is all part of the fun and hobby.
Every once in a while you have to make a major investment that you saved and skimped to get.
A little at a time gets it done and a good woman to help and support you.
Good luck on your project.
:stressed:
I have most of it, including the good woman. My wife of 21 years is the absolute best! |
|
| |
|

Expert 5K+
Posts: 9679
Location: So. Cal | I could really use a good & large blast cabinet, but my problem is not money but space to put it.  |
|
| |
|
Regular
Posts: 60
Location: Northeast | It didn't used to be that way for me, but it is of late.
Got the right front brake assembly completely installed, and got the backing plate mounted to the left. Mounted the brake booster & master cylinder (mostly).
 (LFBrake1.png) (LFBrake1.png)
 (RFBrake1.png) (RFBrake1.png)
 (EngineBay1.png) (EngineBay1.png)
Attachments
----------------
LFBrake1.png (87KB - 217 downloads)
RFBrake1.png (82KB - 221 downloads)
EngineBay1.png (92KB - 226 downloads)
|
|
| |
|
Regular
Posts: 60
Location: Northeast | Ordered sand blaster parts. Without a sand blaster, you ain't restoring, you're just repairing. |
|
| |
|
Regular
Posts: 60
Location: Northeast | Blaster parts came in. Got the other drum reconditioned. Will be taking a trip to the car later today, and will install it then. I'll see what other work I can accomplish while I'm there. |
|
| |
|
Expert
Posts: 2596
Location: Upplands Väsby, Sweden | nice work with the brakes |
|
| |
|
Regular
Posts: 60
Location: Northeast | Thank you so very much. |
|
| |