|
|

Veteran
Posts: 207

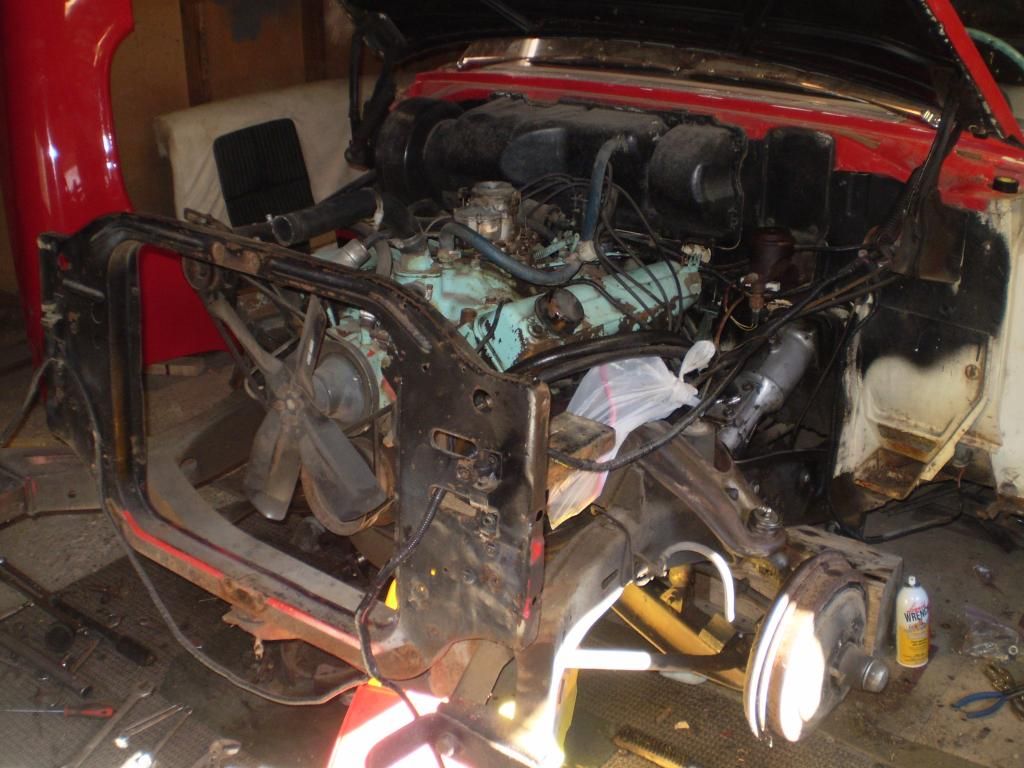
| The Re-Restoration. I began with removing the front end and starting with Front-End Rebuild followed by Front Brakes. Then onto the Engine Re-Gasket and Paint job.
But I have questions that will need answered.
I was told that my stock distributer will not work for my swap to the Dual Quad Set-Up.
Is this true????
What rattle can Gold Engine enamel closely matches that of my Air Cleaners?????
Also I need a set of GOOD quality Exhaust Manifolds
Edited by calvatron 2013-11-02 10:13 PM
|
|
| |
|
Expert 5K+
Posts: 8445
   
Location: Perth Australia | Your dissy will work, but the vacuum advance will not be right (ask Neil on that one?)
I would (and did) go with a full electronic one, just have to make sure the cap is no bigger than the stock one (not a lot of room back there once the 2x4 is on)
The 2x4 engines also used a different cam profile, so you might want to look into that.
Not sure how you will go with the manifolds (I have used the stock ones), you need to decide if your going to keep the genny (need the mount for it on the manifold) or go to an alternator (re mount it off the head) or modify the genny mount to take an alternator ect.
From all I have read on this forum, there are no off the shelf headers (extractors) to fit a poly in our cars
You can get the orriginal manifolds ceramic coated if you want them to look nice (I tried vht exhaust paint and it burnt off in 5 min running time)
Let the fun begin 
|
|
| |
|
Exner Expert 19,174 posts. Neil passed away 18 Sep 2015. You will be missed, Neil!
Posts: 19146
Location: bishop, ca | The extent to which your distributor, and its vacuum advance will 'work' with a dual carb car depends upon
the built-in Mechanical Advance in the dissie, and, the amount of the advance that is built into the V.A.
What model of Autolite dissie do you have?
You can remove the V.A. from the distributor and read the very-small stamping that is put onto its lever arm;
its advancement, in engine-degrees, will be twice whatever is stamped onto it.
In all likelihood, you will have to send your dissie to a shop which can re-curve its M.A. (to around 28 degrees)
and you may have to find another V.A. unit, too---depending upon what/how the dissie gets to be re-curved.
You should get the camshaft re-ground, too, to take advantage of the 8-barrels of fuel that will be dumped into
the intake manifold's plenum.
Yeah, a 2-bbl spec'ed dissie will not be of much use with dual 4-bbl carbs.
|
|
| |
|

Location: Parts Unknown | Use of cutesy non-words like "dissie" and "carbie" make me think one might be a tad light
in the loafies. Sounds great with six-year-olds. What gives ? 
|
|
| |
|
Location: Parts Unknown | What is that, a 57 Chevy ? 
|
|
| |
|
Elite Veteran
Posts: 982
Location: Upper Hunter NSW Australia | ........
....
Following on from Mick regarding no off the shelf poly extractors ( header pipes ) being available, if it is any help there are flanges for Poly A engines on Evilbay and the price ( $45 ) to me seems to be very reasonable........
Lookey here:- http://www.ebay.com/itm/Dodge-277-326-318-Poly-Exhaust-Header-Flang...
I think ??? that I read somewhere ??? that Gary Pavlovich makes ( or can have made ) headers ( extractors ) for these engines.
If not, I'm sure that some could be made considering you have the flanges already.
You generally gain a few HP gain from properly flowing tuned length extractors ( headers )
........... |
|
| |
|
Veteran
Posts: 207
| I will be keeping the generator I spent $240 on a new one. and I have decided even though electronic is more reliable I am not going that way. I want to keep her as close to original as possible.
Is there new distributer that I can buy that will work????? |
|
| |
|
Inactive by user's request
Location: Las Vegas, Nevada | Doctor DeSoto - 2013-11-02 10:28 PM
Use of cutesy non-words like "dissie" and "carbie" make me think one might be a tad light
in the loafies. Sounds great with six-year-olds. What gives ?
What about "vert" for convertible, etc.? Reminds me of those knuckle-draggin' Cro-Magnon men in their filthy wife beaters and soiled boxers, lying on the couch, holding a beer and barking like a sea lion while watching a televised football game.
"Duuuuuuuuh! Me shorten noun to one syllable! I sound hip!"
Ooops, stole a thread. 
K. |
|
| |
|
Inactive by user's request
Location: Las Vegas, Nevada | By the way Calvin, keep us posted. I know what it's like to go through the same car a second time.
K. |
|
| |
|
Expert 5K+
Posts: 8445
Location: Perth Australia | I dont abreviate to be cute, I abreviate to be lazy
I think I do ok typing useing 2 fingers
Anyway, back on subject, I dont believe there is anywhere that you will get a new points DISSY :), which was one
of the reasons I went to a new electronic.
It is possible to get it rebuilt, but I dont know who would do that in the US, but I would try to find a twin points one if you can and get that rebuilt
|
|
| |
|
Expert
Posts: 1730
Location: Michigan | I used these guys. http://www.advanceddistributors.com/index.htm
My distributor works great. I had him put in a Pertronix but you don't have to modify it. |
|
| |
|
Expert
Posts: 2788
Location: USA - KY |
HEMI - just wanted to use an abbreviation to bug Doc. 
Best of luck with the re-restoration, calvatron!
Looking forward to reading about your progress!
BTW - will you be painting just the engine and engine compartment, or the entire car as well?

Edited by FIN ME 2013-11-06 10:46 AM
|
|
| |
|

Expert
Posts: 3903
Location: Northen Virginia | Gosh seen a frame apart again make my stomach upset, a full resto of the frame alone take more than just money, but the results make all worthwhile. |
|
| |
|
Veteran
Posts: 207
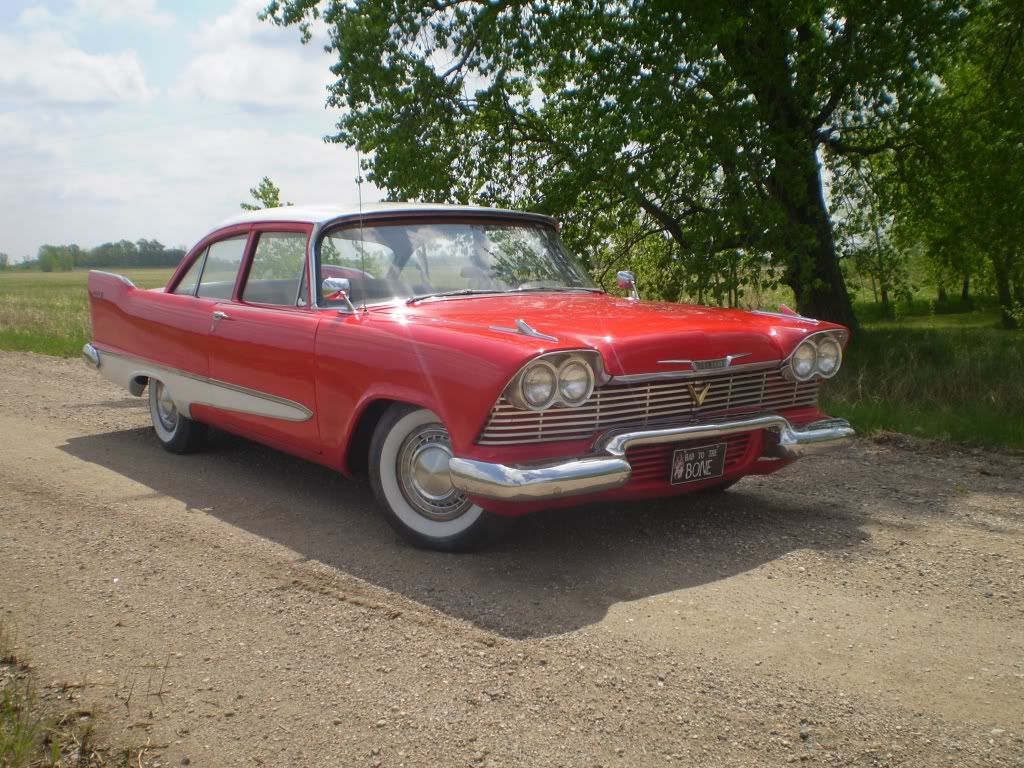
| I will be painting the entire Engine Gold. The Inner Fenders and Core Support have all been sandblasted already and are getting painted this weekend. And the whole front is going to be assembled with Stainless Steel hardware. Its gonna be AWESOME.
I will be doing a complete repaint in Viper Red and Bright White. Interior is all getting redone in red and black new Headliner as well |
|
| |
|
Veteran
Posts: 207
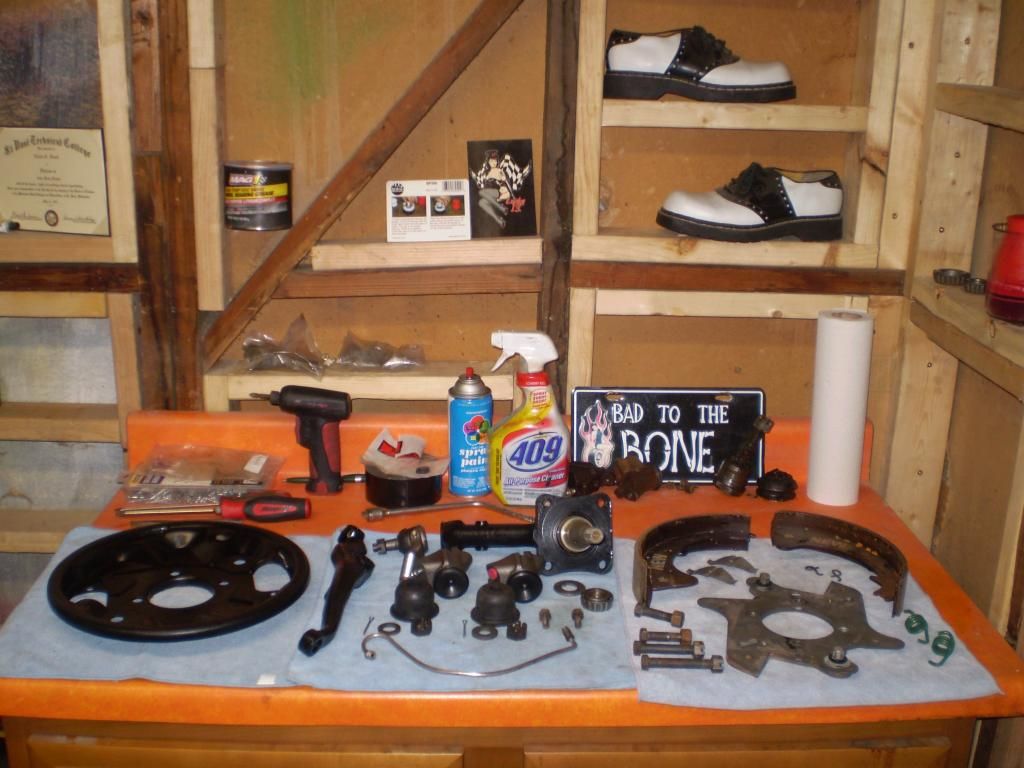
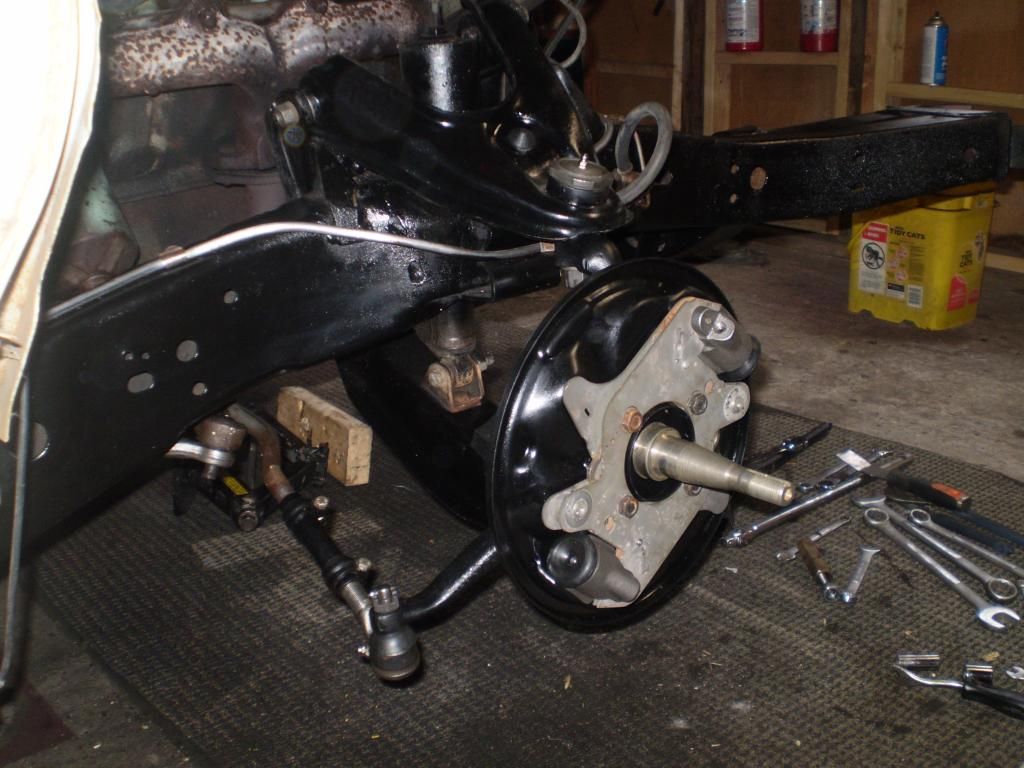
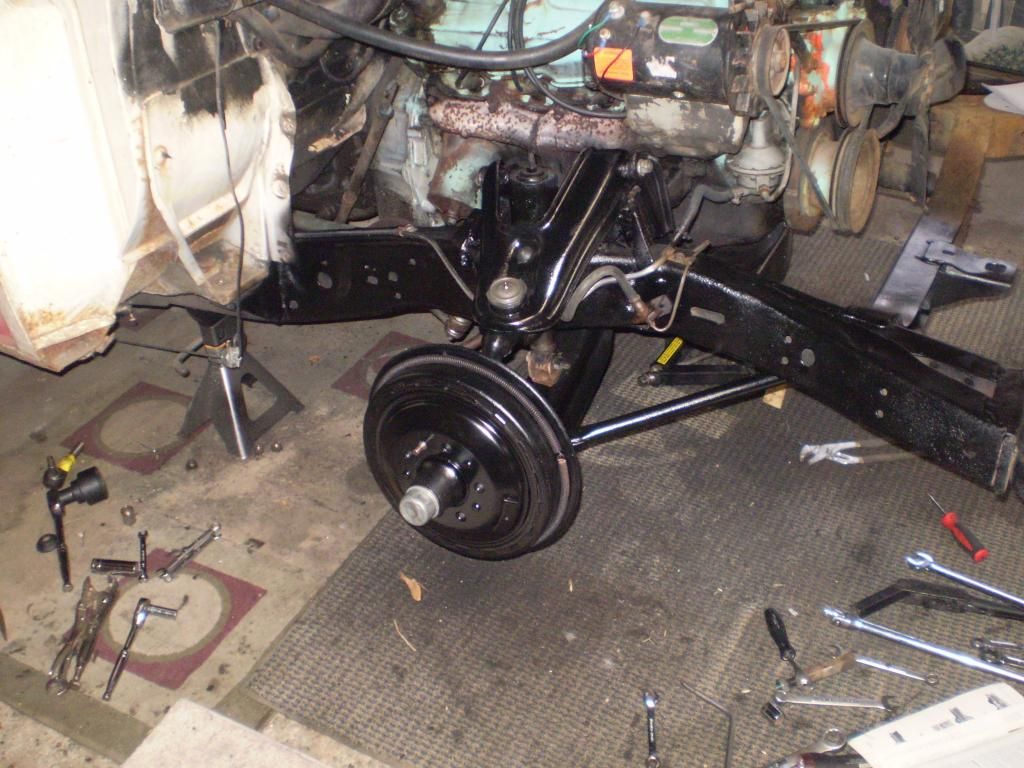
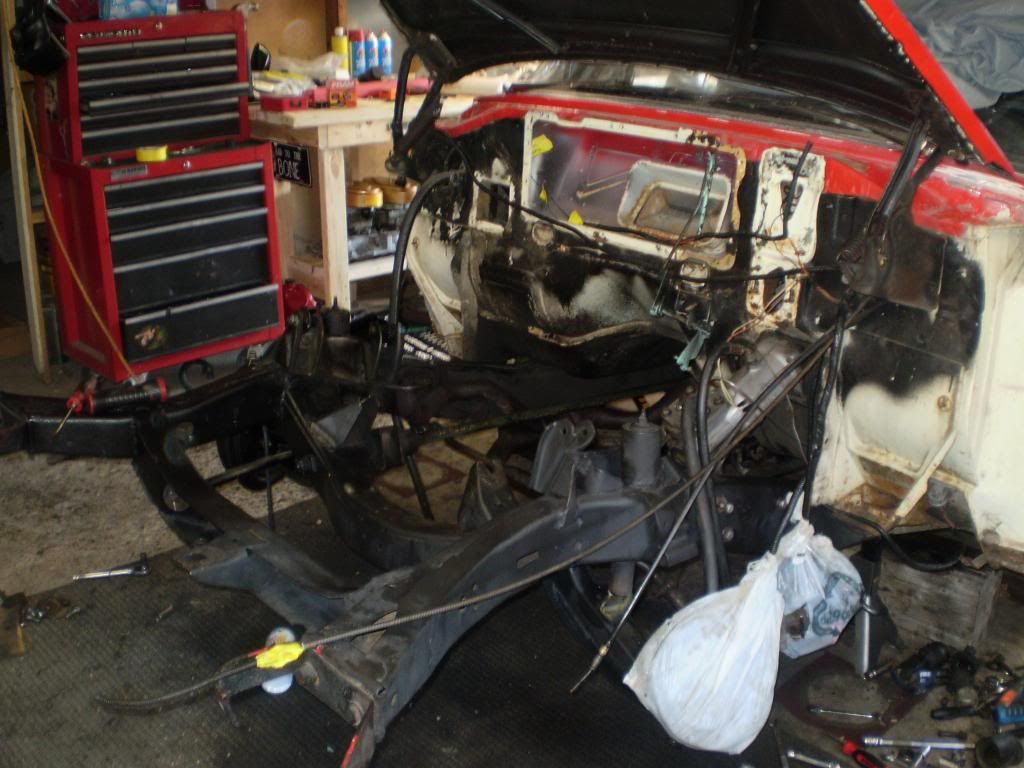
| Its Been a busy day, But I managed to finish the right side of my front end re-build. Just to clarify I am not building a 100 point show car here.
She was a driver before and She will continue to be a driver. I am just giving her a clean up...
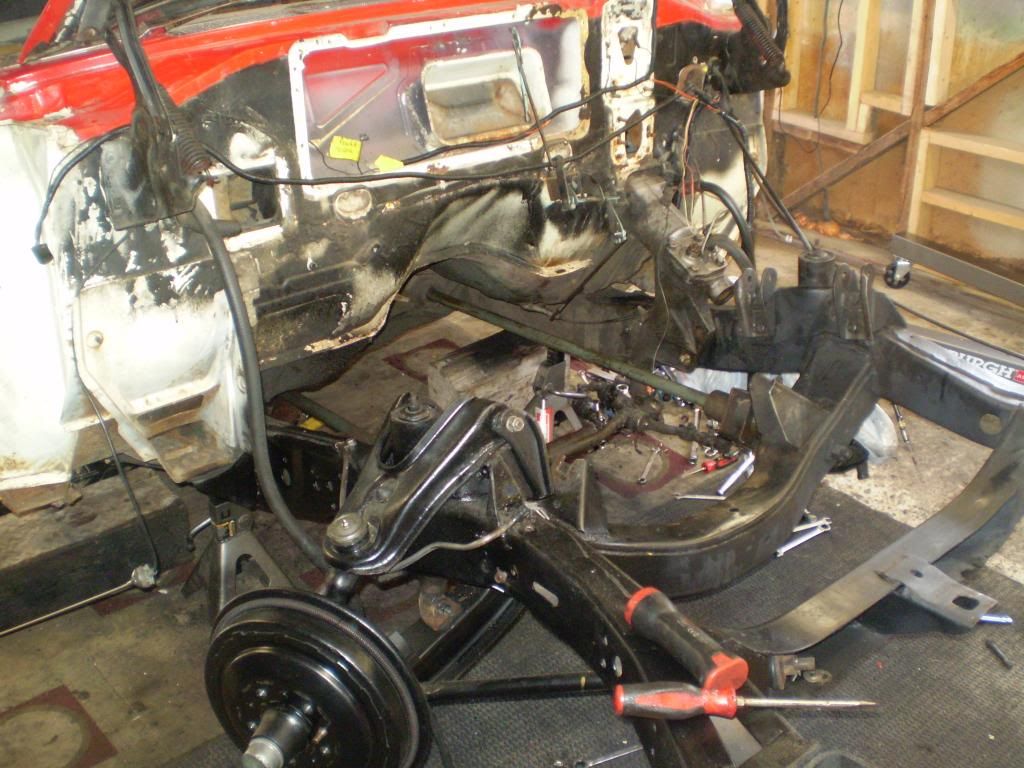
The Frame I cleaned up with a wire brush and a lot of degreaser and Rattle canned Black. New Upper and Lower Ball Joints, Outer Tie-Rod End, Upper and Lower Control Arm Bushings, Strut Arm Bushing, Dust Seals, Inner Wheel Bearing and Cup, Outer Wheel Bearing and Cup, Wheel Cylinders and Brake Shoes.
Let me know how I did......

 |
|
| |
|
Expert
Posts: 1737
Location: Hay Lakes, Alberta, Canada | Looking good! Can you do the same to my four door, if I send it to you? |
|
| |
|
Veteran
Posts: 207
| Yeah sure ill do it up. |
|
| |
|
Expert
Posts: 2788
Location: USA - KY | calvatron - 2013-11-06 8:38 PM
I will be painting the entire Engine Gold. The Inner Fenders and Core Support have all been sandblasted already and are getting painted this weekend. And the whole front is going to be assembled with Stainless Steel hardware. Its gonna be AWESOME.
I will be doing a complete repaint in Viper Red and Bright White. Interior is all getting redone in red and black new Headliner as well
That does sound AWESOME!
|
|
| |
|
Veteran
Posts: 207
| I know right, Just think in a small Minnesota town beats the heart of a Monster.................
 |
|
| |
|

Expert
Posts: 1385
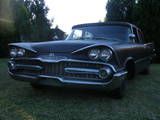
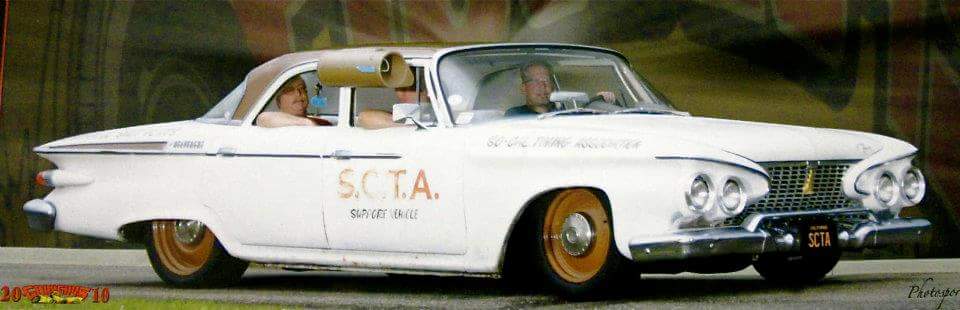
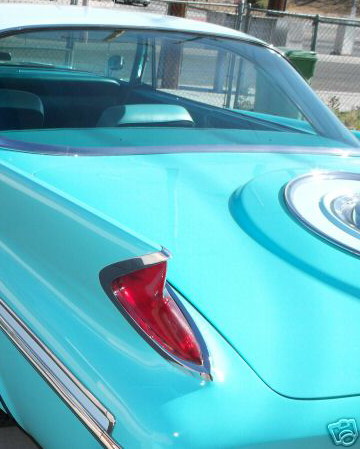
Location: Ocala, Florida | Nice sedan I like the lower side trim more than a Belvedere. |
|
| |
|
Veteran
Posts: 207
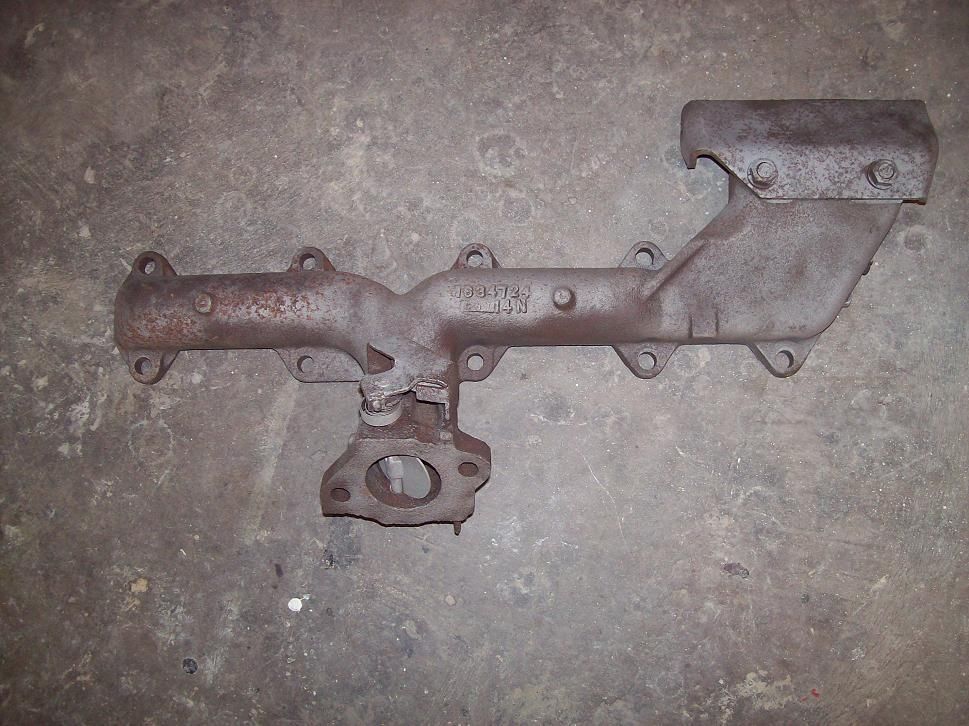
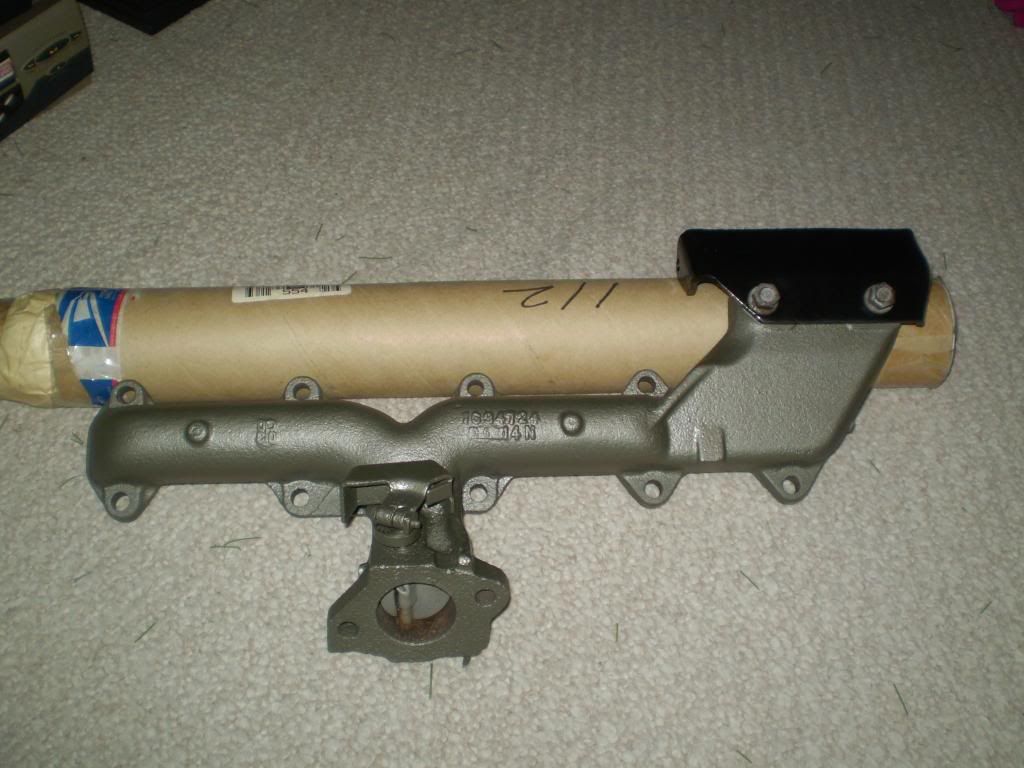
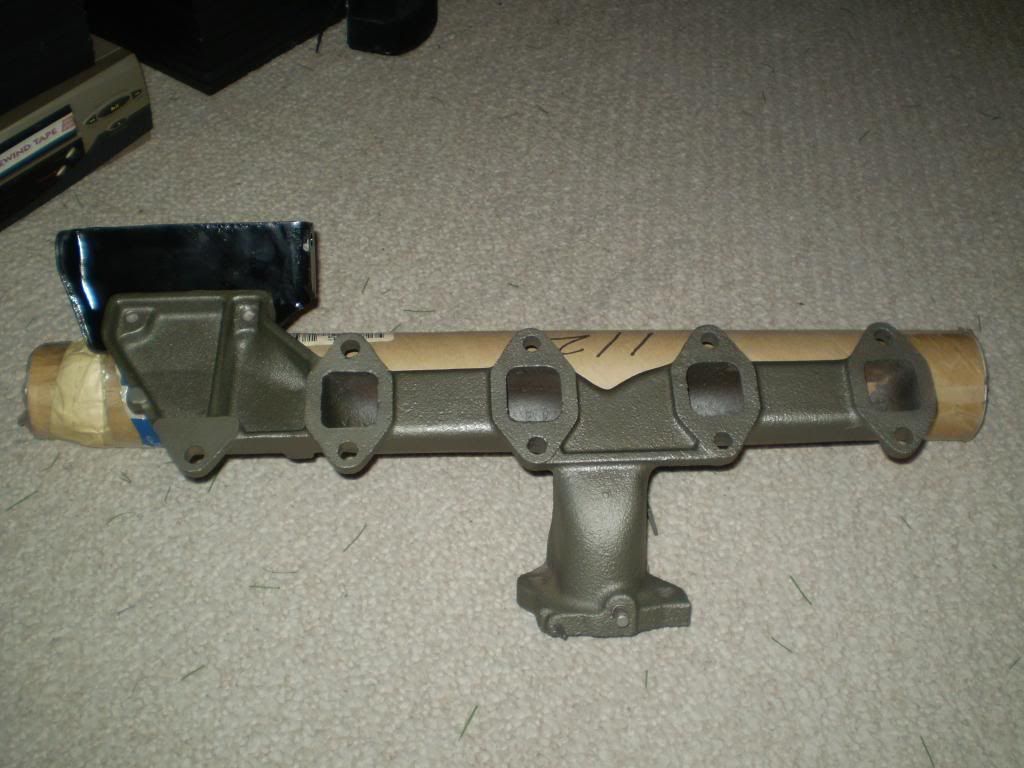
| Alright Exhaust Manifolds who has a set????? |
|
| |
|
Veteran
Posts: 207
| Well we are in a blizzard today which stopped me from going to work today, so I decided to clean up the R Exhaust Manifold I got from
w.weiland. I think it looks pretty good.
|
|
| |
|
Location: NE Ohio | looks great |
|
| |
|
Veteran
Posts: 207
| Son of a Biscuit!!!!!!!!!!!!
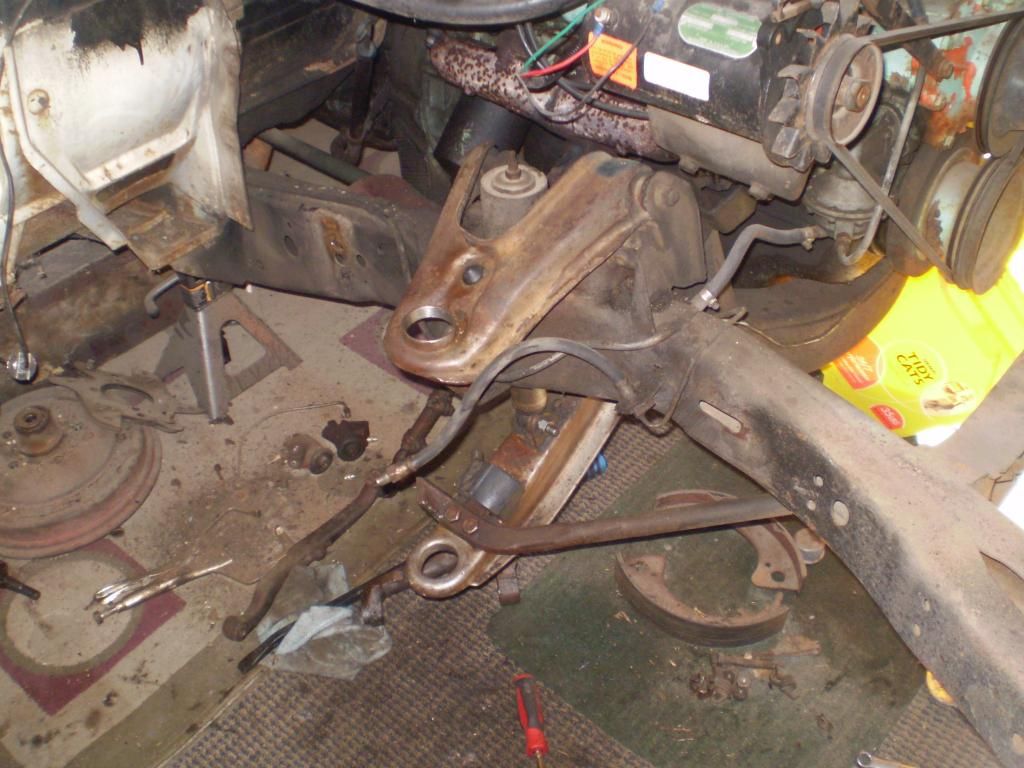
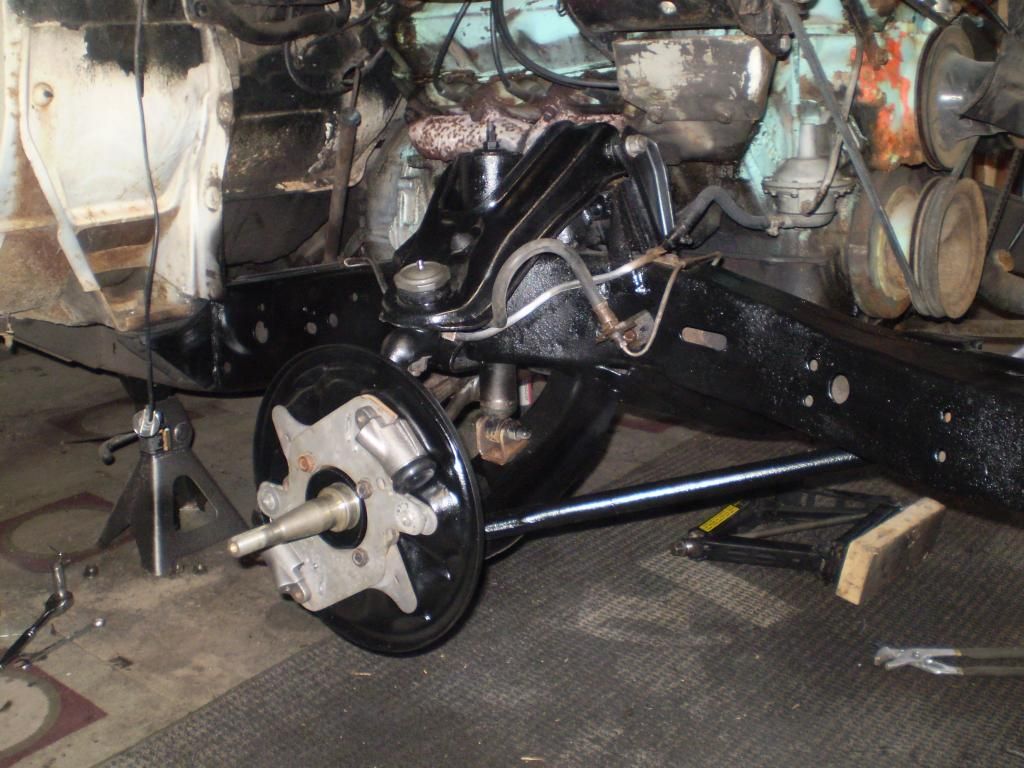
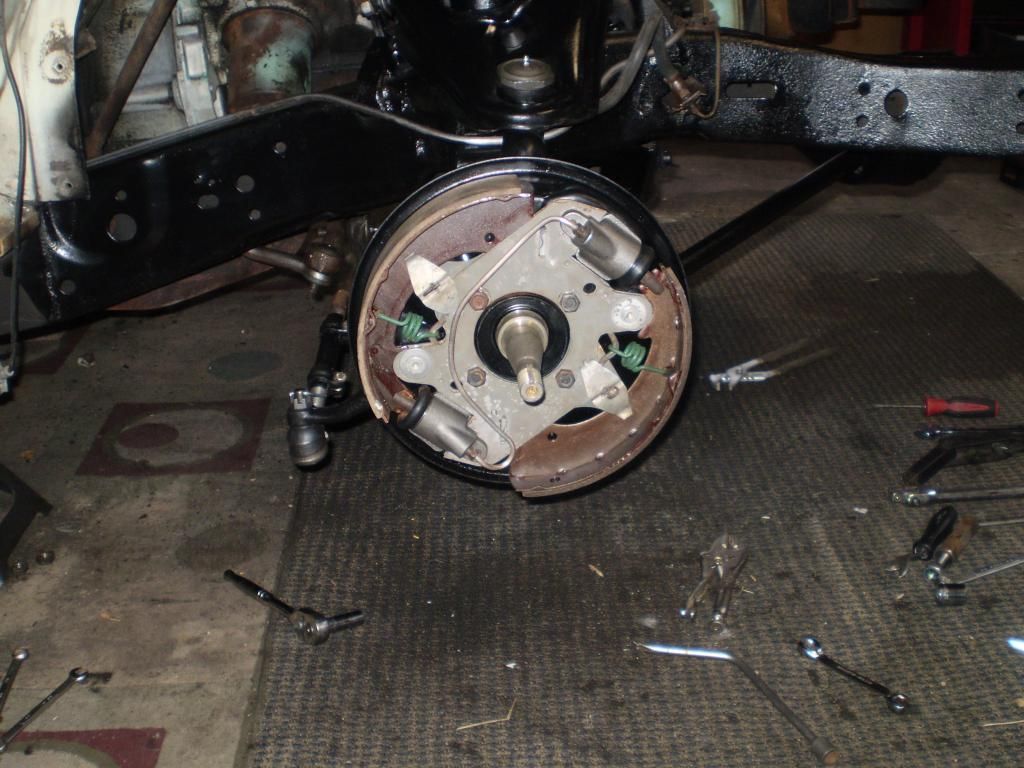
Well it was warm enough today to go out and start on the left side of my front end rebuild. I noticed that the upper control arm was
cracked a little bit in the middle. No big deal. I just figured I would weld it once out. But when I popped the upper ball joint she split
all the way up to where the ball joint screws in.
I need a new one and I need it now.
Does anyone have one they can ship out ASAP?????? |
|
| |
|

Expert
Posts: 2206
Location: Muskego, WI | Better now than when you got her all back together and driving down the road. Love the car, where in Minnesota are you? |
|
| |
|
Veteran
Posts: 207
| Yes that's true.
But still a unexpected little problem that I wasn't prepared for. And I really don't have a lot of $$$ after I purchased the dual point distributor.
So if anyone has one please know right now $$$ is a issue.
Edited by calvatron 2014-03-15 10:16 PM
|
|
| |
|
Expert
Posts: 2905
Location: little rock, AR | I sent you a PM |
|
| |
|
Veteran
Posts: 207
| Does anyone here know if a '59 upper A arm the same as a '58 upper A arm |
|
| |
|
Veteran
Posts: 207
| Really need some help over here..... |
|
| |
|

Expert
Posts: 1819
Location: Vancouver, BC |
No, the 1959 upper and lower A arms were different from 1958. The 1958 and 1957 P, D, E and F models plus 1958 C1 models used upper arm part numbers 1671 426 on the right and 1671 427 on the left.
The front suspension, including torsion bars, were changed for 1959 with upper arm part numbers 1825 306 on the right and 1825 307 on the left. They were used on 118 and 122 inch wheelbase Mopar models from 1959 through 1964. 1959 was the year Chrysler adopted the cam adjusters on the front suspension.
|
|
| |
|
Veteran
Posts: 207
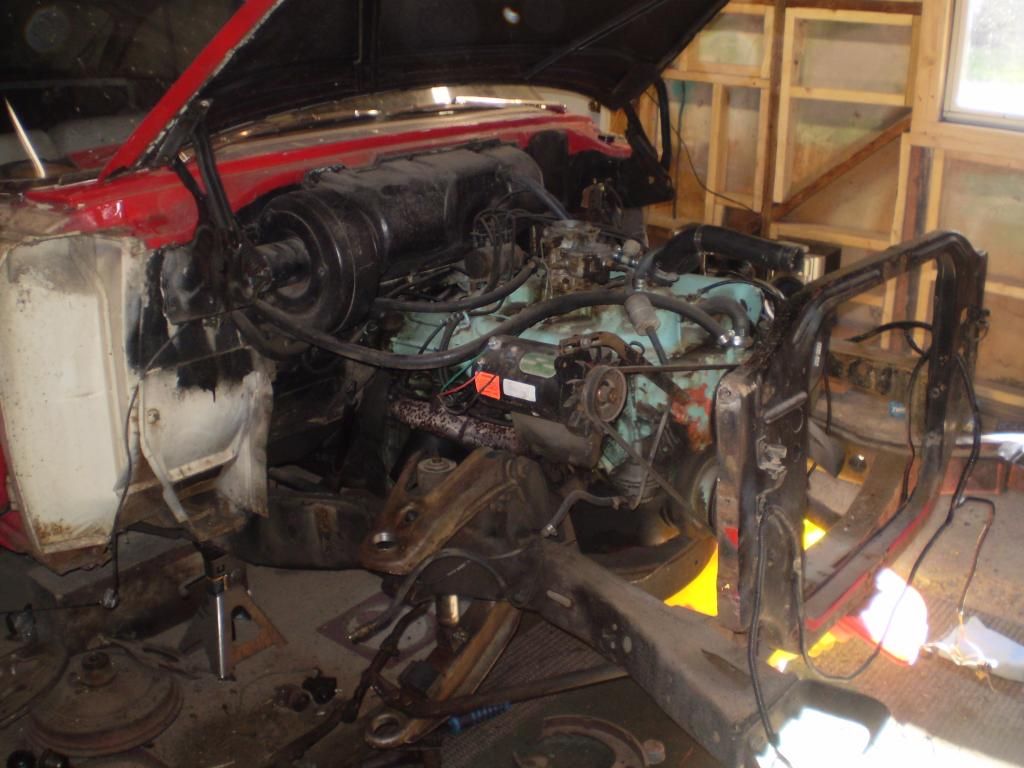
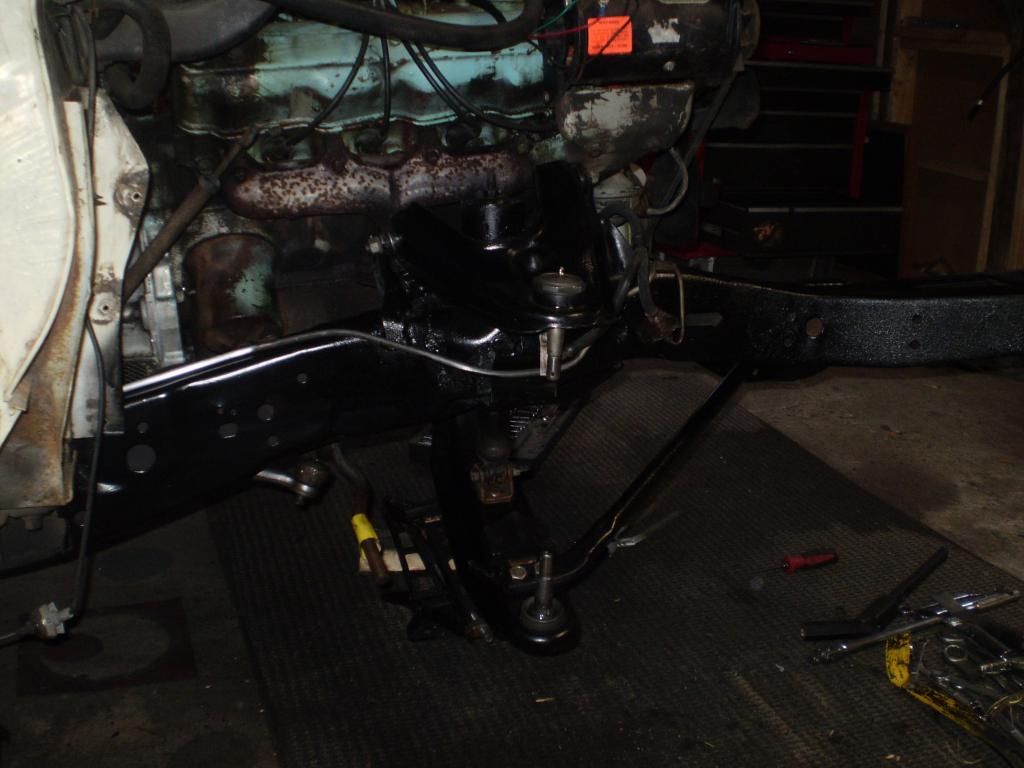
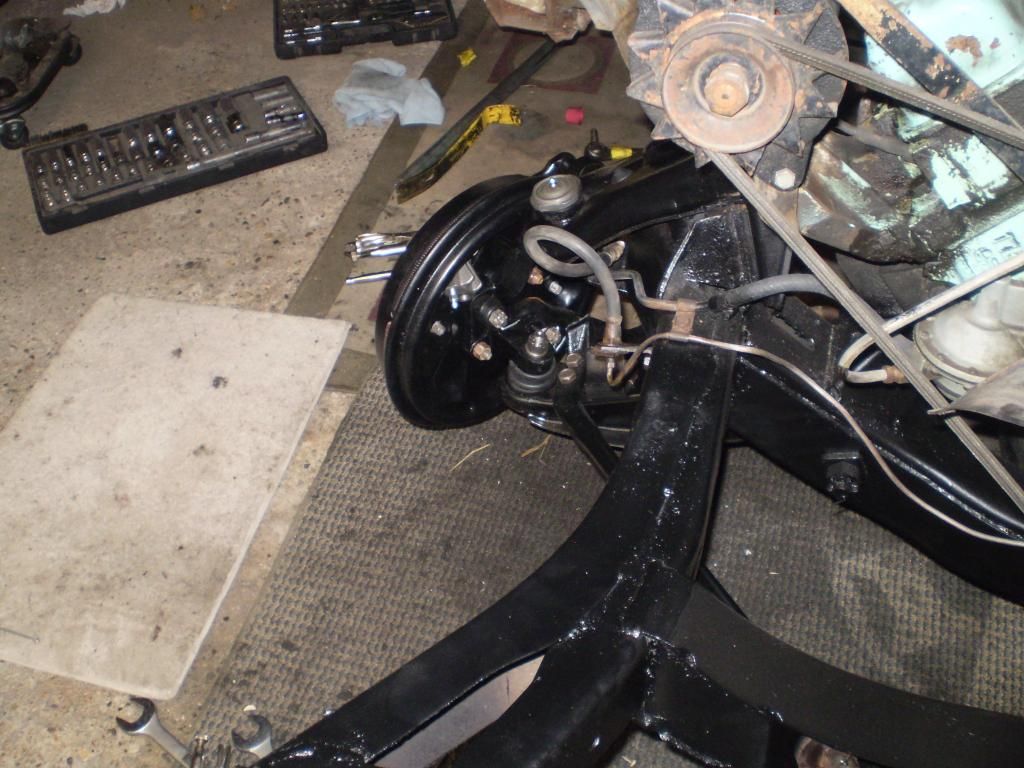
| Well it was pretty nice today, so I got a few things done.
I got the Heater core, Master Cylinder and Front Brake lines pulled. Along with the Exhaust Manifolds and Intake.
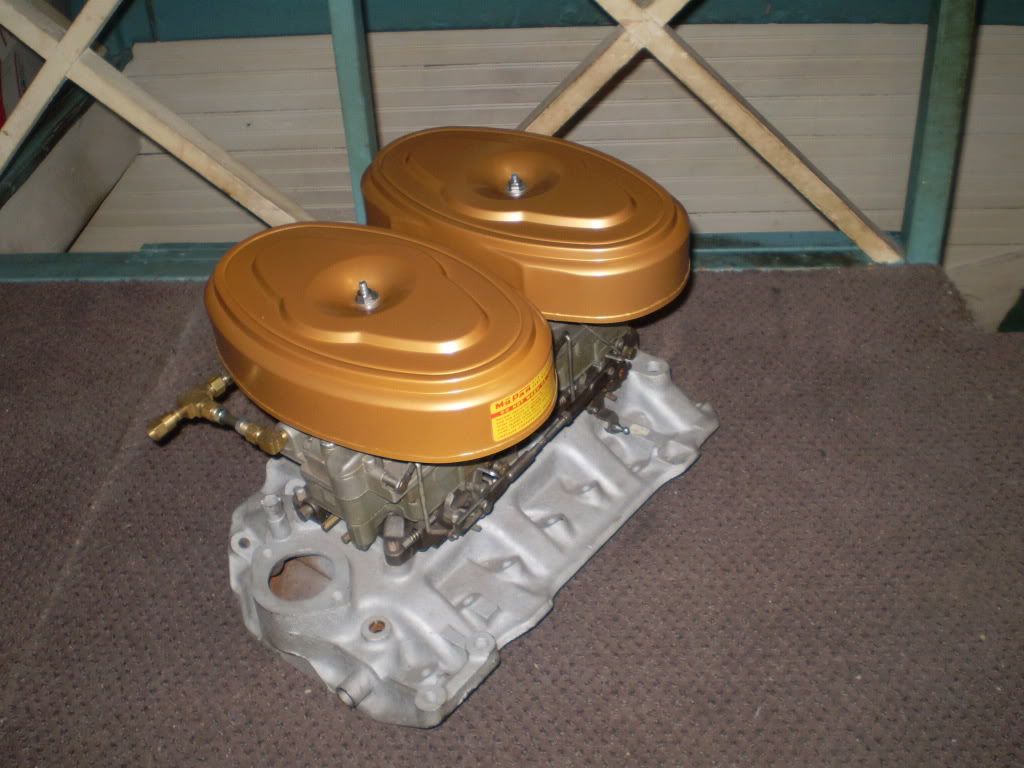
I have seen it before on other cars but never mine. And I had to see it, I had to gaze upon my Dual Fours.
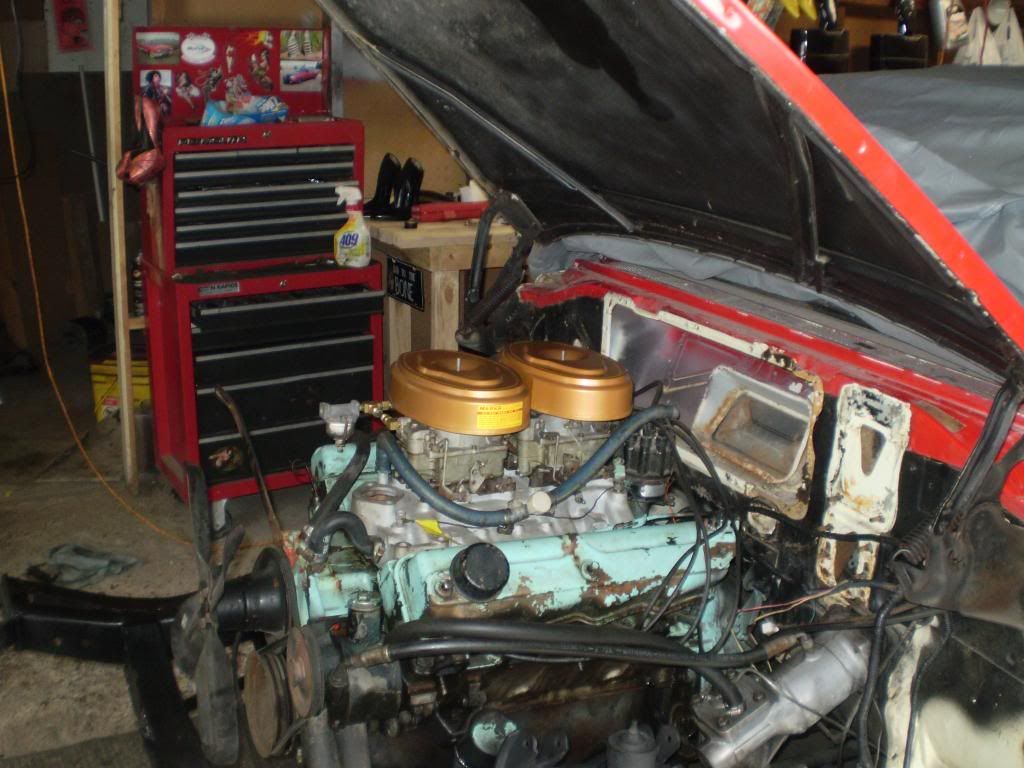
By the way I need a good I mean real good Left (Driver Side) Exhaust manifold. This one was also broken.
Edited by calvatron 2014-03-30 3:17 PM
|
|
| |
|
Expert 5K+
Posts: 8445
Location: Perth Australia | Just curious, but you have that much apart, why not slip the engine forward (if not completely out) so you can get at the firewall better?
Make it easier to paint the engine as well and shouldnt cost anything, but a bit of time
|
|
| |
|
Veteran
Posts: 207
| my man I am looking for the tool required for that. The farther I tear down the more I realize to do the kind of job I want the motor will have come out.
Like you say it will make it easier to paint the motor as well as doing a better job. Plus I can clean and degrease the trans.
PLUS I can really make the firewall look AWESOME!!!!!!
Edited by calvatron 2014-03-30 6:30 PM
|
|
| |
|
Expert 5K+
Posts: 8445
Location: Perth Australia | Just remember where the stop button is (unlike myself) or you will end up spending lots of money and time fixing little insignificant things
|
|
| |
|
Veteran
Posts: 207
| Yeah the stop button is right after my check book hits zero |
|
| |
|
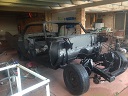
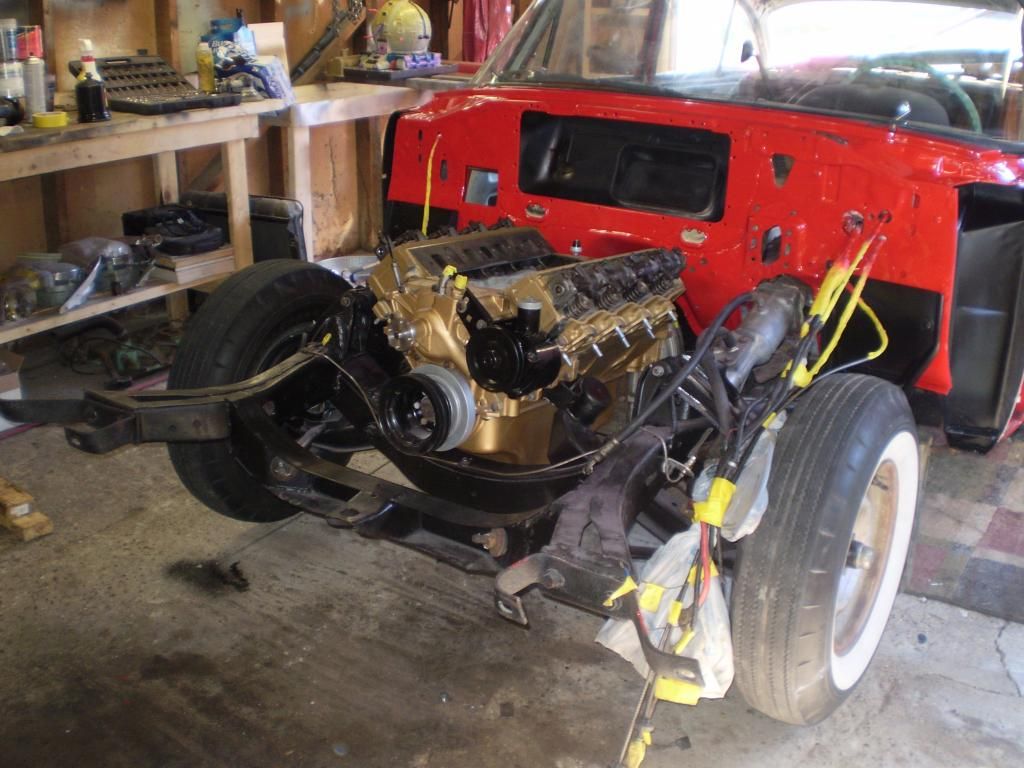
Veteran
Posts: 207
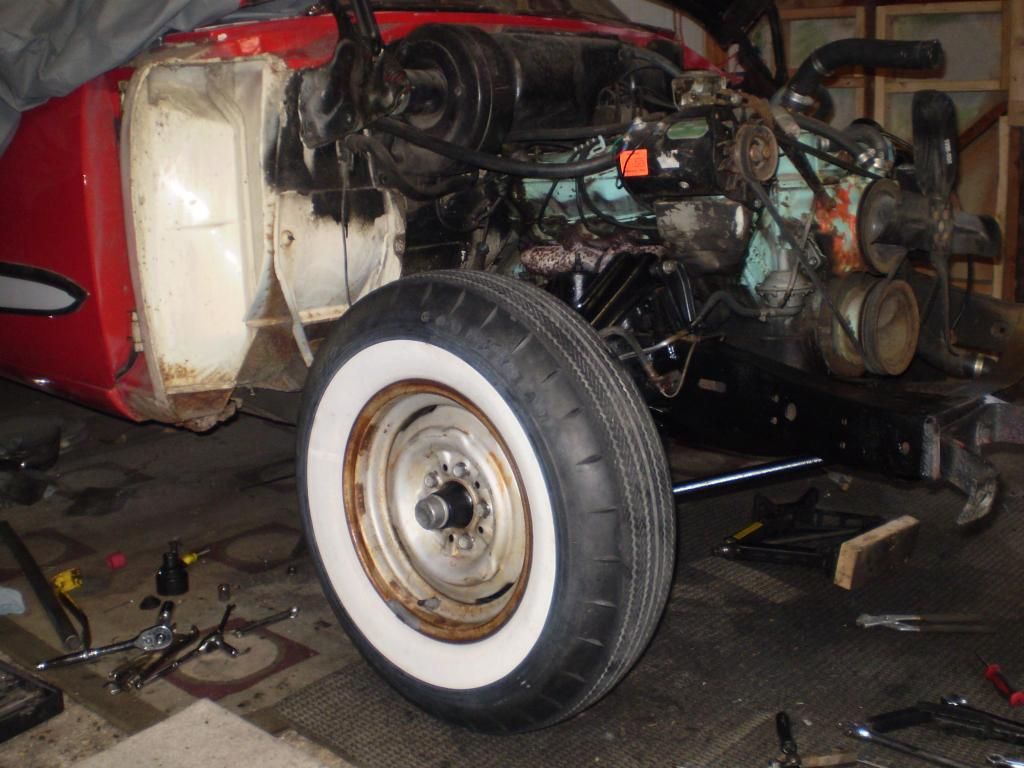
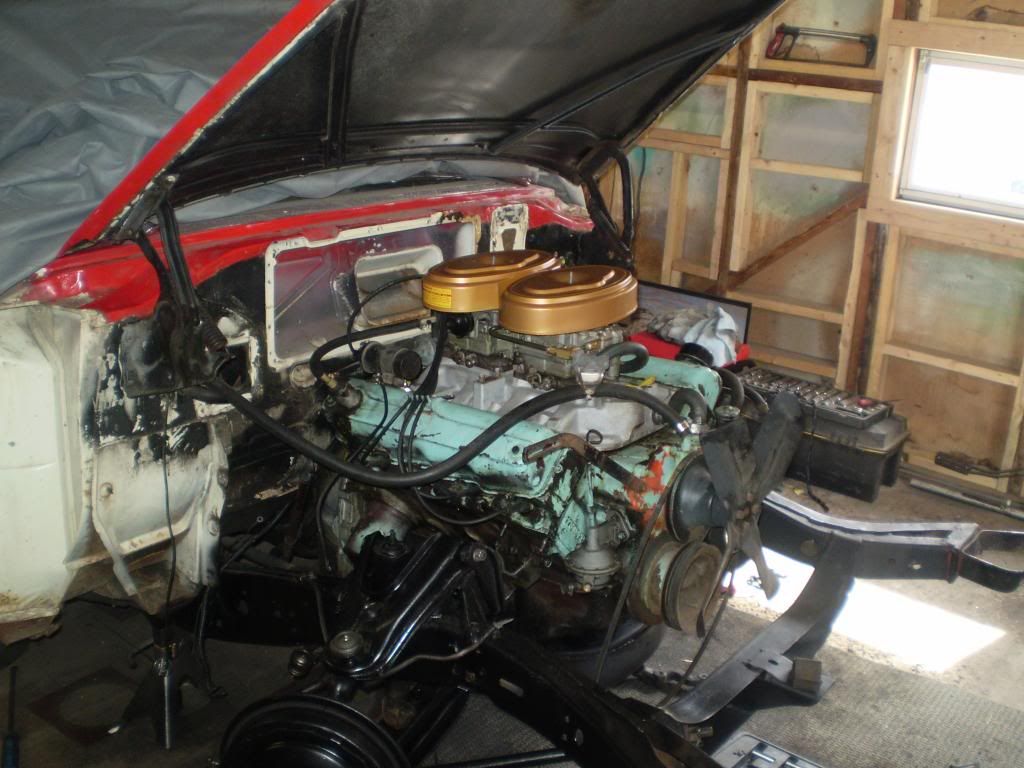
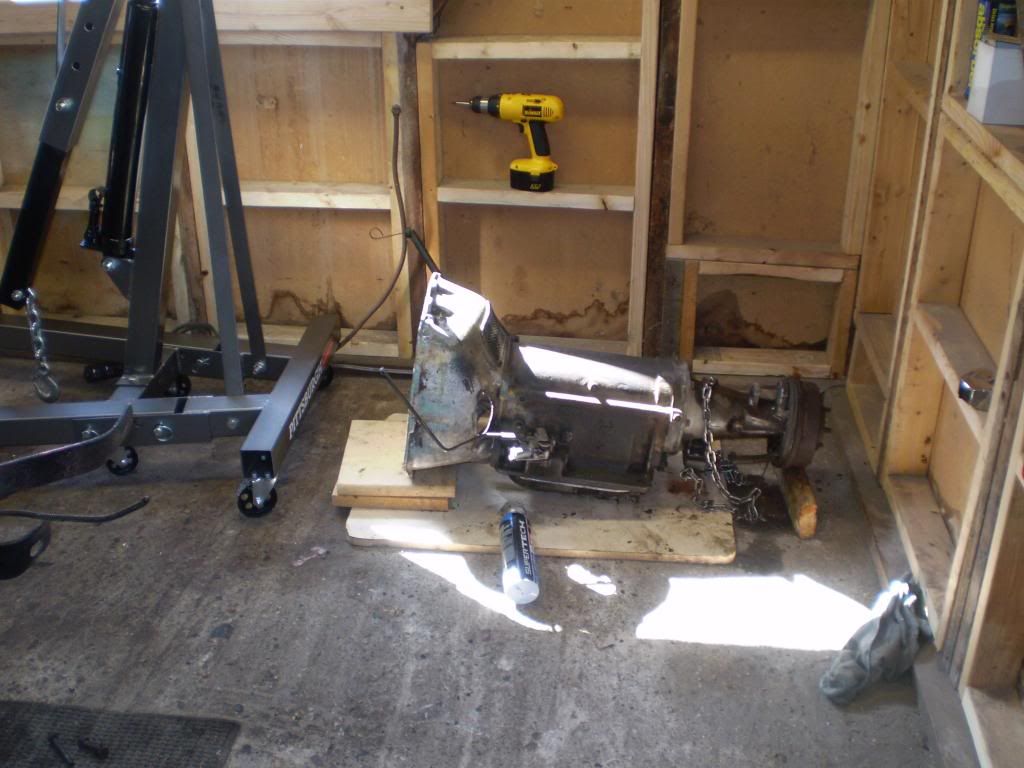
| Well its done.
Motor and Trans is out FINALLY. I had a terrible time getting the trans cable disconnected. I looked thru my service book and did what they said with no luck.
So I called Mel he told me to take the Neutral switch out and try it. WOW 2 hrs doing what service book says 5 min Mel's way. Lesson learned!!!
Anyway Since the motor is out im going to have the heads gone thru valve job and hardened seats installed so I can run on pump gas.
Cleaning the frame is SOO much easier with motor out.

|
|
| |
|

Expert 5K+
Posts: 6552
Location: Newark, Texas (Fort Worth) | Plasti-kote 223 Universal Gold may work.
http://www.amazon.com/Plasti-Kote-223-Universal-Engine-Enamel/dp/B0...
VHT has one too!
http://www.ebay.com/itm/VHT-HIGH-TEMPERATURE-METALLIC-ENGINE-ENAMEL...
Rust-oleum:
http://www.ebay.com/itm/Rust-Oleum-Paint-Engine-Enamel-Metallic-Gol...
VHT Flat look very close:
http://www.ebay.com/itm/VHT-Paint-High-Temperature-Engine-Enamel-Fl...
Mopar:
http://www.dippy.org/forum2/index.php?topic=106.0
Gold Metallic - Mopar P4529149. Used from the late 50s and early 60s
•"Golden Lion" engines
•"Golden Commando" engines
•DeSoto "Adventurer" engines
Read this:
http://www.chrysler300club.com/rcmstuff/1acleaner/01.html
More cool pics:
http://www.nicksgarage.com/aircleaner.htm
Good info:
Ray Melton writes:
I recently had the air cleaners and valve covers for my 1957 Chrysler 300C repainted in what I believe to be the correct shade and gloss level as originally supplied. On the back side of the oval ends of the air cleaner housings, I found what I am certain was the original Chrysler color, untouched by previous owners who had painted the exterior only. I had a local paint and body shop match the old paint color by trial and error until I was completely satisfied with the color - when the custom mix was sprayed right on top of a masked portion of the original paint, I could hardly see the transition. The parts were painted with a urethane primer, sanded, then two coats of the urethane color base coat, followed by a clear coat with approximately 50% flattening agent to give a satin gloss level. The final outcome was a tint slightly more silvery and less reddish-gold than the Plasti-kote #452 that had previously been applied, and with a more subtle satin gloss, rather than a too-bright high-gloss.
However, since the color matching was a multi-step trial-and-error process (add a little green and silver here, take out some red there, add more black, etc.) there was not an easy way for the painter to replicate the color for future applications, either by myself or someone else. So, I took the finished pieces to my local paint specialty shop and had them analyze the color using a special hand-held electronic color matching device. In less than five minutes, they were able to come up with the formula for tinting, and I thought I would share that with other interested members.
The starting point for the color base coat was one pint DuPont Chromabase clear. I don't know what all the numbers and letters mean, but your own paint specialty person will! Also note that a urethane-compatible primer must be applied before the color coat.
259663 K CC: M CHROMABASE BC Alt: (EUR)
Daewoo - 67U
Mix size: 16.0 oz. (pint)
Tinting Guide: Formula #259663
882J LS yelo oxide 27.1 (I was told this means YELLOW)
811J Med aluminum 45.4
891J Transox Red 62.1
819J Fine bright aluminum 69.8
806J HS Black 75.5
833J Green Gold 79.0
1005S Gold Pearl 89.6
1009S Super Green PL 95.2 (I was told the "PL" means PEARL)
150K B/C Balancer 317.1
175K Binder 444.5
The top coat was DuPont Chromabase clear, with ~50% flattening agent to yield a satin gloss level. Not being an automotive painter myself, I was shocked at the price for this base coat/clear coat paint: the base coat alone was $112 for one pint, plus a few bucks more for the activator! On the other hand, the guy who painted my parts mixed up only 8 ounces of color base coat, and there was still some left over after applying two coats of color, so that would be only ~$56.00 for a half-pint of the color coat. I didn't ask about the cost for the clear top coat, but it will be considerably less. I had the parts stripped and bead-blasted by another place ($55.00 - and careful NOT to strip the inner surfaces of the oval air cleaner end pieces to preserve for subsequent color-matching!) before taking them to the automotive body/paint shop -- the final charge for priming, sanding and painting the two air cleaner housings and both valve covers was $280.00.
Note: I've had no need to try out this formula myself, since my parts are already painted, but if you decide to go with the formula above, you might want to do a bit of custom color-matching yourself: do a test shot on a few square inches of a smooth metal surface (tin can lid?) and see how you like it, then add/subtract tint components to fine-tune to your personal preference.
Hope this helps some of you out there, so you won't have to go through the somewhat tedious trial-and-error approach that I did.
Henry Schleimer writes:
A couple of years ago when I had my air cleaners and covers painted, advice from some club members was to use Mercedes Benz Byzantine Gold colour from the 1970's. I'm surprised no one has mentioned this in this (and other) threads.
Did that and they look terrific. My car isn't going in a museum so close is good enough for me. It isn't a bright gold - which is good. Here is a link to an advertised car that is pretty much how it turned out.
http://bringatrailer.com/2011/03/24/bat-exclusive-1973-mercedes-ben...
This may suit others who just want to tell their painter a known colour. Might be even able to get it in a rattle can.
Or you could order it from Italy!
http://www.ricambiamericani.com/parts/151-chrysler/1413586/p4529149...
Edited by mstrug 2014-04-12 2:59 PM
|
|
| |
|
Expert
Posts: 2905
Location: little rock, AR | Ya might want to upgrade the cam since your going with dual 4's.
|
|
| |
|
Veteran
Posts: 207
| Negative!!!
I will stay with the cam I have..... |
|
| |
|
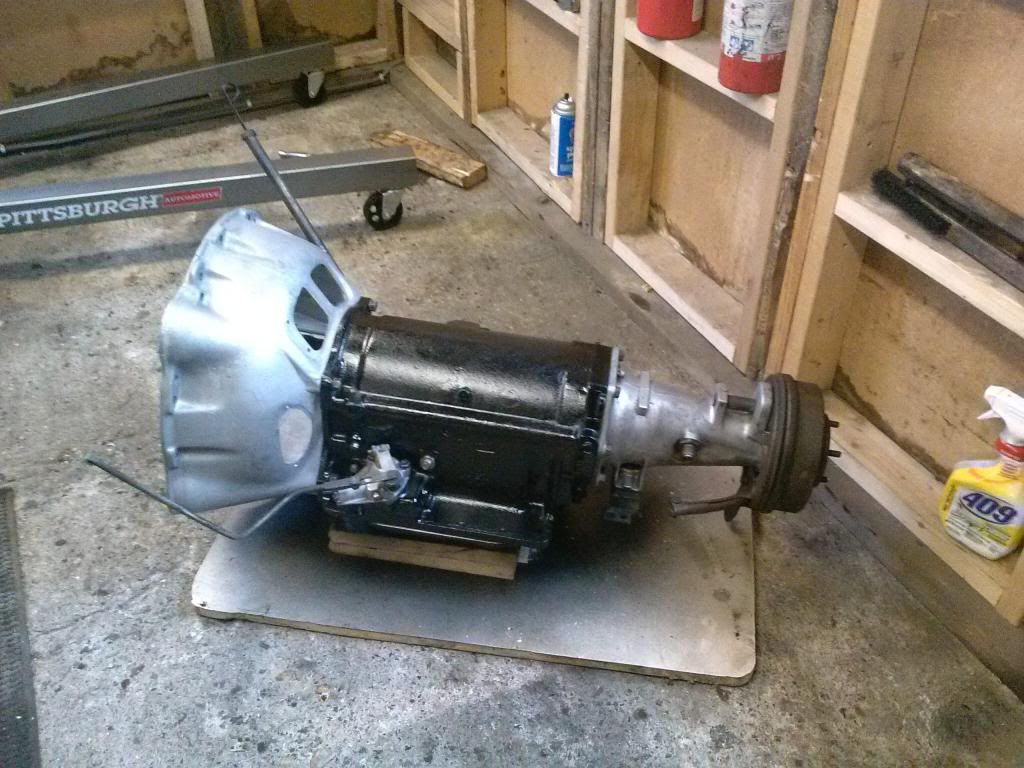
Veteran
Posts: 207
| Yay!!!!
I got the Trans all cleaned up and painted
 |
|
| |
|
Expert
Posts: 2788
Location: USA - KY |
You're winning the battle, calvatron!
Your persistence is paying off!
|
|
| |
|
Veteran
Posts: 207
| Thanks,
That's always nice to hear from others. |
|
| |
|
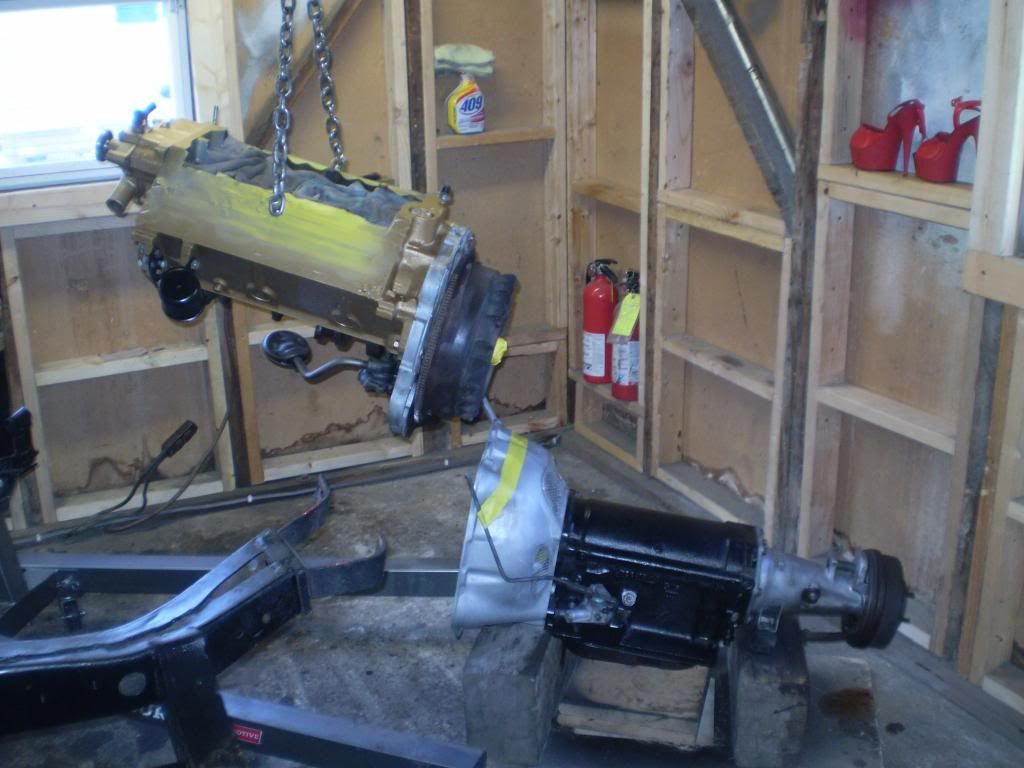
Veteran
Posts: 207
| I believe they call it the Golden Commando.
All the time I sat there scrapping and cleaning was worth it, when I get to lay down that Gold paint. I started the rebuild a few days ago and started re-assembley today the heads and intake are still out. So I got done what I could.

|
|
| |
|

Expert
Posts: 3581
Location: Blythewood, SC | Nice shoes. |
|
| |
|
Veteran
Posts: 207
| Thanks I guess ? |
|
| |
|
Expert
Posts: 2905
Location: little rock, AR | Yes those Red shoes will match the Car. I know that OCD feeling of not knowing where to stop. |
|
| |
|
Veteran
Posts: 207
| What the Hell does that mean????? |
|
| |
|
Veteran
Posts: 207
| Nothing about how good my motor is looking???? Just a couple comments about an old pair of stripper shoes from Halloween, Really? |
|
| |
|
Expert 5K+
Posts: 8445
Location: Perth Australia | Golden commando is a BB isnt it?
Are you going to contrast the gold? (like with the rocker covers) or it going to be all gold?
And yes, a clean engine is a joy
|
|
| |
|
Veteran
Posts: 207
| All gold with the exception of misc brackets that will be black.
|
|
| |
|
Expert
Posts: 2788
Location: USA - KY |
It's going to look really sharp, calvatron!
|
|
| |
|
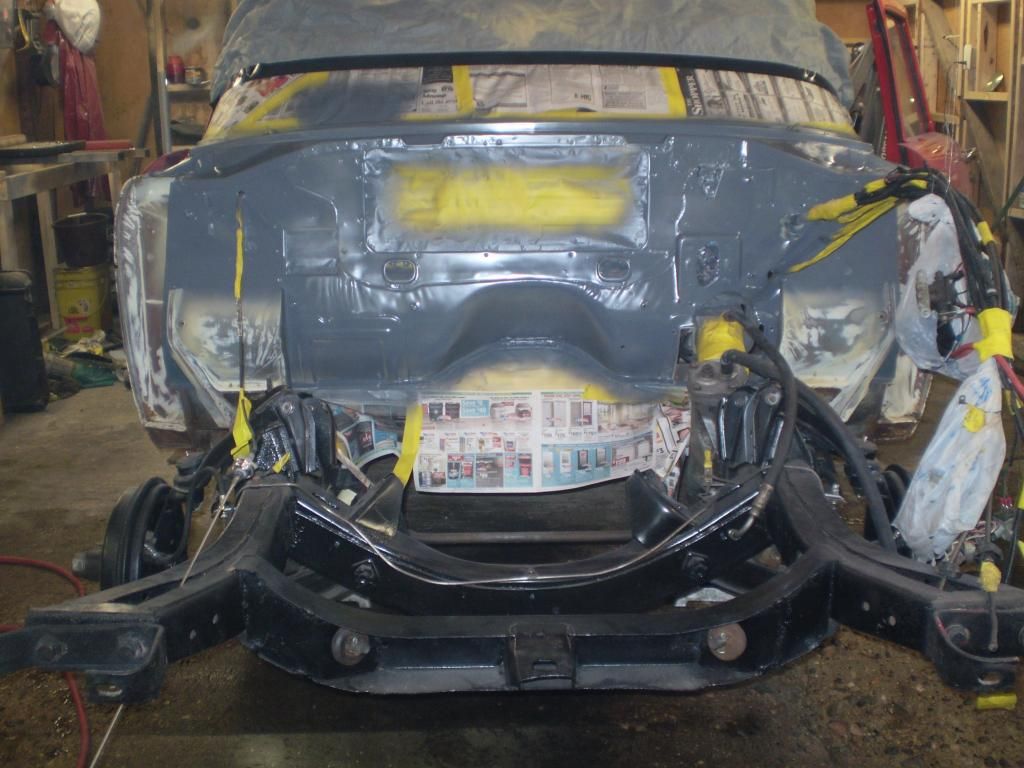
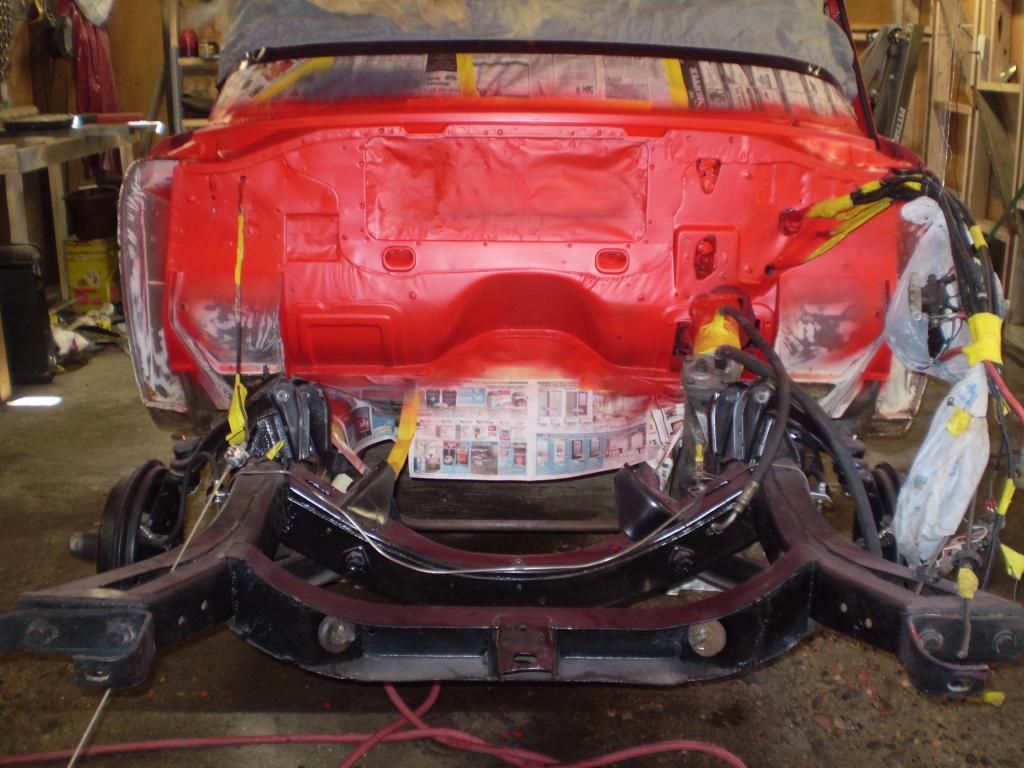
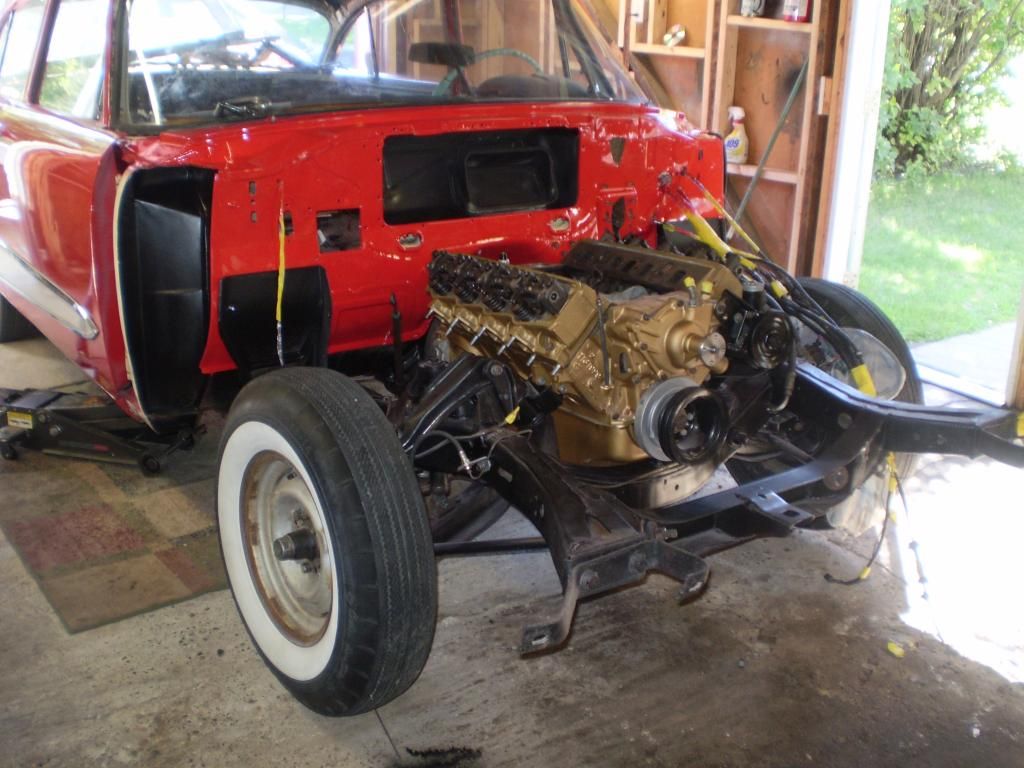
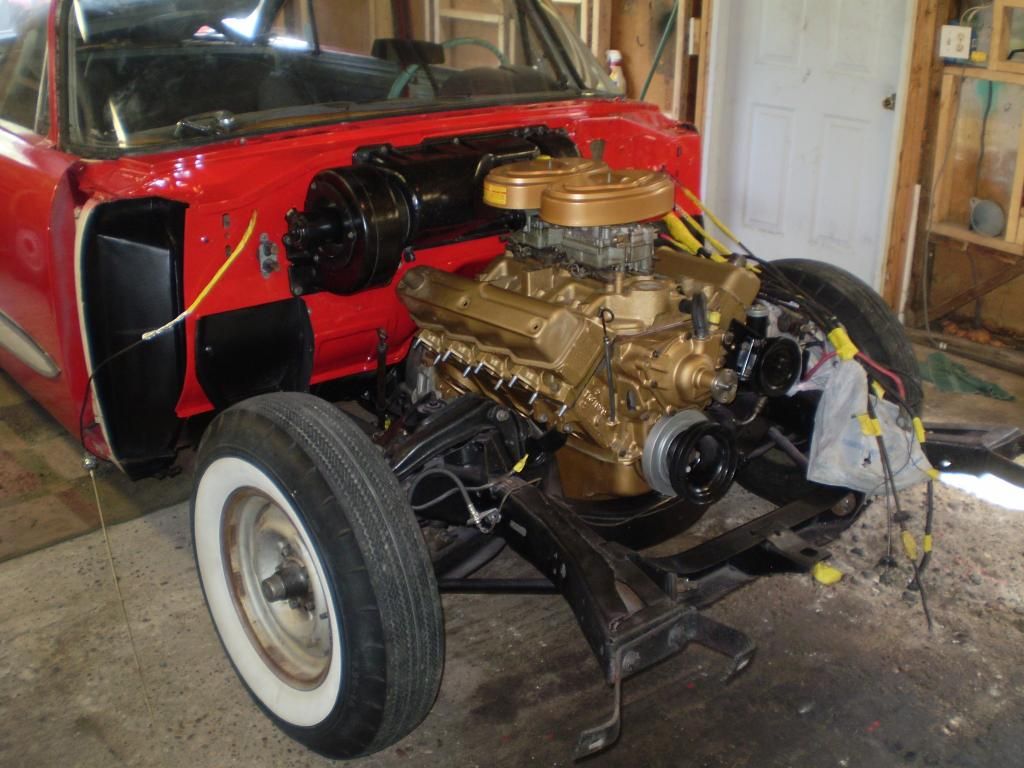
Veteran
Posts: 207
| BUSY BUSY BUSY... But here are a few pics got the firewall stripped and primed. and for the most part motor is back together and OMG does it look AWESOME!!!!!!!!!!!!
I am so glad I decided to pull the motor.....
 |
|
| |
|
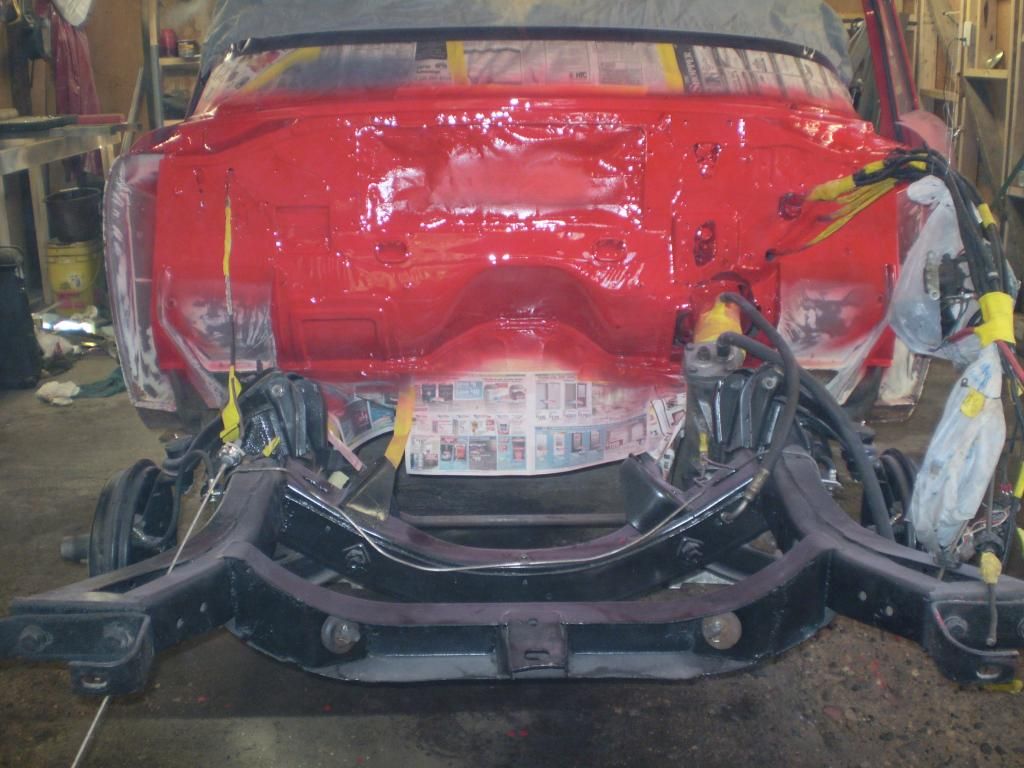
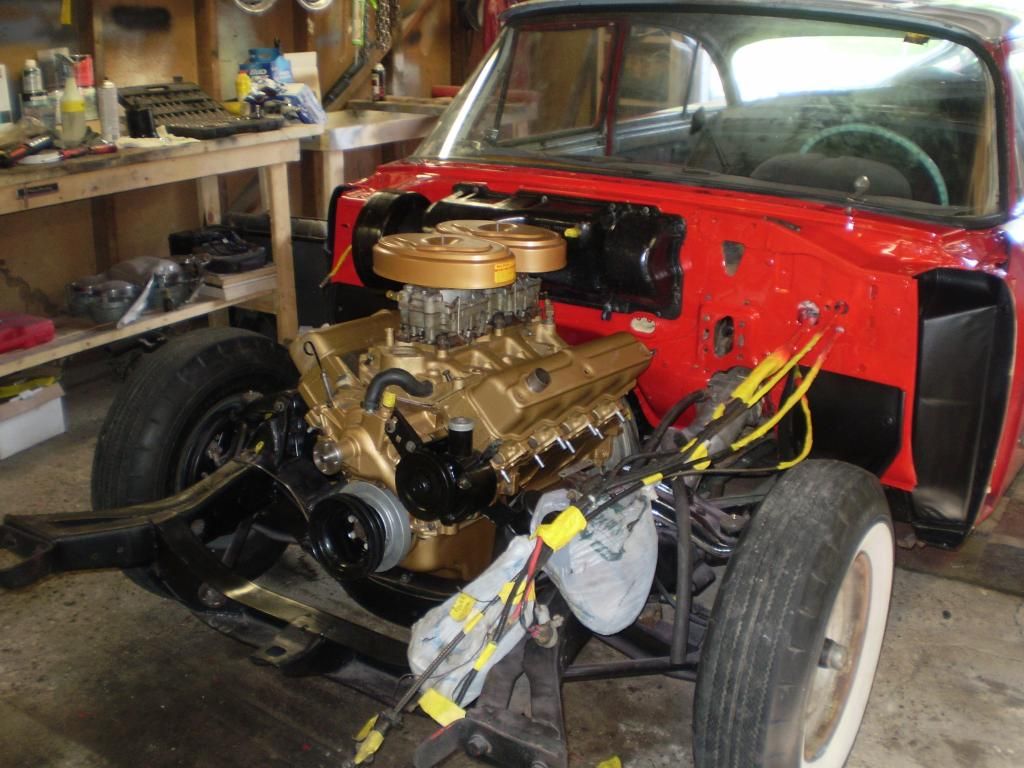
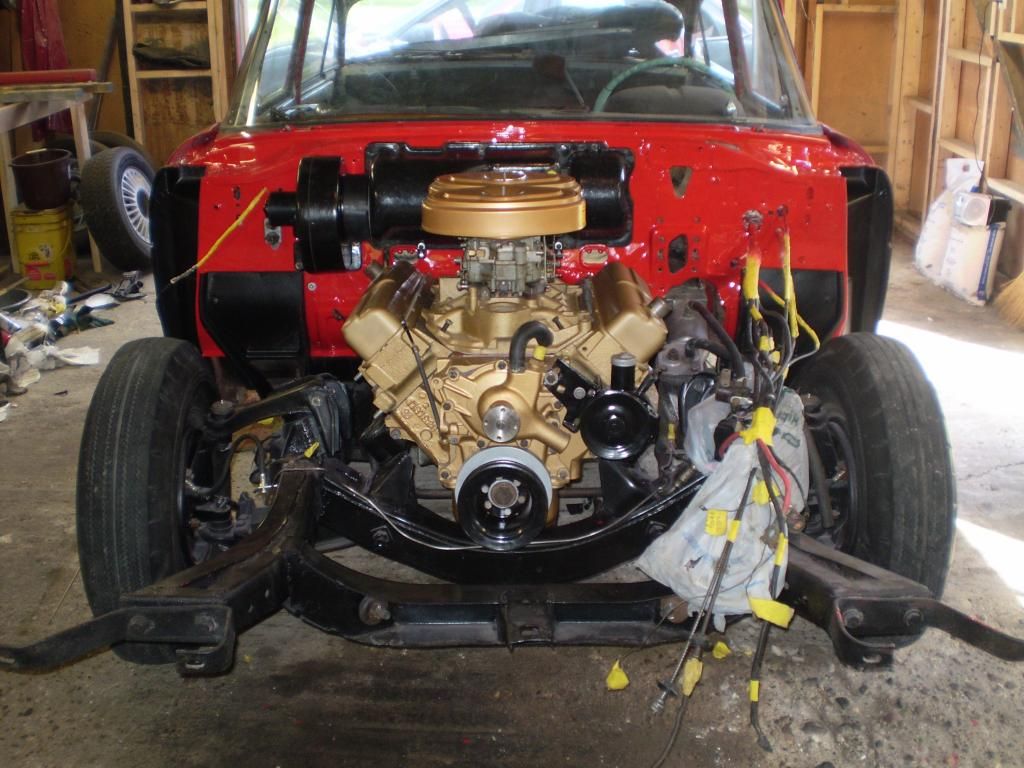
Veteran
Posts: 207
| BUSY BUSY BUSY making sum real good progress. Here is where I am at.
 |
|
| |
|
Expert 5K+
Posts: 7210
Location: Victoria, BC, on Vancouver Island, Canada | Looking good!
|
|
| |
|
Expert
Posts: 2788
Location: USA - KY |
You HAVE been busy!
Things are looking great!
You have made a lot of progress - I know it has been a lot of work, but it sure is paying off.
|
|
| |
|
Exner Expert 19,174 posts. Neil passed away 18 Sep 2015. You will be missed, Neil!
Posts: 19146
Location: bishop, ca | That's SPAMtastic to know.
|
|
| |
|
Extreme Veteran
Posts: 390
| calvatron - 2014-04-12 5:30 PM
Negative!!!
I will stay with the cam I have.....
FYI
318-2bbl
Plugs AR-42
Distributor cam dwell 27° - 32°
Cam specs:
Intake opens 8° BTC
Closes 52° ABC
Exhaust opens 52° BBC
Closes 8° ATC
Duration (Int & exh) 240°
Lift .386"
318-Dual 4V
Plugs AR-32
Distributor cam dwell 36° - 40° (2 sets of points)
Cam specs:
Intake opens 17°BTC
Closes 55° ABC
Exhaust opens 55° BBC
Closes 21° ATC
Duration (int & exh) 256°
Lift .405
|
|
| |
|
Veteran
Posts: 207
| Can I use this guide for sitting the valves on my 58 318??????

 |
|
| |


